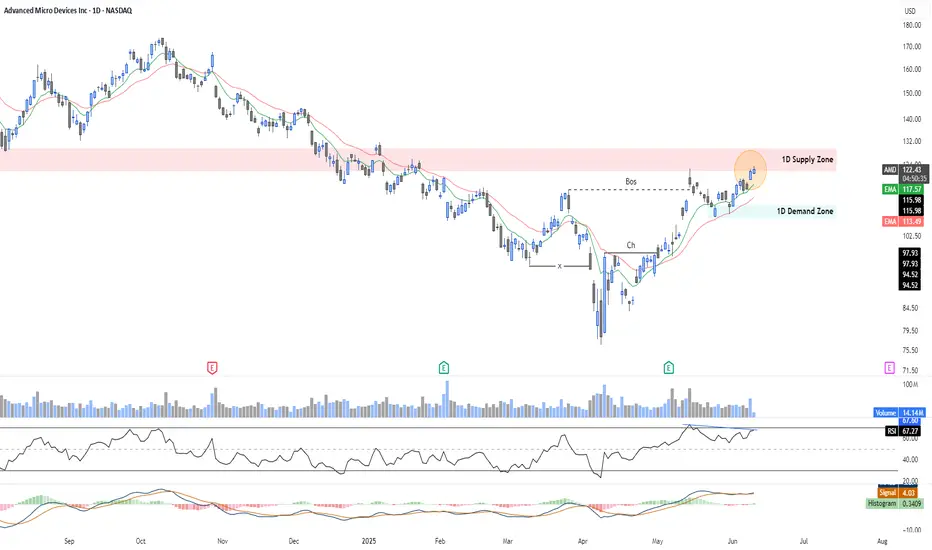
📌 Thesis:
AMD is approaching a critical 1D supply zone ($122–$130) with bearish RSI divergence, suggesting possible short-term exhaustion.
🔍 Technical Overview:
✅ Structure: Bullish recovery confirmed with Break of Structure (BoS).
📈 Price Action: Higher highs into known supply zone.
📉 RSI: Forming lower highs, showing classic bearish divergence — a common warning signal near key resistance.
🧭 MACD: Still positive, but momentum is slowing.
📊 Volume: Healthy, but not confirming a breakout (yet).
📌 Base Case (Bias):
Rejection from supply zone is likely, given weakening momentum. Watch for bearish reversal candles around $122–$130.
If rejection confirms:
🎯 First target: EMA cluster ($116).
🛑 Invalidation: Clean breakout above $130 with volume.
🔁 Alternate Scenario:
If AMD breaks and holds above $130, divergence is invalidated.
Next upside target: $140–$150 (previous resistance zone).
✅ Trade Plan:
🔹 Short setup: Bearish rejection + divergence confirmation at supply zone.
🔹 Long setup: Breakout + retest of supply zone turned support.
Conclusion:
This is a technical inflection point for AMD. Price action in the coming sessions will likely define the short-term direction. Trade the setup, not the prediction.
Disclaimer
The information and publications are not meant to be, and do not constitute, financial, investment, trading, or other types of advice or recommendations supplied or endorsed by TradingView. Read more in the Terms of Use.
Disclaimer
The information and publications are not meant to be, and do not constitute, financial, investment, trading, or other types of advice or recommendations supplied or endorsed by TradingView. Read more in the Terms of Use.