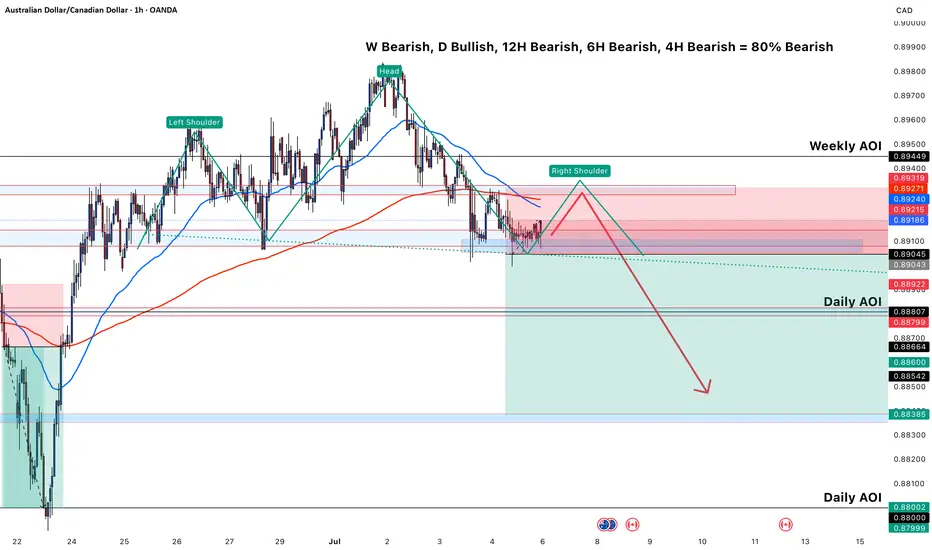
This AUD/CAD chart shows a **clear bearish bias** supported by multiple timeframes and a head and shoulders pattern forming, which justifies a potential **sell setup**. Here's a breakdown of the reasoning:
---
### 🧠 **Multi-Timeframe Analysis Bias**
* **Weekly: Bearish**
* **Daily: Bullish**
* **12H, 6H, 4H: Bearish**
* ✅ Overall: **80% Bearish Bias**
This gives confidence that **lower timeframes** are aligning to favor a **short trade**.
---
### 🧱 **Technical Structure – Head & Shoulders**
* **Left Shoulder**, **Head**, and **Right Shoulder** are identified.
* The **Right Shoulder is projected to complete** near the **Weekly Area of Interest (AOI)**.
* This structure is a **classic bearish reversal pattern**, suggesting a potential breakdown after the right shoulder forms.
---
### 📍 **Key Zones**
* **Weekly AOI (0.89271–0.89449)**: Strong supply zone; potential area for **price rejection**.
* **Daily AOI (0.88002–0.88709)**: Key downside target, aligning with prior demand zones.
---
### 🧰 **Indicators and Confluences**
* **Price is below the 50 EMA and testing the 200 EMA**, indicating weakening bullish momentum.
* Bearish price action is forming near resistance.
* Entry is planned after the right shoulder forms, respecting structure.
---
### 🧨 **Sell Trade Idea Summary**
* **Sell after the right shoulder completes around 0.892–0.894**
* **Target**: Daily AOI (especially near 0.8800–0.8838)
* **Stop Loss**: Above the head (likely above 0.8950)
* **Risk/Reward**: Appears favorable (>2:1 based on projection)
---
### 🧠 **Multi-Timeframe Analysis Bias**
* **Weekly: Bearish**
* **Daily: Bullish**
* **12H, 6H, 4H: Bearish**
* ✅ Overall: **80% Bearish Bias**
This gives confidence that **lower timeframes** are aligning to favor a **short trade**.
---
### 🧱 **Technical Structure – Head & Shoulders**
* **Left Shoulder**, **Head**, and **Right Shoulder** are identified.
* The **Right Shoulder is projected to complete** near the **Weekly Area of Interest (AOI)**.
* This structure is a **classic bearish reversal pattern**, suggesting a potential breakdown after the right shoulder forms.
---
### 📍 **Key Zones**
* **Weekly AOI (0.89271–0.89449)**: Strong supply zone; potential area for **price rejection**.
* **Daily AOI (0.88002–0.88709)**: Key downside target, aligning with prior demand zones.
---
### 🧰 **Indicators and Confluences**
* **Price is below the 50 EMA and testing the 200 EMA**, indicating weakening bullish momentum.
* Bearish price action is forming near resistance.
* Entry is planned after the right shoulder forms, respecting structure.
---
### 🧨 **Sell Trade Idea Summary**
* **Sell after the right shoulder completes around 0.892–0.894**
* **Target**: Daily AOI (especially near 0.8800–0.8838)
* **Stop Loss**: Above the head (likely above 0.8950)
* **Risk/Reward**: Appears favorable (>2:1 based on projection)
Order cancelled
I am not interested anymore in this trade idea, I believe that it will go long by the daily candle closedDisclaimer
The information and publications are not meant to be, and do not constitute, financial, investment, trading, or other types of advice or recommendations supplied or endorsed by TradingView. Read more in the Terms of Use.
Disclaimer
The information and publications are not meant to be, and do not constitute, financial, investment, trading, or other types of advice or recommendations supplied or endorsed by TradingView. Read more in the Terms of Use.