AUD/CAD – Bullish Continuation with Fibonacci-Based Entry -1H-TF
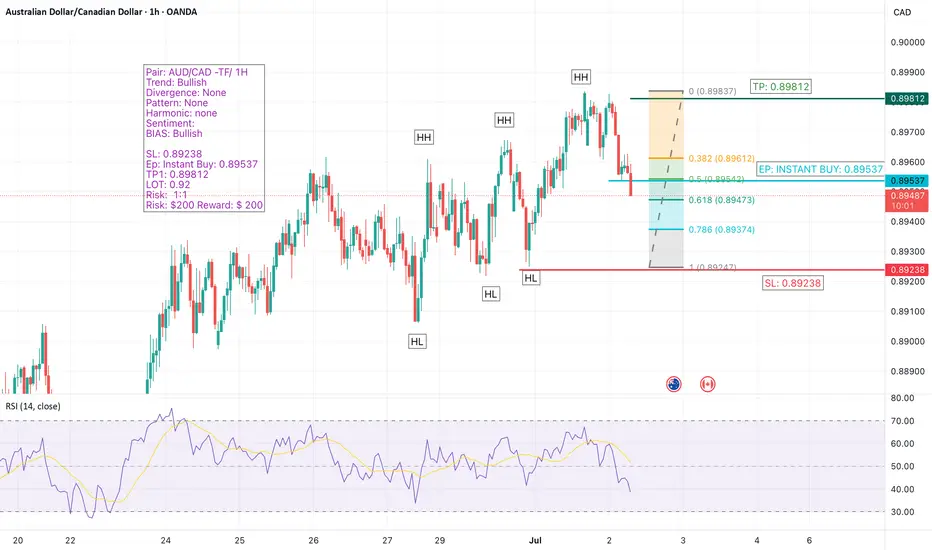
We're closely monitoring AUD/CAD on the 1-hour chart, where the pair is maintaining a strong bullish trend, consistently forming higher highs (HH) and higher lows (HL).
Currently, the price is undergoing a retracement, and a new HL appears to be forming. Using the Fibonacci retracement tool, we observed a pullback beyond the 0.5 level, which aligns with a high-probability entry zone for trend continuation setups.
Based on this technical alignment, we’ve executed an instant buy order, aiming to capitalize on the next potential leg upward.
🔹 Pair: AUD/CAD
🔹 Timeframe: 1H
🔹 Trend: Bullish
🔹 Divergence: None
🔹 Pattern: None
🔹 Harmonic: None
🔹 Sentiment: N/A
🔹 Bias: Bullish
🔹 Entry (Instant Buy): 0.89537
🔹 Stop Loss: 0.89238
🔹 Take Profit 1: 0.89812
🔹 Lot Size: 0.92
🔹 Risk/Reward: 1:1
🔹 Risk: $200
🔹 Potential Reward: $200
🎯 Strategy: Entry is based on a Fibonacci-based retracement after a series of bullish structure points (HH/HL). Setup is positioned for trend continuation with tight risk management.
📌 #AUDCAD #ForexSignals #TrendContinuation #FibonacciTrading #PriceAction #BullishTrend #SmartEntry #RiskManagement #1HChart #ForexTradeSetup #TechnicalAnalysis #BuySetup
Disclaimer
The information and publications are not meant to be, and do not constitute, financial, investment, trading, or other types of advice or recommendations supplied or endorsed by TradingView. Read more in the Terms of Use.
Disclaimer
The information and publications are not meant to be, and do not constitute, financial, investment, trading, or other types of advice or recommendations supplied or endorsed by TradingView. Read more in the Terms of Use.