📕 Smart Money Trade Breakdown
🔻 AUDJPY 4H Short Setup
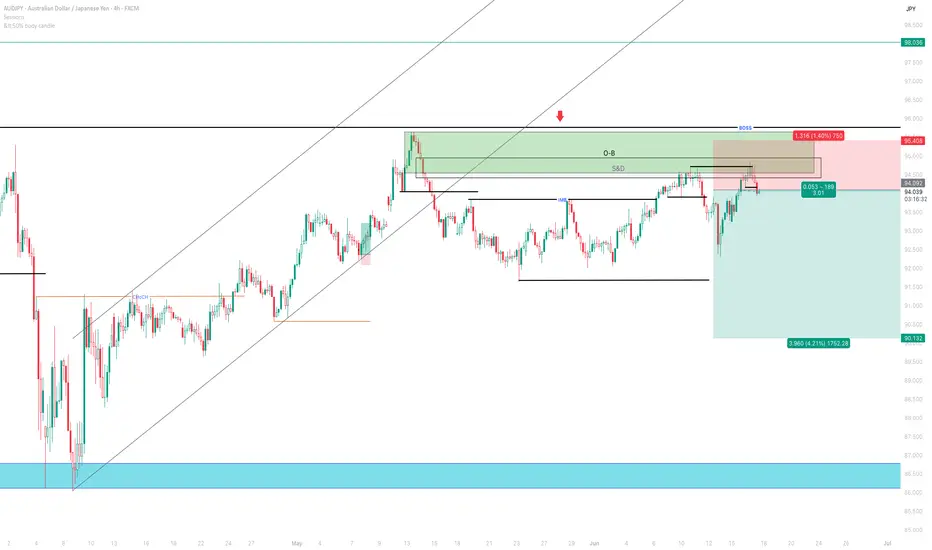
This is a short entry on AUDJPY, taken from a premium price zone within an Order Block (O-B) and Supply & Demand (S&D) area, showing strong bearish rejection after internal market structure shift.
📉 Entry: 94.096
🎯 Take Profit: 90.136
🛡️ Stop Loss: 95.399
⚖️ Risk-Reward Ratio: ~1:3
🔍 Key Confluences:
Entry within a well-defined Order Block and S&D zone
Price reacted to upper supply with a visible wick rejection
Break of internal structure (M15-H1) shows bearish intent
Bearish engulfing on confirmation candle
Trendline break suggests end of bullish wave
This setup aims to catch the institutional distribution phase before price retraces to discount demand around the 90.100 zone or lower.
⚠️ Disclaimer: This is for educational purposes. Apply proper risk management and strategy validation before live execution.
🔻 AUDJPY 4H Short Setup
This is a short entry on AUDJPY, taken from a premium price zone within an Order Block (O-B) and Supply & Demand (S&D) area, showing strong bearish rejection after internal market structure shift.
📉 Entry: 94.096
🎯 Take Profit: 90.136
🛡️ Stop Loss: 95.399
⚖️ Risk-Reward Ratio: ~1:3
🔍 Key Confluences:
Entry within a well-defined Order Block and S&D zone
Price reacted to upper supply with a visible wick rejection
Break of internal structure (M15-H1) shows bearish intent
Bearish engulfing on confirmation candle
Trendline break suggests end of bullish wave
This setup aims to catch the institutional distribution phase before price retraces to discount demand around the 90.100 zone or lower.
⚠️ Disclaimer: This is for educational purposes. Apply proper risk management and strategy validation before live execution.
Disclaimer
The information and publications are not meant to be, and do not constitute, financial, investment, trading, or other types of advice or recommendations supplied or endorsed by TradingView. Read more in the Terms of Use.
Disclaimer
The information and publications are not meant to be, and do not constitute, financial, investment, trading, or other types of advice or recommendations supplied or endorsed by TradingView. Read more in the Terms of Use.