Hey Traders,
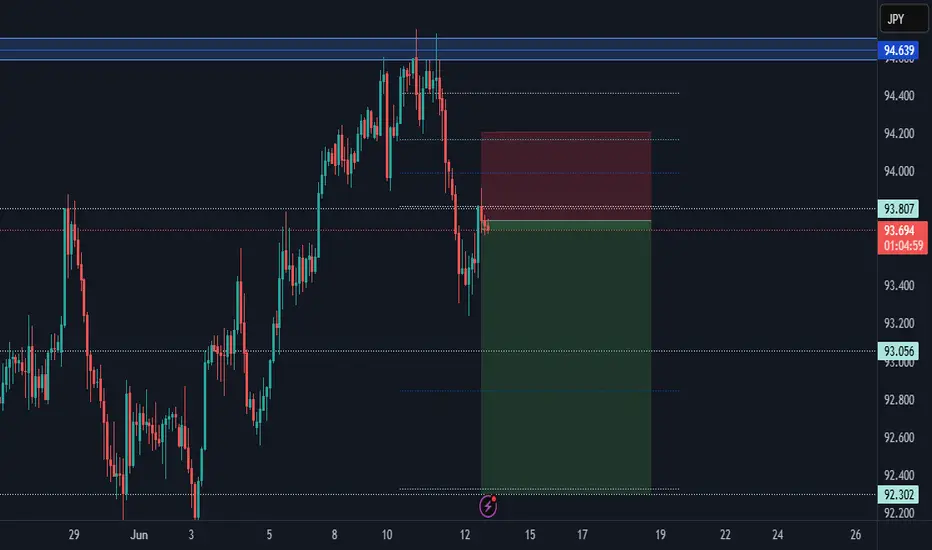
AUDJPY has recently reversed from the key resistance zone near 94.60, showing signs of short-term weakness. Price action has broken below the previous structure and is now attempting a retest of the 93.80 area, which could act as fresh resistance and trigger the next bearish leg.
Current Market Conditions:
The pair rejected a major resistance zone (94.60) after forming a swing high and printing consecutive bearish candles.
Currently retesting the broken support-now-turned-resistance at around 93.80.
A confirmed rejection here may accelerate the move toward the next support around 93.05, and further down to 92.30.
Fundamental Analysis/Outlook:
AUD is under pressure following weaker-than-expected Chinese data, Australia’s largest trading partner, raising concerns about reduced demand for Australian exports. Meanwhile, the JPY is seeing slight safe-haven bids as global equities show mixed sentiment ahead of the U.S. CPI and FOMC decision. This macro setup favors a bearish bias on AUDJPY as risk appetite cools and the yen regains some strength.
Targets:
TP1: 93.05
TP2: 92.30
TP3 (extended): 91.80 if downside momentum intensifies
Risk Management:
Stop-Loss: Above 94.20 to protect against bullish breakout
Confirm rejection at 93.80 before committing to position sizing
Risk no more than 1-2% per trade; stick to your plan.
Technical Outlook:
Strong bearish rejection from resistance
Retest of key level aligns with structure-based entries
Downward price channel may be forming if support breaks
Conclusion:
AUDJPY appears ready for further downside if 93.80 holds as resistance. Watch for more bearish confirmation before entry—this setup offers solid R:R potential for both day and swing traders.
Sign-off:
"Patience in trading is not waiting without action, but waiting with purpose."
I would love to hear your thoughts in the comment section, and please hit boost and follow for more ideas. Thank you, and profitable trading to you all!
Disclaimer
The information and publications are not meant to be, and do not constitute, financial, investment, trading, or other types of advice or recommendations supplied or endorsed by TradingView. Read more in the Terms of Use.
Disclaimer
The information and publications are not meant to be, and do not constitute, financial, investment, trading, or other types of advice or recommendations supplied or endorsed by TradingView. Read more in the Terms of Use.