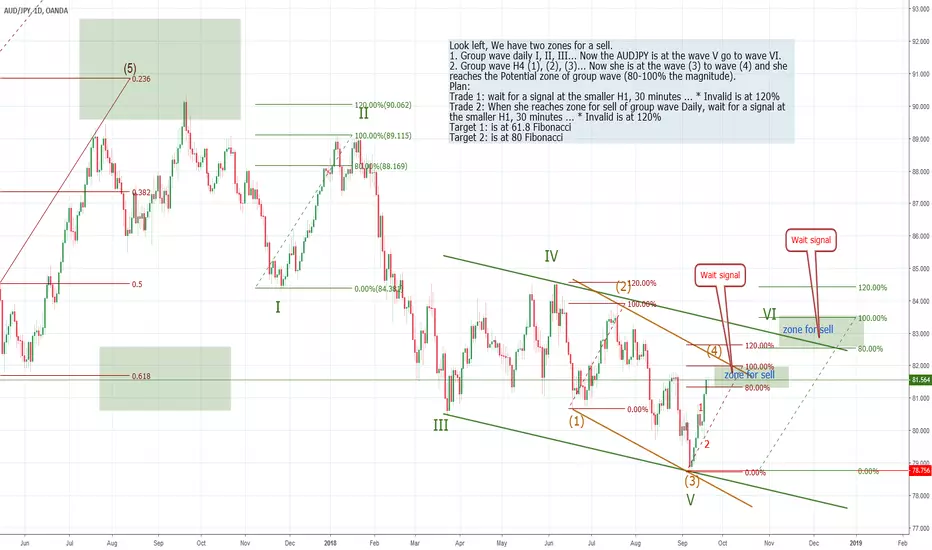
Look left, We have two zones for a sell.
1. Group wave daily I, II, III... Now the AUDJPY is at the wave V go to wave VI.
2. Group wave H4 (1), (2), (3)... Now she is at the wave (3) to wave (4) and she reaches the Potential zone of group wave (80-100% the magnitude).
Plan:
Trade 1: wait for a signal at the smaller H1, 30 minutes ... * Invalid is at 120%
Trade 2: When she reaches zone for a sell of group wave Daily, wait for a signal at the smaller H1, 30 minutes ... * Invalid is at 120%
Target 1: is at 61.8 Fibonacci
Target 2: is at 80 Fibonacci
Note
Note
Note
Stop loss is at 83.220 (double the Hammer CandleTrade closed: target reached
target 1 reached 160 bibs profits. Move to Stop loss accord to Symmetry rule (h1).Trade closed manually
85% reached for closed with 195 bibs profitsNote
Related publications
Disclaimer
The information and publications are not meant to be, and do not constitute, financial, investment, trading, or other types of advice or recommendations supplied or endorsed by TradingView. Read more in the Terms of Use.
Related publications
Disclaimer
The information and publications are not meant to be, and do not constitute, financial, investment, trading, or other types of advice or recommendations supplied or endorsed by TradingView. Read more in the Terms of Use.