Q3 | W37 | D5 | Y25 AUDUSD Forecast
Moving into Week 37, my highest-probability bias is firmly long. The Week 36 candle closed bullish above the Weekly 50 EMA, signaling strong buying pressure around that level. Trading in line with the higher timeframe, liquidity clearly favors the buy side.
-Continued long breaks of structure confirm directional strength.
- Best long entries will come from the lows of the range, while best short term shorts will be from the highs.
This doesn’t rule out short opportunities, but they should be managed aggressively as they run counter to the overall bias.
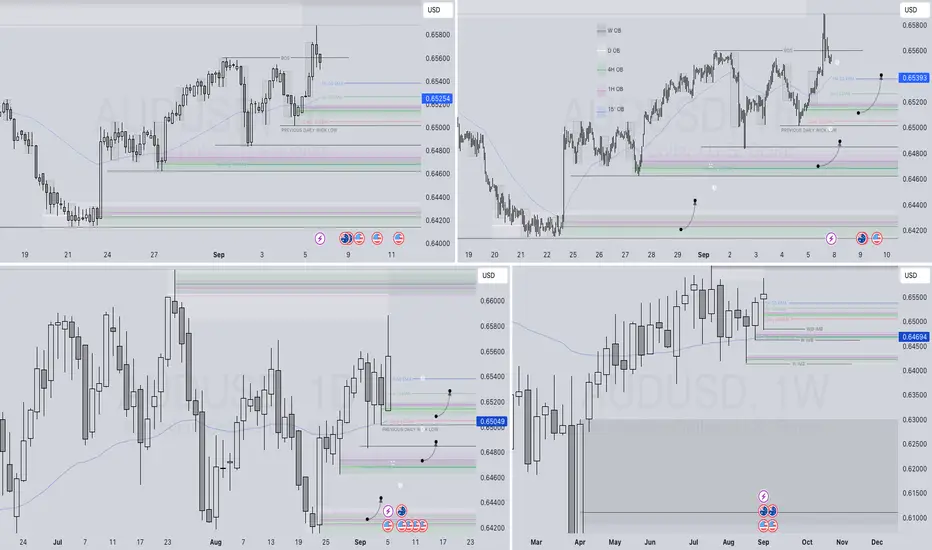
Here’s how I plan to execute long positions: on the chart you’ll notice a mix of colors—this is my method of identifying and aligning order blocks and voids across multiple timeframes to build confluence for entries.
High-Probability Zones
Zone 1
Daily 50 EMA
Previous daily wick low
4H & 1H order blocks
4H 50 EMA
Final higher low before last market close
👉 Heavy confluence in this zone. I’ll look for longs from here during London Open, ideally price opens in the LDN session at the low of the Asia range. Adding further confluence to the positon.
Execution: Wait for a 1-min break of structure post London open inside the zone from a refined 15-min order block created in Asia or the 15' order block below the range.
Zone 2
Weekly 50 EMA
Previous week’s wick imbalance
4H & 1H order blocks
👉 Strong confluence but caution is needed: at this point, the daily candle may close below the Daily 50 EMA, reducing long confidence.
Execution: Safer play is to wait for the daily to reclaim above the Daily 50 EMA, then enter on an imbalance fill. Patience required—don’t rush.
Zone 3
Daily, 4H & 1H order blocks
Previous week’s wick imbalance
👉 At these ultimate lows, all EMA confluence is lost. Still, if price reaches this zone later in the week, I’ll be confident in a long. Why? Because the weekly candle is forecasted to close above the Weekly 50 EMA.
Execution: Wait for a clear break of structure in the zone before entering longs.
Key Notes
Zone 1 longs will be managed aggressively (scalps), as price may dip deeper towards Zones 2 or 3 before rejecting higher.
Expect possible fakeouts early in the week, with price dipping below the Weekly 50 EMA before rejecting upward.
Best setups will come from refined 15-min order blocks inside the higher-probability zones.
✅ Summary:
My Week 37 bias remains firmly bullish on AUDUSD. I’ll be focusing on long setups from Zones 1–3, refining with lower-timeframe order blocks and structure breaks. Shorts remain countertrend and will be managed tightly.
FRGNT
https://tradingview.sweetlogin.com/x/tLMPV6KK/


 AUDUSD
Moving into Week 37, my highest-probability bias is firmly long. The Week 36 candle closed bullish above the Weekly 50 EMA, signaling strong buying pressure around that level. Trading in line with the higher timeframe, liquidity clearly favors the buy side.
-Continued long breaks of structure confirm directional strength.
- Best long entries will come from the lows of the range, while best short term shorts will be from the highs.
This doesn’t rule out short opportunities, but they should be managed aggressively as they run counter to the overall bias.
Here’s how I plan to execute long positions: on the chart you’ll notice a mix of colors—this is my method of identifying and aligning order blocks and voids across multiple timeframes to build confluence for entries.
High-Probability Zones
Zone 1
Daily 50 EMA
Previous daily wick low
4H & 1H order blocks
4H 50 EMA
Final higher low before last market close
👉 Heavy confluence in this zone. I’ll look for longs from here during London Open, ideally price opens in the LDN session at the low of the Asia range. Adding further confluence to the positon.
Execution: Wait for a 1-min break of structure post London open inside the zone from a refined 15-min order block created in Asia or the 15' order block below the range.
Zone 2
Weekly 50 EMA
Previous week’s wick imbalance
4H & 1H order blocks
👉 Strong confluence but caution is needed: at this point, the daily candle may close below the Daily 50 EMA, reducing long confidence.
Execution: Safer play is to wait for the daily to reclaim above the Daily 50 EMA, then enter on an imbalance fill. Patience required—don’t rush.
Zone 3
Daily, 4H & 1H order blocks
Previous week’s wick imbalance
👉 At these ultimate lows, all EMA confluence is lost. Still, if price reaches this zone later in the week, I’ll be confident in a long. Why? Because the weekly candle is forecasted to close above the Weekly 50 EMA.
Execution: Wait for a clear break of structure in the zone before entering longs.
Key Notes
Zone 1 longs will be managed aggressively (scalps), as price may dip deeper towards Zones 2 or 3 before rejecting higher.
Expect possible fakeouts early in the week, with price dipping below the Weekly 50 EMA before rejecting upward.
Best setups will come from refined 15-min order blocks inside the higher-probability zones.
✅ Summary:
My Week 37 bias remains firmly bullish on AUDUSD. I’ll be focusing on long setups from Zones 1–3, refining with lower-timeframe order blocks and structure breaks. Shorts remain countertrend and will be managed tightly.
FRGNT
https://tradingview.sweetlogin.com/x/tLMPV6KK/
Disclaimer
The information and publications are not meant to be, and do not constitute, financial, investment, trading, or other types of advice or recommendations supplied or endorsed by TradingView. Read more in the Terms of Use.
Disclaimer
The information and publications are not meant to be, and do not constitute, financial, investment, trading, or other types of advice or recommendations supplied or endorsed by TradingView. Read more in the Terms of Use.