**Description (AUD/USD Long Setup):**
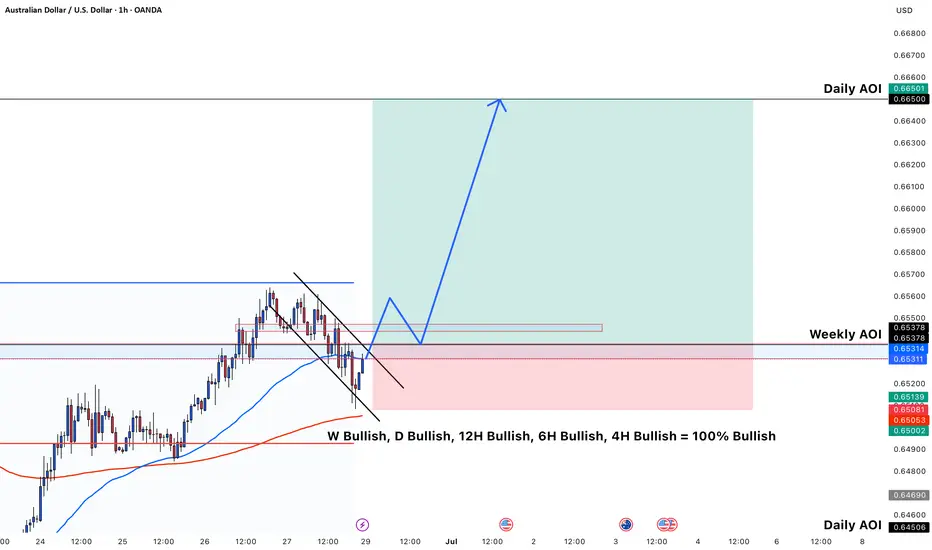
This is a 1-hour chart of **AUD/USD**, showing a textbook **bullish continuation setup**. The price has recently pulled back in a **bullish flag** (descending channel) and is now showing signs of a breakout above the flag's upper boundary.
Price is reacting from a **Weekly Area of Interest (AOI)** — a zone of previous support — while remaining above the **200 EMA (red)** and reclaiming the **50 EMA (blue)**.
All major timeframes (W, D, 12H, 6H, 4H) are **100% bullish**, adding confluence and confidence to this buy idea.
---
**Why I want to enter Buy:**
* ✅ **Bullish flag breakout** — strong bullish pattern indicating trend continuation.
* ✅ **Price bounced from Weekly AOI** — key support zone respected.
* ✅ **Reclaiming EMAs** — bullish strength returning.
* ✅ **Confluence of timeframes** — momentum aligned from 4H to Weekly.
* ✅ **Great Risk-to-Reward (R\:R)** — defined invalidation below support (Daily AOI), and upside toward **Daily AOI @ 0.66500**.
---
🎯 **Target:** 0.66500
🛡️ **Stop loss:** Just below 0.64500
📈 **Entry idea:** Either aggressive on breakout or conservative on retest of flag breakout / AOI
This setup reflects smart money reaccumulation at a key zone with multi-timeframe alignment — high probability for bullish continuation.
Disclaimer
The information and publications are not meant to be, and do not constitute, financial, investment, trading, or other types of advice or recommendations supplied or endorsed by TradingView. Read more in the Terms of Use.
Disclaimer
The information and publications are not meant to be, and do not constitute, financial, investment, trading, or other types of advice or recommendations supplied or endorsed by TradingView. Read more in the Terms of Use.