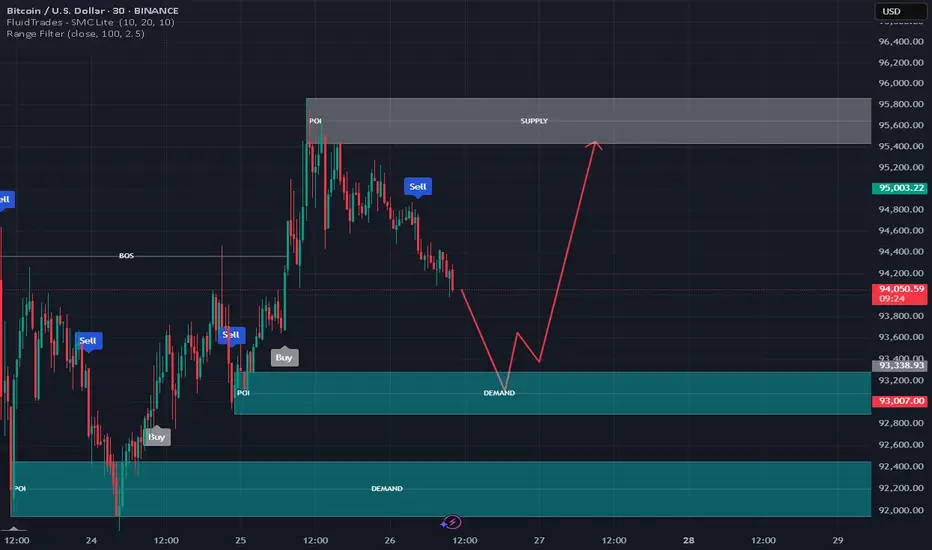
Market Context:
Price is currently in a downtrend, heading toward a strong demand zone.
There is a major supply zone above where selling pressure previously pushed the price down.
Entry Plan:
🔵 Buy Entry:
Wait for price to tap into the Demand Zone (around 93,000–93,400 USD).
Look for bullish confirmation (e.g., bullish engulfing candle, strong rejection wick, or structure break on lower timeframes like 5-min).
Enter a buy trade once confirmation appears.
🔴 Sell Entry:
If price reaches the Supply Zone (around 95,400–95,800 USD), wait for bearish confirmation (e.g., bearish engulfing, rejection candles).
Consider selling if bearish signs are strong.
Stop Loss:
✅ For Buy Trade:
Below the Demand Zone (~92,800 USD), giving enough room for volatility.
✅ For Sell Trade:
Above the Supply Zone (~95,900 USD).
Take Profit Targets:
🎯 Buy Trade TP:
First Target: Previous minor resistance (~94,600 USD)
Final Target: Supply Zone (~95,400–95,800 USD)
🎯 Sell Trade TP:
First Target: Minor support (~94,600 USD)
Final Target: Back to Demand Zone (~93,400 USD)
Risk Management:
Risk only 1–2% of your trading account per trade.
Adjust position size according to stop loss distance.
Maintain Risk-Reward Ratio of at least 1:2 or better.
Important Reminder:
Always wait for clear confirmation signals before entering. Avoid forcing trades. Manage emotions and stick to your plan!
Trade active
Trade Active 150 pips + and Set BarkaawanTrade closed: target reached
200 pips + Almost Target HitDisclaimer
The information and publications are not meant to be, and do not constitute, financial, investment, trading, or other types of advice or recommendations supplied or endorsed by TradingView. Read more in the Terms of Use.
Disclaimer
The information and publications are not meant to be, and do not constitute, financial, investment, trading, or other types of advice or recommendations supplied or endorsed by TradingView. Read more in the Terms of Use.