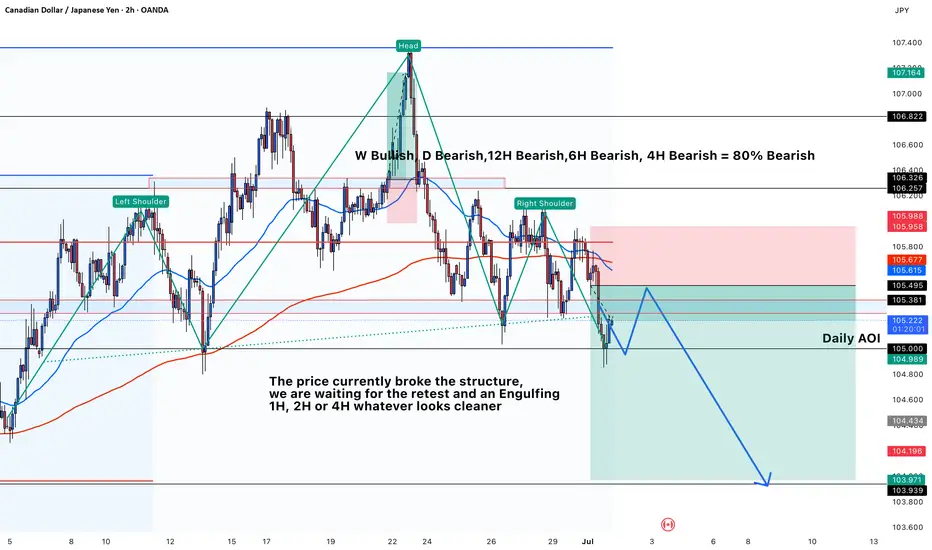
This is a **CAD/JPY** (Canadian Dollar / Japanese Yen) short setup on the **2-hour chart**, structured around a **Head and Shoulders pattern** and a **break of structure**, supported by multi-timeframe bearish bias.
### **Trade Description:**
* **Direction**: SELL
* **Entry Plan**: After the recent **break of structure** to the downside, the trader is waiting for a **retest** of the broken support zone (now resistance) and a **bearish engulfing candle** on any timeframe (1H, 2H, or 4H) to enter short.
* **Stop Loss**: Just above the retest zone (\~105.95 - 106.00)
* **Take Profit**: Targeting \~103.95 area
* **Risk/Reward**: Approximately 3.5:1 RRR
---
### **Reasoning Behind the Trade:**
#### ✅ **Technical Setup:**
1. **Head and Shoulders Pattern**:
* A classic **reversal pattern** visible, with the right shoulder confirming lower highs.
* The neckline has been broken — signaling trend reversal from bullish to bearish.
2. **Structure Break**:
* Price has **broken below previous higher lows**, confirming a shift in structure.
* A retest of the broken level is anticipated before the next move down.
3. **Confluence Zones**:
* The **Daily Area of Interest (AOI)** lies around 105.00–105.20.
* EMA cluster (blue and red lines) above current price adds resistance pressure.
4. **Engulfing Candle Confirmation**:
* The entry is not immediate — we wait for **bearish confirmation** via engulfing candle (on 1H/2H/4H depending on clarity).
---
### **Multi-Timeframe Bias:**
* **Weekly (W): Bullish**
* **Daily (D): Bearish**
* **12H / 6H / 4H: Bearish**
* → Overall bias: **80% Bearish**, supporting a short position.
---
### **Summary:**
The trader is looking to short CAD/JPY after a **clear break of structure and neckline**, within a **bearish market context on most higher timeframes**, waiting for a cleaner **bearish engulfing signal on the retest** before executing. The trade targets a zone below 104.00 for a strong reward-to-risk potential.
Disclaimer
The information and publications are not meant to be, and do not constitute, financial, investment, trading, or other types of advice or recommendations supplied or endorsed by TradingView. Read more in the Terms of Use.
Disclaimer
The information and publications are not meant to be, and do not constitute, financial, investment, trading, or other types of advice or recommendations supplied or endorsed by TradingView. Read more in the Terms of Use.