Multi-Timeframe Market Analysis
🕐 1-Hour Chart (Higher Timeframe – HTF)
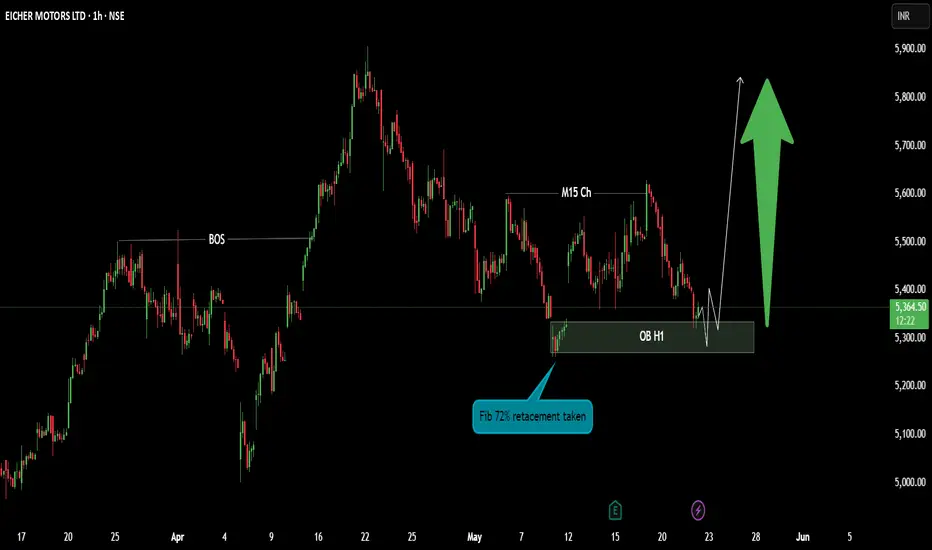
Trend: Bullish
Structure: The market recently formed a Break of Structure (BOS) by taking out the previous swing high.
Retracement: Price has retraced to the 72% Fibonacci level, indicating a potential area for continuation of the uptrend.
Key Zone: Price has now tapped into a significant 1H Order Block (OB), which may act as a strong support zone.
🕒 15-Minute Chart (Mid Timeframe – MTF)
Change of Character (ChoCh): A bullish ChoCh has occurred, signaling a shift in internal structure from bearish to bullish.
Implication: This confirms alignment with the bullish HTF trend and strengthens the case for a potential long entry.
🕐📉 Lower Timeframe (3-Minute or 1-Minute – LTF)
Confirmation Required: Wait for one of the following before entering:
ChoCh (bullish structure shift)
Flip Zone (resistance turning into support)
Entry Strategy: Enter a long position after confirmation from LTF price action.
Stop Loss: Place below the LTF swing low or the 1H OB (based on risk tolerance).
Target: Previous 1H high or next significant liquidity level.
🕐 1-Hour Chart (Higher Timeframe – HTF)
Trend: Bullish
Structure: The market recently formed a Break of Structure (BOS) by taking out the previous swing high.
Retracement: Price has retraced to the 72% Fibonacci level, indicating a potential area for continuation of the uptrend.
Key Zone: Price has now tapped into a significant 1H Order Block (OB), which may act as a strong support zone.
🕒 15-Minute Chart (Mid Timeframe – MTF)
Change of Character (ChoCh): A bullish ChoCh has occurred, signaling a shift in internal structure from bearish to bullish.
Implication: This confirms alignment with the bullish HTF trend and strengthens the case for a potential long entry.
🕐📉 Lower Timeframe (3-Minute or 1-Minute – LTF)
Confirmation Required: Wait for one of the following before entering:
ChoCh (bullish structure shift)
Flip Zone (resistance turning into support)
Entry Strategy: Enter a long position after confirmation from LTF price action.
Stop Loss: Place below the LTF swing low or the 1H OB (based on risk tolerance).
Target: Previous 1H high or next significant liquidity level.
Disclaimer
The information and publications are not meant to be, and do not constitute, financial, investment, trading, or other types of advice or recommendations supplied or endorsed by TradingView. Read more in the Terms of Use.
Disclaimer
The information and publications are not meant to be, and do not constitute, financial, investment, trading, or other types of advice or recommendations supplied or endorsed by TradingView. Read more in the Terms of Use.