Key Technical Elements
1. Market Structure
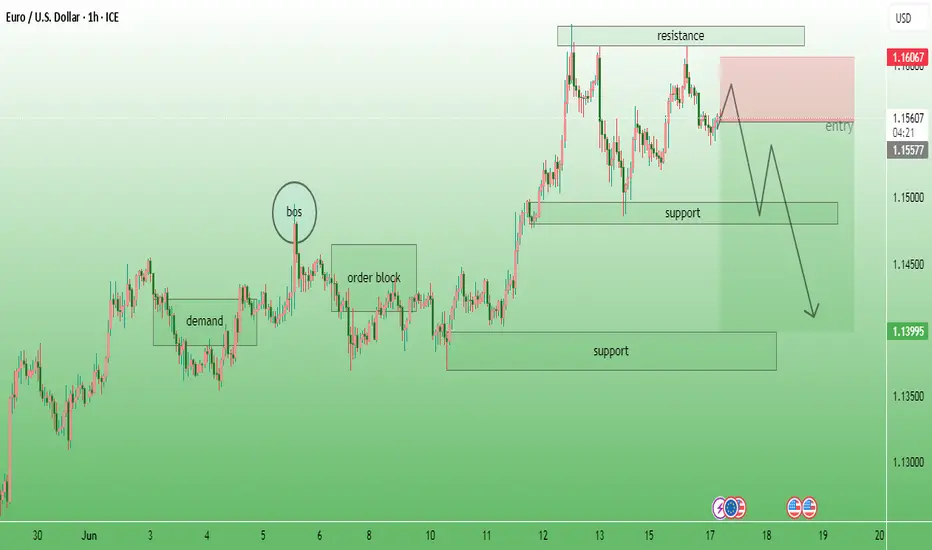
BOS (Break of Structure):
Clearly marked where price breaks a previous high, indicating a shift in market structure.
Order Block:
A bullish order block is highlighted after the BOS, where price later retests — showing smart money interest.
Demand Zone:
A prior demand zone helped fuel the breakout to the upside earlier on the chart.
2. Resistance & Supply Area
A resistance zone is marked at the top (approx. 1.16067), where price previously reversed.
A red short-entry zone (supply area) indicates a potential sell zone where price could react.
3. Support Zones
Immediate Support around 1.1500
Deeper Support around 1.13995
These levels are potential take-profit zones or retracement targets.
---
Trade Idea Highlighted
Entry Zone: Around 1.15579 (current price)
Bearish Expectation:
Price is expected to rally slightly into the red zone (supply).
After rejection from this area, a sharp bearish move is anticipated.
Targets:
First Support Zone (~1.1500)
Second Deeper Support (~1.13995)
---
Professional Commentary
This setup reflects a Smart Money Concept (SMC) strategy:
It uses order blocks, BOS, and liquidity zones to anticipate market direction.
The trader anticipates a lower high formation near resistance and a continuation to the downside.
Good use of confluence between structure, supply/demand, and support/resistance.
1. Market Structure
BOS (Break of Structure):
Clearly marked where price breaks a previous high, indicating a shift in market structure.
Order Block:
A bullish order block is highlighted after the BOS, where price later retests — showing smart money interest.
Demand Zone:
A prior demand zone helped fuel the breakout to the upside earlier on the chart.
2. Resistance & Supply Area
A resistance zone is marked at the top (approx. 1.16067), where price previously reversed.
A red short-entry zone (supply area) indicates a potential sell zone where price could react.
3. Support Zones
Immediate Support around 1.1500
Deeper Support around 1.13995
These levels are potential take-profit zones or retracement targets.
---
Trade Idea Highlighted
Entry Zone: Around 1.15579 (current price)
Bearish Expectation:
Price is expected to rally slightly into the red zone (supply).
After rejection from this area, a sharp bearish move is anticipated.
Targets:
First Support Zone (~1.1500)
Second Deeper Support (~1.13995)
---
Professional Commentary
This setup reflects a Smart Money Concept (SMC) strategy:
It uses order blocks, BOS, and liquidity zones to anticipate market direction.
The trader anticipates a lower high formation near resistance and a continuation to the downside.
Good use of confluence between structure, supply/demand, and support/resistance.
Trade active
200 pips runing in profitFree Accurate GOLD Signals Quality Education 🎓Quality Analysis 🔥🔥High Impact News Livetrades Accuracy 💯💯 All FREE!
Disclaimer
The information and publications are not meant to be, and do not constitute, financial, investment, trading, or other types of advice or recommendations supplied or endorsed by TradingView. Read more in the Terms of Use.
Free Accurate GOLD Signals Quality Education 🎓Quality Analysis 🔥🔥High Impact News Livetrades Accuracy 💯💯 All FREE!
Disclaimer
The information and publications are not meant to be, and do not constitute, financial, investment, trading, or other types of advice or recommendations supplied or endorsed by TradingView. Read more in the Terms of Use.