Hey traders! 👋
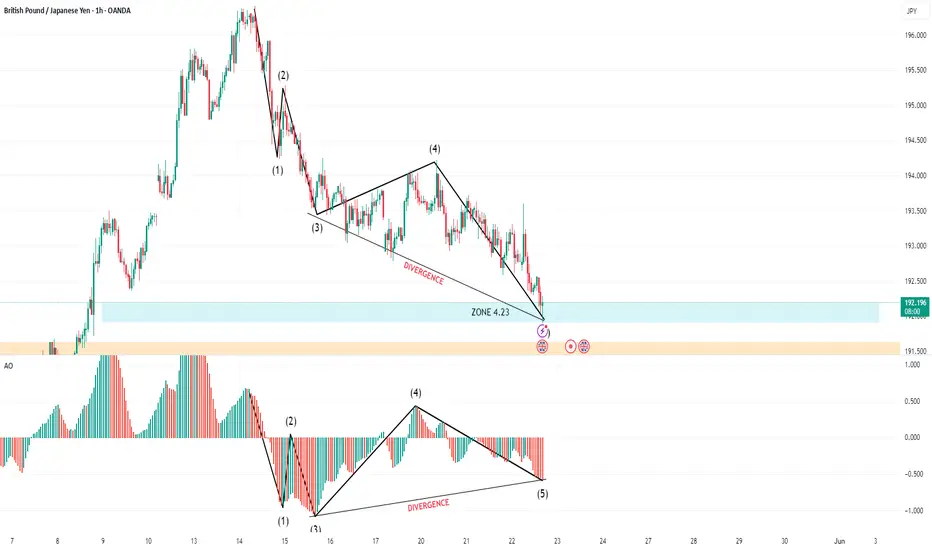
Here’s an exciting setup on GBP/JPY (1H) — we might be at the early stage of a major reversal, and you’ll want this on your radar. Let's break it down with Elliott Wave theory, the Awesome Oscillator (AO), and some powerful Fibonacci confluence.
🧠 Elliott Wave Count – 5-Wave Impulse Completed
We have a clean 5-wave bearish impulsive structure:
1️⃣ Wave (1): Sharp drop kicks off the trend.
2️⃣ Wave (2): Classic pullback, respecting structure.
3️⃣ Wave (3): Longest and most powerful wave down.
4️⃣ Wave (4): Corrective triangle/flat with weakening bear momentum.
5️⃣ Wave (5): Final push into a key demand zone, but lacks strength.
🛑 What makes this special? Wave (5) lands right into “Zone 4.23” — a Fibonacci extension (423.6%) of the corrective leg — acting as a magnet for price exhaustion.
📊 AO Divergence – Early Warning Signal!
Check the Awesome Oscillator (AO):
Price makes lower lows (Wave 3 → Wave 5)
AO makes higher lows — textbook bullish divergence 🔍
This is smart money exhaustion: the bears are running out of steam, even though price is still pushing lower. When momentum diverges from price, a reversal is highly probable.
📌 ZONE 4.23 – Fibonacci Confluence + Demand Zone
This zone (191.900 – 192.300) is no ordinary support. It combines:
📐 423.6% Fibonacci extension (a powerful exhaustion level)
🟦 Historical demand zone from previous impulsive rally
🤖 Price reacting instantly on touch = algorithmic buying likely
⚠️ What Comes Next – Break of Structure (BOS) = Entry Trigger
We’re not rushing in blindly. Here’s the plan:
Wait for BOS: Price must break above Wave (4) structure (~193.200).
AO flips green: Extra confirmation of new bullish momentum.
Retest of BOS or Zone 4.23: That’s our golden buy entry.
Target Zone: Use Fibonacci retracement of full Wave 1–5 down. First targets:
🎯 38.2% = 193.800
🎯 61.8% = 194.900
🎯 Full correction = 196.000+
🎯 Conclusion: This Is a Setup with EDGE
✅ Completed Elliott Wave
✅ AO Divergence = Hidden strength
✅ Fibonacci 4.23 Confluence
✅ Demand Zone bounce
✅ Clear BOS-based entry plan
🔥 Are You Ready for the Reversal?
Drop a comment if you're watching this setup too 👇
Like ❤️ + Follow if you want more clean, actionable Elliott Wave + AO confluence setups like this!
📈 Let’s catch the move before the crowd reacts.
#GBPJPY #ElliottWave #AO #Divergence #ForexTrading #TechnicalAnalysis #BuySetup #SmartMoney #Fib4.23 #BreakOfStructure #TrendReversal
Disclaimer
The information and publications are not meant to be, and do not constitute, financial, investment, trading, or other types of advice or recommendations supplied or endorsed by TradingView. Read more in the Terms of Use.
Disclaimer
The information and publications are not meant to be, and do not constitute, financial, investment, trading, or other types of advice or recommendations supplied or endorsed by TradingView. Read more in the Terms of Use.