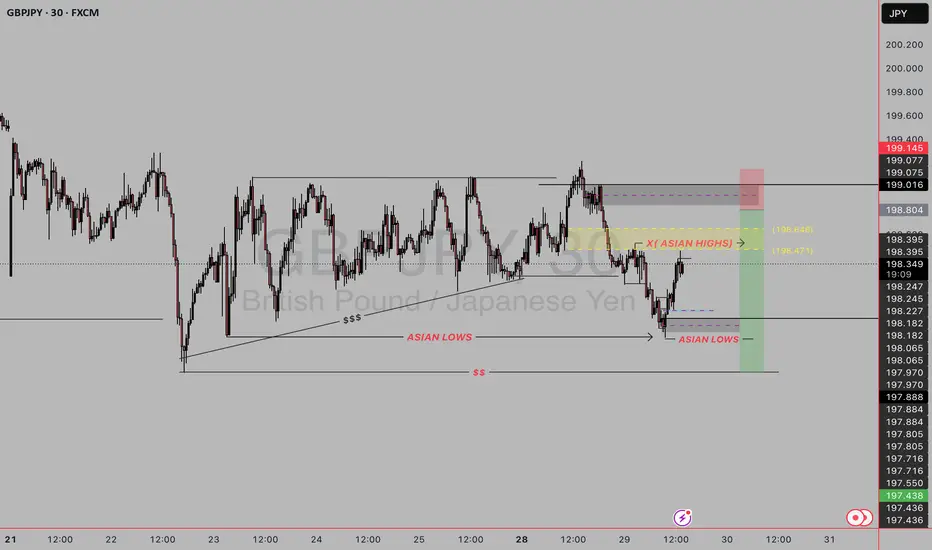
This GBP/JPY 30-minute chart shows a short trade setup based on Smart Money Concepts (SMC), liquidity sweep zones, and session highs/lows. Here's a breakdown of what’s happening:
1) Key Elements Identified in the Chart
Asian Session Range
Asian Highs (Yellow Zone at ~198.471–198.646): Marked as a key liquidity zone.
Asian Lows (Purple Line): Used for liquidity hunting and market structure context.
2) Market Structure
Prior to this setup, price had a bullish structure, forming higher highs.
Eventually, price broke structure to the downside, suggesting a shift to bearish momentum.
3)Liquidity Grabs
Price swept the Asian lows, tapping into sell-side liquidity.
The current move upward looks like a retracement into the Asian highs, likely aiming to grab buy-side liquidity.
4)Entry Zone
The entry is placed just around the Asian highs, targeting the idea that this area will act as a supply zone or breaker block.
Stop Loss (Red Box): Above the liquidity zone, where a breaker would be invalidated.
Take Profit (Green Box): Targeting the recent lows or continuation lower—likely the low around 197.438.
Risk-Reward Ratio
The R:R looks solid—about 2.5–3:1, suggesting a well-balanced trade.
Why This Is a Bearish Setup
Liquidity Sweep: Price ran below Asian lows, collected liquidity, and is now retracing.
Premium Zone: Current price is retracing into a premium zone (above equilibrium) where sellers are expected to re-enter.
Rejection Expected: The idea is that price will reject around 198.5–198.6 (where previous buy stops are likely stacked).
Disclaimer
The information and publications are not meant to be, and do not constitute, financial, investment, trading, or other types of advice or recommendations supplied or endorsed by TradingView. Read more in the Terms of Use.
Disclaimer
The information and publications are not meant to be, and do not constitute, financial, investment, trading, or other types of advice or recommendations supplied or endorsed by TradingView. Read more in the Terms of Use.