📉 GBP/JPY Short Setup – Structure Cracking Below
Pair: GBP/JPY
Timeframe: 4H / Daily
Bias: Bearish
Entry Zone: 196.900 - 197.100 (71% + EMA Retest)
Target Zones:
🔹 TP1: 195.00
🔹 TP2: 190.00 (W-Target)
🧠 Technical Breakdown:
✅ 4H Structure Shift Confirmed
Price has broken and shifted structure on the 4H timeframe.
Multiple BOS (Breaks of Structure) confirm a weakening bullish trend.
✅ Daily Still Holding – But Weak
Daily structure hasn't fully flipped yet, but bullish pressure is cracking.
This gives us a high-risk-reward opportunity before full higher-timeframe confirmation.
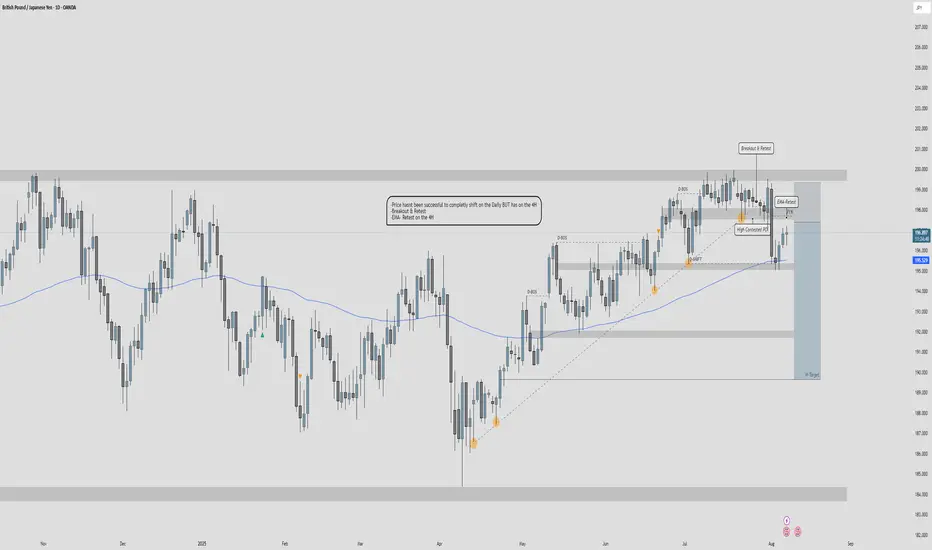
✅ Breakout & Retest + 71% Retracement
Classic breakout and retest pattern from the high.
Price has pulled back into the 71% Fib level, providing a premium entry.
✅ Retest of EMA + Contested POI
Price also tested the 4H EMA, acting as dynamic resistance.
This zone overlaps with a previous point of interest (POI) – heavy confluence for sell pressure.
📌 Sell Plan:
Sell Zone: 196.900 – 197.100 (watch for rejection candles or LTF structure breaks)
Stop Loss: Above the last swing high or EMA
Take Profits:
TP1: 195.00
TP2: 190.00 (Weekly Target)
⚠️ Risk Management
Only execute once LTF confirms entry (M15/M5 BOS or bearish engulfing rejection).
Position size with R:R in mind; this setup offers a potential 1:4+ move.
🗓️ Market Outlook:
GBP/JPY is showing early signs of rolling over. The 4H shift, combined with a premium retest and EMA rejection, creates a clean short window. Watch the daily close for full confirmation.
🔔 Like and follow for more clean smart money & structure-based setups.
Pair: GBP/JPY
Timeframe: 4H / Daily
Bias: Bearish
Entry Zone: 196.900 - 197.100 (71% + EMA Retest)
Target Zones:
🔹 TP1: 195.00
🔹 TP2: 190.00 (W-Target)
🧠 Technical Breakdown:
✅ 4H Structure Shift Confirmed
Price has broken and shifted structure on the 4H timeframe.
Multiple BOS (Breaks of Structure) confirm a weakening bullish trend.
✅ Daily Still Holding – But Weak
Daily structure hasn't fully flipped yet, but bullish pressure is cracking.
This gives us a high-risk-reward opportunity before full higher-timeframe confirmation.
✅ Breakout & Retest + 71% Retracement
Classic breakout and retest pattern from the high.
Price has pulled back into the 71% Fib level, providing a premium entry.
✅ Retest of EMA + Contested POI
Price also tested the 4H EMA, acting as dynamic resistance.
This zone overlaps with a previous point of interest (POI) – heavy confluence for sell pressure.
📌 Sell Plan:
Sell Zone: 196.900 – 197.100 (watch for rejection candles or LTF structure breaks)
Stop Loss: Above the last swing high or EMA
Take Profits:
TP1: 195.00
TP2: 190.00 (Weekly Target)
⚠️ Risk Management
Only execute once LTF confirms entry (M15/M5 BOS or bearish engulfing rejection).
Position size with R:R in mind; this setup offers a potential 1:4+ move.
🗓️ Market Outlook:
GBP/JPY is showing early signs of rolling over. The 4H shift, combined with a premium retest and EMA rejection, creates a clean short window. Watch the daily close for full confirmation.
🔔 Like and follow for more clean smart money & structure-based setups.
Disclaimer
The information and publications are not meant to be, and do not constitute, financial, investment, trading, or other types of advice or recommendations supplied or endorsed by TradingView. Read more in the Terms of Use.
Disclaimer
The information and publications are not meant to be, and do not constitute, financial, investment, trading, or other types of advice or recommendations supplied or endorsed by TradingView. Read more in the Terms of Use.