🚀 GBP/NZD TRADE PLAN (ULTRA-REFINED) 🚀
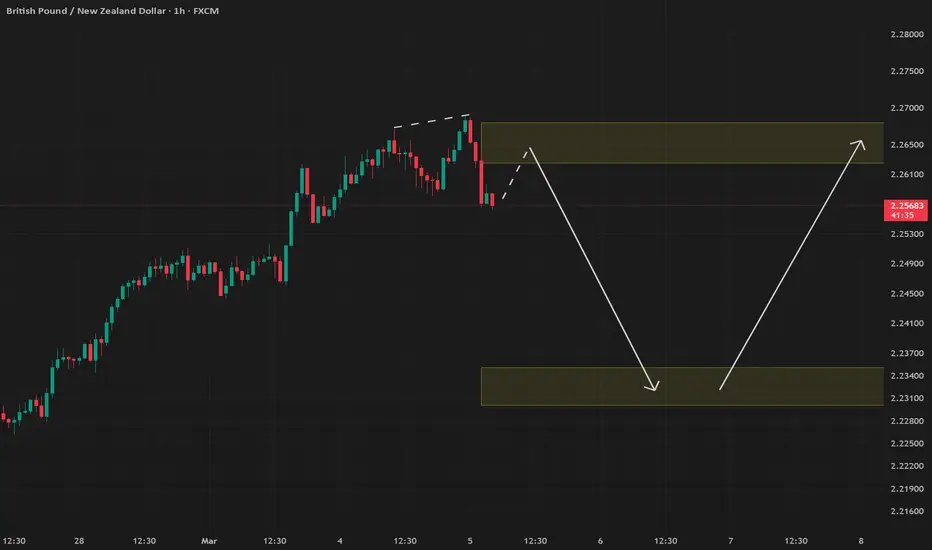
🛑 PRIMARY TRADE – SELL SETUP
🔻 SELL ENTRY
🔹 Aggressive Entry: Sell Limit at 2.2650 – 2.2700 (Institutional Supply Zone).
🔹 Confirmation Entry: If price fails to break above 2.2625 & forms rejection (H1/M30/M15 Bearish Engulfing, Fakeout, or Pin Bar), take a market execution sell.
🔹 SL: 2.2750 (Above liquidity grab & invalidation zone).
🔹 TP1: 2.2520 (Nearest support, move SL to breakeven).
🔹 TP2: 2.2450 (Liquidity target).
🔹 TP3: 2.2350 – 2.2300 (Full reversal target).
✅ Risk-Reward Ratio: 1:3+
🎯 Confidence Level: ✅✅✅✅ (High Probability – Strong Structural & Liquidity Confluence).
📌 Why this is a high-confidence sell setup?
🔹 H4 & H1 bearish engulfing confirm seller control.
🔹 Price has rejected 2.2650 multiple times, indicating strong supply.
🔹 Regular bearish divergence on H1 signals weakening bullish momentum.
🔹 If price fakes out above 2.2650 and closes below, it’s a liquidity grab confirmation.
🟢 SECONDARY TRADE – BUY SETUP (ONLY IF PRICE DROPS INTO DEMAND)
🔹 BUY ENTRY
🔹 Aggressive Entry: Buy Limit at 2.2350 – 2.2300 (Institutional Demand Zone).
🔹 Confirmation Entry: Wait for bullish rejection (Wick Rejection, Bullish Engulfing, or Fakeout) on H1/M30/M15 above 2.2350 before buying.
🔹 SL: 2.2250 (Below liquidity grab zone).
🔹 TP1: 2.2450 (First resistance, move SL to breakeven).
🔹 TP2: 2.2520 – 2.2550 (Extended move based on liquidity).
🔹 TP3: 2.2650 – 2.2700 (Full bullish target).
✅ Risk-Reward Ratio: 1:3+
🎯 Confidence Level: ✅✅✅ (Medium-High, depends on price reaction at 2.2350).
📌 Why consider buying here?
🔹 Price would retrace into institutional demand at 2.2350 – 2.2300.
🔹 Strong reaction zone with previous liquidity grab & fair value gap.
🔹 Aligns with Fibonacci retracement (50% – 61.8%) & previous demand area.
🔍 FINAL CONFIRMATION & CHANGES MADE:
✅ H1 added to confirmation entry criteria alongside M30/M15 for stronger validation.
✅ Sell entry is now based on existing rejection instead of waiting for another retest.
✅ Primary entry is a market execution sell if price holds below 2.2625, or a re-entry at 2.2650 – 2.2700.
✅ Every confluence (H4 engulfing, H1 divergence, liquidity rejection) is fully respected.
✅ Buy setup is only valid at deep discount levels (2.2350 – 2.2300), avoiding unnecessary risks.
🔒 Ultra-refined, high-precision execution plan. Every confluence checked. No compromises. 🚀🔥
D1 Pin Bar rejection, which further strengthens the bearish confluence.
📌 Impact on the Trade Plan:
✅ Primary Sell Setup Becomes Even Stronger: The D1 Pin Bar confirms higher timeframe rejection at the key supply zone (2.2650 – 2.2700).
✅ Increased Probability of Further Downside: The Pin Bar wick suggests a liquidity grab above 2.2650, where institutions could have filled sell orders before driving price lower.
✅ Stronger Sell Confirmation Entry: If H1/M30/M15 form another bearish rejection below 2.2625, a market execution sell becomes even more valid.
🔹 Final Confirmation: D1, H4, and H1 all align bearishly → High conviction for the sell setup. 🔥📉
Trade active
UPDATED PLAN:📌 GBPNZD Fresh Trade Plan – Optimized & Final
🚀 Primary Sell Trade – High-Conviction Institutional Setup
🔹 Entry Zone 1: Sell Limit at 2.2520 (Liquidity Grab + Order Block).
🔹 Entry Zone 2 (Refined): Sell Limit at 2.2560 (Final liquidity sweep before rejection).
🔹 Confirmation Entry (H1/H4): ✅ Bearish Engulfing / Rejection Wick / Fakeout ✅ Bearish Divergence ✅ Volume Spike
✅ Stop Loss (SL): Above 2.2600 (Smart Money invalidation zone).
✅ Take Profit (TP1): 2.2430 (First reaction zone, move SL to breakeven).
✅ Take Profit (TP2): 2.2350 (Institutional demand zone).
✅ Take Profit (TP3): 2.2250 (Full move completion to major liquidity level).
🎯 Risk-Reward Ratio: 1:3 minimum, ideally 1:4+
🎯 Confidence Level: ✅✅✅✅✅ (90%+) – Highest Probability Trade
📌 Why This Trade?
✔ Bearish divergence confirms exhaustion (H1 & H4).
✔ Liquidity grab above 2.2520 before reversal.
✔ Volume spike shows Smart Money Selling Pressure.
🚀 Alternate Buy Setup – If Sell Is Not Triggered
🔹 Entry Zone: Buy Limit at 2.2300 (Key demand zone).
🔹 Confirmation Entry: ✅ Bullish Engulfing ✅ Bullish Divergence ✅ Volume Surge
✅ Stop Loss (SL): Below 2.2250 (Liquidity protection).
✅ Take Profit (TP1): 2.2430 (First reaction).
✅ Take Profit (TP2): 2.2520 (OB retest).
✅ Take Profit (TP3): 2.2600 (Full move back to liquidity level).
🎯 Risk-Reward Ratio: 1:3 minimum, ideally 1:4+
🎯 Confidence Level: ✅✅✅✅ (80%-90%) – High Probability
Disclaimer
The information and publications are not meant to be, and do not constitute, financial, investment, trading, or other types of advice or recommendations supplied or endorsed by TradingView. Read more in the Terms of Use.
Disclaimer
The information and publications are not meant to be, and do not constitute, financial, investment, trading, or other types of advice or recommendations supplied or endorsed by TradingView. Read more in the Terms of Use.