Summary
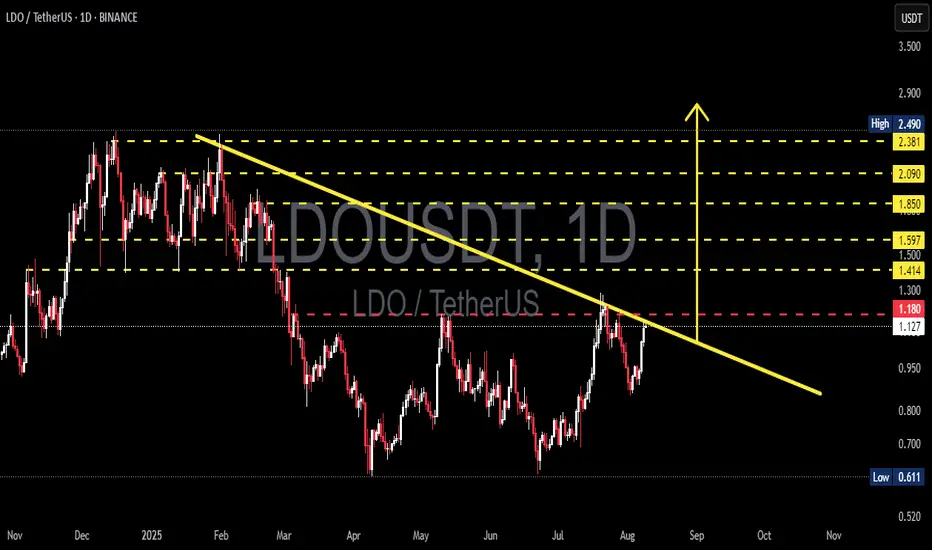
LDO price is currently testing the descending trendline (yellow) connecting this year’s major highs. This zone coincides with a key horizontal resistance around 1.18–1.30. Price action in this area will determine the next move — either a sustained breakout towards higher supply zones or a rejection leading to renewed bearish pressure.
---
Key Levels (from chart)
Immediate resistance / quick supply zone: ~1.18 (red line) — short-term key.
Descending trendline (yellow): dynamic resistance, currently intersecting near 1.18–1.30.
Staged resistance targets (yellow dashed lines): 1.414 → 1.50 → 1.597 → 1.85 → 2.09 → 2.38 → 2.49.
Main supports: 0.95–1.00 (intraday), and major swing low 0.611.
---
Pattern / Structure Analysis
Mid-term trend — bearish: a clear series of lower highs since the start of the year, marked by a descending supply line.
Current condition — accumulation pressure: after months of sideways consolidation, price is rallying into trendline resistance — often a decisive point leading to either breakout or rejection.
No clear classic reversal pattern (e.g., full inverse head & shoulders) — more of a trendline test after consolidation.
Volume and daily close confirmation are critical to avoid false breakouts.
---
Bullish Scenario (requirements for a valid bullish setup)
Bullish trigger (confirmation):
1. Daily close above trendline + above ~1.30 (body close, not just wick).
2. Rising volume during breakout, showing strong buying participation.
3. A successful retest of the trendline as support after breakout for safer entry.
Step targets after confirmation:
Target 1: 1.414 — partial profit zone.
Target 2: 1.50 – 1.597 — mid-term resistance.
Target 3: 1.85 – 2.09 — major supply zone; if momentum remains, extend to 2.38 – 2.49.
Risk management:
Initial stop-loss below retest area or under 0.95 (adjust to position size).
Consider trailing stops for strong momentum moves.
---
Bearish Scenario (rejection / continuation)
Bearish trigger (confirmation):
1. Rejection at trendline: long upper wick + daily close back under 1.18 without volume confirmation on buying.
2. Increasing sell volume during rejection and follow-through.
Downside targets:
Target 1: 0.95–1.00 (intraday support).
Target 2: 0.80 (mid-level support).
Target 3: if breakdown continues, retest major low at 0.611.
Short strategy on confirmation:
Enter after rejection candle with volume confirmation; stop-loss above wick high / slightly above trendline.
---
Key Signals to Watch Before Entry
1. Daily close — avoid acting solely on intraday wicks.
2. Volume — breakouts without strong volume are prone to failure.
3. Retest confirmation — ideal for safer entries after breakout.
4. Broader market context — BTC/DeFi sentiment can accelerate or reverse moves.
5. Orderflow / on-chain / Lido news — large unlocks or updates may trigger volatility.
---
Trading Plan Highlights
Position sizing: risk only 1–2% of capital per trade.
Measured stop-loss: under breakout retest or under 0.95 for longs; above rejection wick for shorts.
Take profits in stages at resistance zones; avoid aiming for one all-or-nothing target.
Prepare a contingency plan for false breakouts.
---
Final Note
LDO is at a decision point — whether to break the yellow trendline or get rejected will set the mid-term direction. Wait for confirmation (daily close + volume + retest) before committing capital, and maintain strict risk control.
---
Hashtags (for TradingView):
#LDOUSDT #LDO #Lido #Crypto #TechnicalAnalysis #Breakout #SwingTrade #RiskManagement
✅ Get Free Signals! Join Our Telegram Channel Here: t.me/TheCryptoNuclear
✅ Twitter: twitter.com/crypto_nuclear
✅ Join Bybit : partner.bybit.com/b/nuclearvip
✅ Benefits : Lifetime Trading Fee Discount -50%
✅ Twitter: twitter.com/crypto_nuclear
✅ Join Bybit : partner.bybit.com/b/nuclearvip
✅ Benefits : Lifetime Trading Fee Discount -50%
Disclaimer
The information and publications are not meant to be, and do not constitute, financial, investment, trading, or other types of advice or recommendations supplied or endorsed by TradingView. Read more in the Terms of Use.