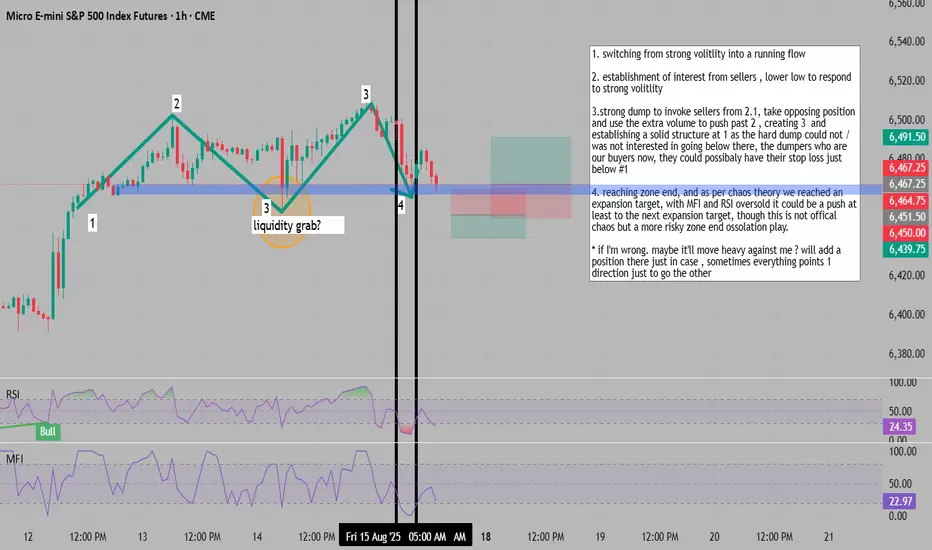
1. **Pattern Recognition**: Identifying a transition from strong volatility into a running flow pattern.
2. **Seller Interest Established**: Lower low formation in response to the initial volatility spike, confirming seller presence at this level.
3. **Liquidity Grab and Reversal**: Strong dump designed to trigger sellers identified in point 2. Take the opposing (long) position here, using the increased volume from triggered sellers to push price past level 2, creating level 3. This establishes solid structure at level 1, as the dump showed no interest in breaking below it. The dumpers (now turned buyers) likely have stop losses positioned just below level 1.
4. **Zone End Target**: Approaching zone end with expansion target reached per chaos theory principles. With both MFI and RSI showing oversold conditions, expecting at minimum a push to the next expansion target. Note: This is an unofficial chaos theory application - a higher risk zone end oscillation play.
**Risk Management Note**: If the analysis is wrong, price may move heavily against the position. Consider adding a hedge position as insurance, as markets sometimes present all signals pointing in one direction only to reverse completely.
Join our public discord : discord.gg/hUUhRKByFt
To access my premium indicators , including unrestricted usage of public indicators ( all timeframes ) : whop.com/chaos-theory-indicator-s-5/?store=true
To access my premium indicators , including unrestricted usage of public indicators ( all timeframes ) : whop.com/chaos-theory-indicator-s-5/?store=true
Disclaimer
The information and publications are not meant to be, and do not constitute, financial, investment, trading, or other types of advice or recommendations supplied or endorsed by TradingView. Read more in the Terms of Use.