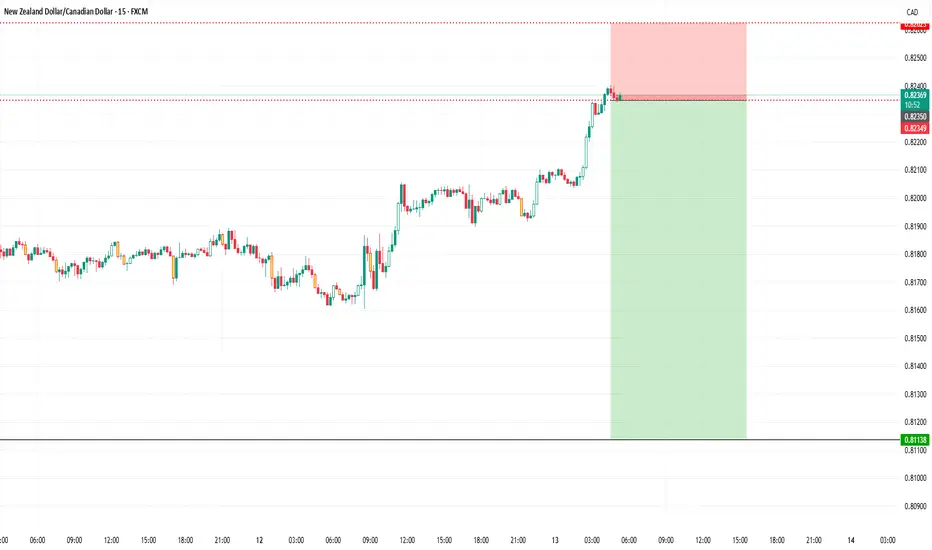
1. Trade Setup
Entry Price: ~0.8235
Stop Loss (SL): ~0.82645 (about 29 pips above entry)
Take Profit (TP): ~0.81138 (about 121 pips below entry)
Risk-to-Reward Ratio: ~1:4 — this is favorable if the setup plays out.
2. Price Action Context
Price had a strong bullish push before entry, likely hitting a previous resistance area (near 0.8240–0.8260).
The short entry appears to be taken at or just after price tapped into that resistance, possibly anticipating a reversal.
Candles leading up to entry show upward momentum, so the trade depends heavily on that resistance holding.
3. Support & Resistance Zones
Immediate Resistance: 0.8240–0.8260 (where SL is placed, marking the breakout invalidation zone).
First Support: 0.8210 (minor intraday level).
Major Target Support: 0.8113 (TP zone, possibly a demand area from earlier price action).
4. Risk Factors
Strong bullish momentum into entry could mean price might test or slightly break resistance before dropping.
If NZD or CAD news is upcoming, volatility could shake the trade.
5. Trade Idea Logic
Likely based on supply zone rejection or the overbought pullback idea.
Good R:R, but the trade relies on a sharp reversal after a strong push — this type of setup works best if there are bearish confirmation candles or divergence.
Disclaimer
The information and publications are not meant to be, and do not constitute, financial, investment, trading, or other types of advice or recommendations supplied or endorsed by TradingView. Read more in the Terms of Use.
Disclaimer
The information and publications are not meant to be, and do not constitute, financial, investment, trading, or other types of advice or recommendations supplied or endorsed by TradingView. Read more in the Terms of Use.