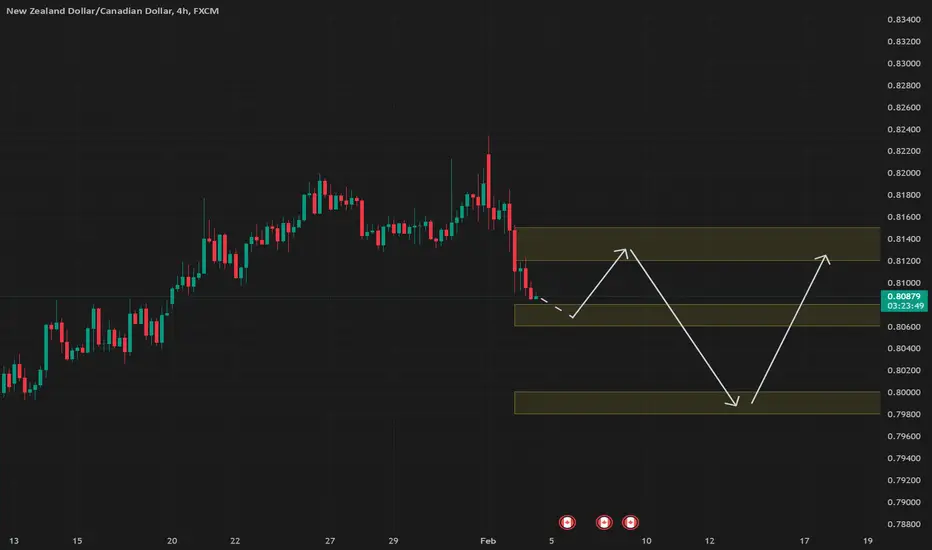
🔹 Plan A: Swing BUY Trade (Counter-Trend Reversal Setup)
📌 Entry: Buy at 0.8080–0.8060 (Liquidity Grab & Demand Zone).
📌 Stop Loss (SL): Below 0.8040 (Safe Level).
📌 Take Profit 1 (TP1): 0.8125 (First resistance & breakout level).
📌 Take Profit 2 (TP2): 0.8150 (HTF Resistance).
📌 Take Profit 3 (Final TP3): 0.8200 (Supply Zone).
🎯 Risk-to-Reward (R:R): 1:4+ (High Probability Trade).
✅ Confirmation Needed:
Bullish engulfing or rejection wick at 0.8080.
H1 Close above 0.8100 for safer entry.
Divergence in lower timeframe (M15/M30) supports the buy.
🔹 Plan B: Continuation SELL Trade (Trend Continuation)
📌 Entry: Sell at 0.8120–0.8150 (Retest of broken structure).
📌 Stop Loss (SL): Above 0.8180.
📌 Take Profit 1 (TP1): 0.8100 (Short-term level).
📌 Take Profit 2 (TP2): 0.8080 (Major demand zone).
📌 Final TP3: 0.8050 (Liquidity zone).
🎯 Risk-to-Reward (R:R): 1:3+ (Solid trade).
✅ Confirmation Needed:
Bearish engulfing at 0.8120–0.8150.
H1 Close below 0.8100 confirms sellers in control.
🔹 Plan C: Extreme BUY Trade (Deep Liquidity Grab & Strong Reversal Setup)
📌 Entry: Buy at 0.7980–0.8000 (HTF Demand & Liquidity Grab Zone).
📌 Stop Loss (SL): Below 0.7950 (Safe Level).
📌 Take Profit 1 (TP1): 0.8050 (Previous demand).
📌 Take Profit 2 (TP2): 0.8080 (Mid-range).
📌 Take Profit 3 (Final TP3): 0.8125+ (Reversal target).
🎯 Risk-to-Reward (R:R): 1:5+ (High Precision Setup).
✅ Confirmation Needed:
Bullish engulfing/rejection wick at 0.7980–0.8000.
H1/H4 closes strong bullish to confirm buyers stepping in.
Divergence on M15/M30 for added confluence.
📌 FINAL DECISION (How to Trade This)
1️⃣ If price reaches 0.8080–0.8060 and shows bullish confirmation → BUY Plan A is activated.
2️⃣ If price rejects 0.8120–0.8150 with bearish signs → SELL Plan B is activated.
3️⃣ If price breaks below 0.8060 and drops to 0.7980–0.8000, wait for confirmation → BUY Plan C is activated.
🚀 Smart Money Execution—No Rushing, Only High-Probability Trades!
Trade active
BUY Trade got triggered and reached TP where we would SOON look to Sell High Probability Setup. Disclaimer
The information and publications are not meant to be, and do not constitute, financial, investment, trading, or other types of advice or recommendations supplied or endorsed by TradingView. Read more in the Terms of Use.
Disclaimer
The information and publications are not meant to be, and do not constitute, financial, investment, trading, or other types of advice or recommendations supplied or endorsed by TradingView. Read more in the Terms of Use.
