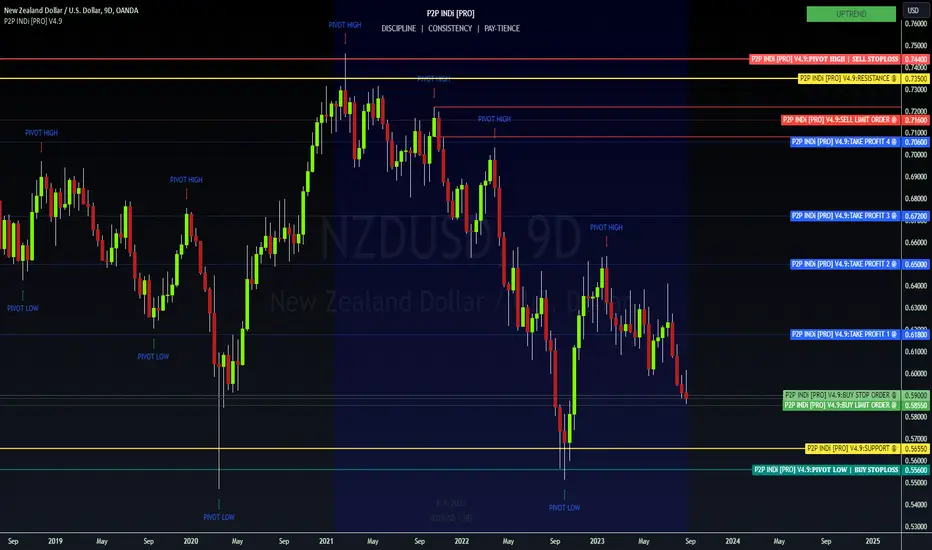
RESISTANCE @ 0.7350
SLO @ 0.7160 ⏳
TP4 @ 0.7060
TP3 @ 0.6720
TP2 @ 0.6500
TP1 @ 0.6180
BSO @ 0.5900 ⏳
BLO @ 0.5855 ⏳
SUPPORT @ 0.5655
After a +600 pips profit towards the downside, we are ready to rock towards the upside again.
SLO @ 0.7160 ⏳
TP4 @ 0.7060
TP3 @ 0.6720
TP2 @ 0.6500
TP1 @ 0.6180
BSO @ 0.5900 ⏳
BLO @ 0.5855 ⏳
SUPPORT @ 0.5655
After a +600 pips profit towards the downside, we are ready to rock towards the upside again.
Note
NZDUSD: CURVE ANALYSIS (1H)
SLO2 @ 0.6040 ⏳
SLO1 @ 0.6020 ⏳
TP1 @ 0.5990
TP2 @ 0.5960
TP3 @ 0.5940
TP4 @ 0.5910
BLO1 @ 0.5900 ⏳
BLO2 @ 0.5880 ⏳
ADDITIONAL INFO:
❓ Although the High Time Frame shows a BIG PICTURE uptrend, it appears that Price Action on the Intermediate Time Frame is coming into some bearish momentum.
📉 The current technical analysis for NZDUSD appears to nearing a Supply Zone which would cause PA to become bearish.
Moving Averages:
✍️ The 20-period simple moving average (SMA) is below the 50-period SMA
✍️ The 50-period simple moving average (SMA) is below the 100-period SMA
📉 The above averages indicate a bearish trend.
🤔 The 100- and 200-period SMA, already reflect a bearish trend.
Support Levels:
🕯 A key Support Level is @ 0.5886. If NZDUSD breaks below 0.5871, it could continue to drop further to 0.5780
Resistance Levels:
🕯 A key Resistance Level is @ 0.6022. If NZDUSD breaks above 0.6050, it could continue to climb further to 0.6066
Technical Indicators:
P2P INDi
Pivot High @ 0.6049
Pivot High @ 0.5871
TEMASHA
A break below 0.5975 could lead to further downside.
Trade active
NZDUSD: Curve Analysis (6H)
⚠️ This is an ALTERNATIVE Curve analysis showing the probability of PA going higher.
✍️ I'll keep you posted as l make adjustments.
Professor C. E. Ward
Disclaimer
The information and publications are not meant to be, and do not constitute, financial, investment, trading, or other types of advice or recommendations supplied or endorsed by TradingView. Read more in the Terms of Use.
Professor C. E. Ward
Disclaimer
The information and publications are not meant to be, and do not constitute, financial, investment, trading, or other types of advice or recommendations supplied or endorsed by TradingView. Read more in the Terms of Use.