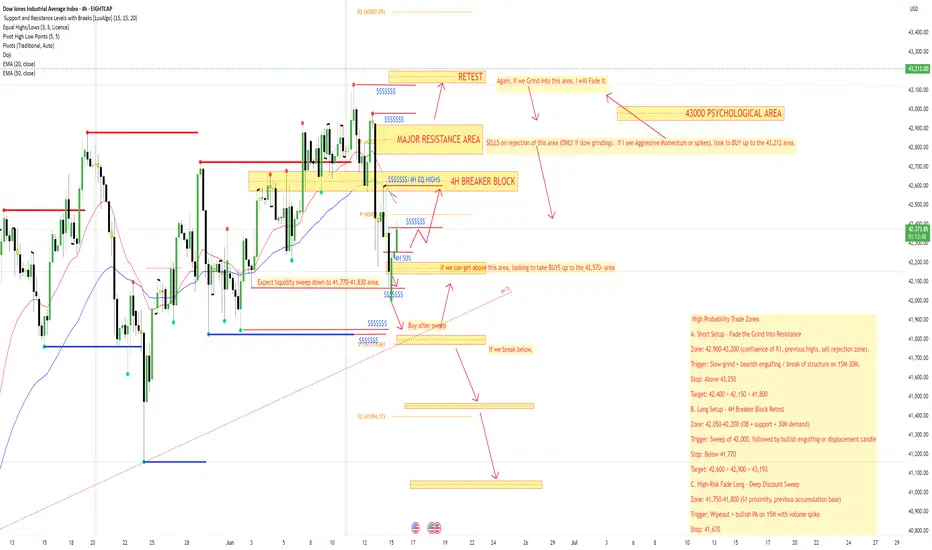
High Probability Trade Zones
A. Short Setup – Fade the Grind Into Resistance
Zone: 42,900–43,200 (confluence of R1, previous highs, sell rejection zone).
Trigger: Slow grind + bearish engulfing / break of structure on 15M–30M.
Stop: Above 43,250
Target: 42,400 > 42,150 > 41,800
B. Long Setup – 4H Breaker Block Retest
Zone: 42,050–42,200 (OB + support + 30M demand)
Trigger: Sweep of 42,000, followed by bullish engulfing or displacement candle
Stop: Below 41,770
Target: 42,600 > 42,900 > 43,193
C. High-Risk Fade Long – Deep Discount Sweep
Zone: 41,750–41,800 (S1 proximity, previous accumulation base)
Trigger: Wipeout + bullish PA on 15M with volume spike
Stop: 41,670
Target: 42,200 > 42,500
Disclaimer
The information and publications are not meant to be, and do not constitute, financial, investment, trading, or other types of advice or recommendations supplied or endorsed by TradingView. Read more in the Terms of Use.
Disclaimer
The information and publications are not meant to be, and do not constitute, financial, investment, trading, or other types of advice or recommendations supplied or endorsed by TradingView. Read more in the Terms of Use.