🧱 Market Structure
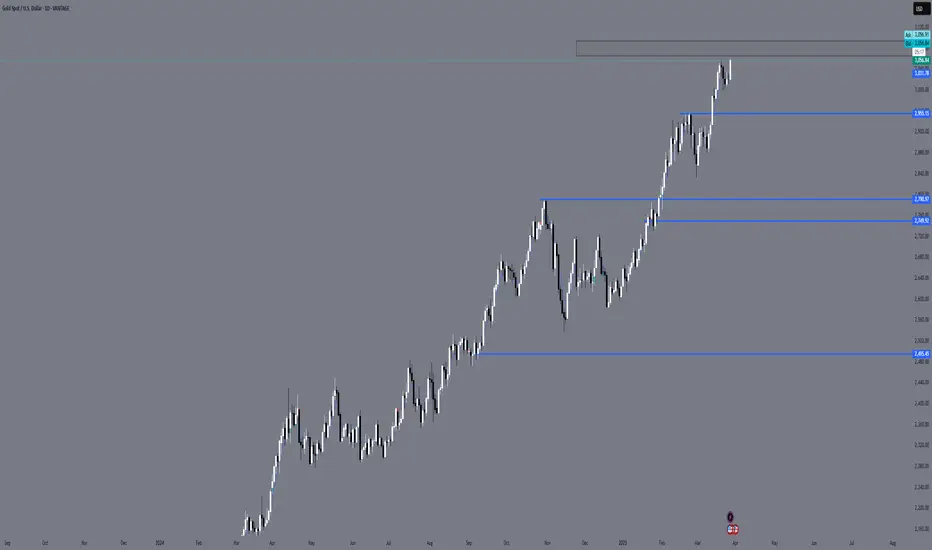
The D1 structure is clearly bullish – price is printing HHs and HLs consistently.
Current push is a continuation from previous consolidation, breaking structure upwards.
No CHoCH or BOS bearish yet – buyers still in control.
🔵 Key Zones (marked on your chart)
1. Near-term Liquidity / Resistance
Price is approaching a marked supply zone / premium area at the top (same one from W1).
This is likely to act as a reaction point – either:
Sweep liquidity and reverse
Break through and continue higher
2. Imbalances / Mitigation Zones Below Price
These zones are clean mitigation targets if price rejects from the top:
Zone Level Description
2955 Fair value gap / inefficiency (imbalance)
2790–2800 Strong structure zone + FVG + OB
2740–2750 Potential OB + previous consolidation
2495 Deep retracement level – less likely short-term
🧩 Order Flow Observation
Very little sign of exhaustion in candles right now.
The only reason to expect reversal is if:
Price hits the extreme premium zone
We see a strong daily rejection or
Lower timeframes shift (CHoCH / BOS)
📉 EMA Perspective (implied)
Assuming EMA 21/50/200:
Price is well above EMA 21 & 50, indicating strong short-term bullish trend.
A return to EMA 21 (probably around ~2950–2970) would be a healthy pullback.
📌 Bias – Daily
Term Bias Reason Daily
✅ Bullish Clean bullish structure, no shift Short-term
⚠️ Watchful
If price hits supply zone with reaction
Ideal setup
Rejection from premium + CHoCH on H4/H1
🧠 Trade Ideas (based on D1)
🔼 Bullish Scenario
Price holds above 3060 and breaks 3090+
Entry on breakout + retest of minor OB on H1
Target: ATH sweep and continuation
SL: Below minor HL / reaction low
🔽 Bearish Scenario
Price enters supply zone → forms bearish D1 candle (engulfing / pinbar)
Look for CHoCH on H4/H1 to enter short
Target levels: 2950 ➝ 2800 ➝ 2750
SL: Above daily high or OB
GoldFxMinds | XAUUSD Sniper Plans, Structure-Driven Bias & Execution Clarity
Free: t.me/GoldMindsFX_AI
VIP: t.me/GoldMindsFX_A
1-on-1 Coaching: t.me/GoldFxMinds
Free: t.me/GoldMindsFX_AI
VIP: t.me/GoldMindsFX_A
1-on-1 Coaching: t.me/GoldFxMinds
Disclaimer
The information and publications are not meant to be, and do not constitute, financial, investment, trading, or other types of advice or recommendations supplied or endorsed by TradingView. Read more in the Terms of Use.