Market Structure:
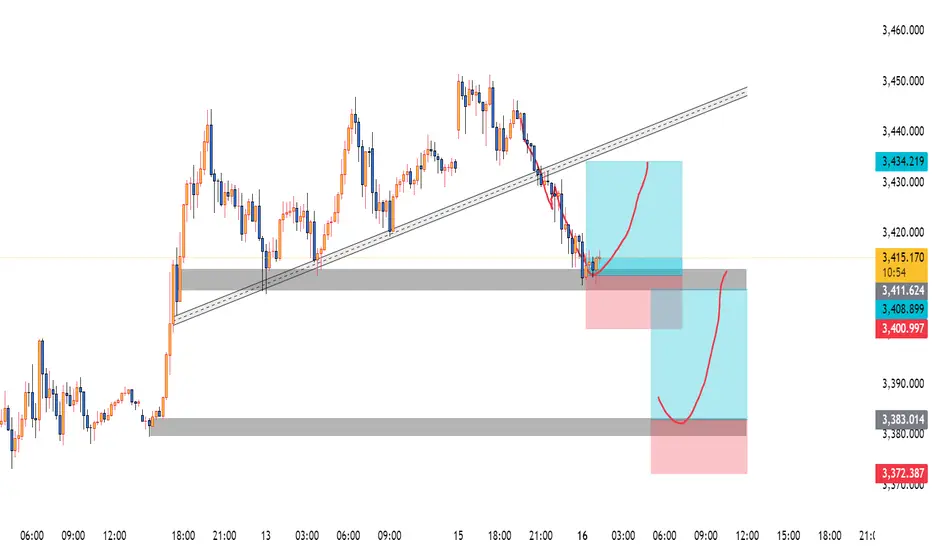
The market isin a clear uptrend, forming higher highs and higher lows until a recent break of the ascending trendline, signaling a short-term structural weakness.
Current price is in a retracement phase, heading towards previous demand zones.
🔹 Zone 1 (3408–3414):
Confluence of:
Broken trendline retest (former support).
Minor order block / demand zone.
Overlapping price reaction area.
Risk: This zone may act as a liquidity inducement before price sweeps deeper into Zone 2.
Entry trigger: Bullish engulfing or LTF market structure shift on 1m/5m.
🔹 Zone 2 (3380–3384):
Stronger demand zone:
Aligned with previous accumulation base.
Larger imbalance (FVG-type area) and bullish impulsive origin.
More convincing for high-RR entries.
Higher probability: If Zone 1 fails or only wicks price, Zone 2 may provide the main entry opportunity.
Entry trigger: Shift in LTF structure with volume spike or breaker flip.
✅ Trade Signal Suggestions
🟦 Setup 1: Buy from Zone 1
Entry: 3410 (upon bullish confirmation)
SL: 3400 (below structure low)
TP: 3434 (prior high)
RR: ~2.4R
Note: Only take if price forms bullish structure (MSS or BOS) on lower timeframe.
🟦 Setup 2: Buy from Zone 2
Entry: 3380/3384 (upon confirmation)
SL: 3372 (below demand zone)
TP: 3411 or 3434 (scalp to intraday swing)
RR: ~1:3 or better
Note: Wait for clean rejection or reversal candle from this zone.
⚠️ Risk Management
Risk 0.5–1% per trade.
Use entry confirmation such as:
Bullish engulfing
Fair value gap reaction
Break of internal structure
Trade active
100 pips and counting. Trade activating exactly from my first zone, now it's upto you how you manage your risk.
Note
Got hit breakeven after 120+ pips at first zone (3408/14) but the second zone (3480-84) being running perfectly.
200+ pips in the bucket so far.
Trade closed: target reached
After achieving the 200 pips and taking partials, gold at the breakevens again.✅Free Telegram
t.me/+6YQX9c4-BiQ2M2M8
Twitter 👇
twitter.com/QuinnGoldTrader
t.me/+6YQX9c4-BiQ2M2M8
Twitter 👇
twitter.com/QuinnGoldTrader
Disclaimer
The information and publications are not meant to be, and do not constitute, financial, investment, trading, or other types of advice or recommendations supplied or endorsed by TradingView. Read more in the Terms of Use.
✅Free Telegram
t.me/+6YQX9c4-BiQ2M2M8
Twitter 👇
twitter.com/QuinnGoldTrader
t.me/+6YQX9c4-BiQ2M2M8
Twitter 👇
twitter.com/QuinnGoldTrader
Disclaimer
The information and publications are not meant to be, and do not constitute, financial, investment, trading, or other types of advice or recommendations supplied or endorsed by TradingView. Read more in the Terms of Use.