Overall Context
The chart showcases:
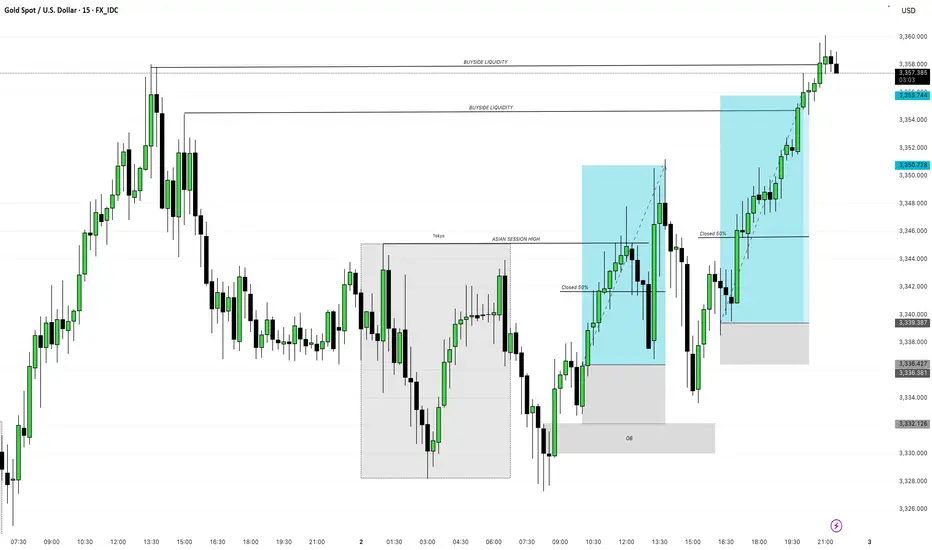
• Smart money concepts (SMC) such as liquidity grabs, order blocks, and session-based trading.
• A bullish bias following a successful manipulation and mitigation during the Asian to London/NY overlap.
Key Concepts Highlighted
Liquidity Zones
• Buyside Liquidity (BSL) is marked above the recent highs, indicating retail buy stop orders — a key magnet for institutional price action.
• Price ultimately targets and sweeps this liquidity.
Sessions
• Tokyo/Asian Session Range is shaded, showing consolidation.
• Price creates a high marked “ASIAN SESSION HIGH”, which becomes a short-term liquidity target.
Order Block (OB)
• A bullish Order Block is marked below price, around the 3,332.126 area.
• Price taps into this OB during the London session, indicating institutional accumulation.
Trade Setup Breakdown
Entry Zone
• Price dipped into the Order Block (OB) after forming a higher low (HL) — this likely triggered long positions.
• Bullish order flow followed with clean, impulsive moves upward.
First Trade Position
• Trade enters post-OB mitigation and breaks above short-term structure.
• First TP (Take Profit) is possibly near the Asian Session High, where 50% was closed (partial profit-taking).
• Price retraces post-take-profit, but maintains bullish structure.
Second Trade Position
• After a retracement into a demand zone (gray shaded), another long opportunity arises.
• The second entry likely occurs after confirmation of support in the retracement.
• TP targets the next buyside liquidity pool.
Trade Management
• 50% Closures are clearly annotated — a risk management tactic to secure profit while letting the rest run.
• Each leg upwards is followed by a correction but respects bullish structure.
Final Target
• The final buyside liquidity pool at the top is swept, suggesting:
• Completion of the smart money play.
• Potential reversal zone or exhaustion.
Summary of Trade Execution
Bias
>Bullish
Entry Basis
> OB Mitigation + Liquidity Sweep + Bullish Break of Structure (BoS)
TP Zones
> Asian Session High, then Final BSL
Risk Management
> 50% closure at intermediate targets
Confirmation
> Structure shift + aggressive entry post-mitigation
The chart showcases:
• Smart money concepts (SMC) such as liquidity grabs, order blocks, and session-based trading.
• A bullish bias following a successful manipulation and mitigation during the Asian to London/NY overlap.
Key Concepts Highlighted
Liquidity Zones
• Buyside Liquidity (BSL) is marked above the recent highs, indicating retail buy stop orders — a key magnet for institutional price action.
• Price ultimately targets and sweeps this liquidity.
Sessions
• Tokyo/Asian Session Range is shaded, showing consolidation.
• Price creates a high marked “ASIAN SESSION HIGH”, which becomes a short-term liquidity target.
Order Block (OB)
• A bullish Order Block is marked below price, around the 3,332.126 area.
• Price taps into this OB during the London session, indicating institutional accumulation.
Trade Setup Breakdown
Entry Zone
• Price dipped into the Order Block (OB) after forming a higher low (HL) — this likely triggered long positions.
• Bullish order flow followed with clean, impulsive moves upward.
First Trade Position
• Trade enters post-OB mitigation and breaks above short-term structure.
• First TP (Take Profit) is possibly near the Asian Session High, where 50% was closed (partial profit-taking).
• Price retraces post-take-profit, but maintains bullish structure.
Second Trade Position
• After a retracement into a demand zone (gray shaded), another long opportunity arises.
• The second entry likely occurs after confirmation of support in the retracement.
• TP targets the next buyside liquidity pool.
Trade Management
• 50% Closures are clearly annotated — a risk management tactic to secure profit while letting the rest run.
• Each leg upwards is followed by a correction but respects bullish structure.
Final Target
• The final buyside liquidity pool at the top is swept, suggesting:
• Completion of the smart money play.
• Potential reversal zone or exhaustion.
Summary of Trade Execution
Bias
>Bullish
Entry Basis
> OB Mitigation + Liquidity Sweep + Bullish Break of Structure (BoS)
TP Zones
> Asian Session High, then Final BSL
Risk Management
> 50% closure at intermediate targets
Confirmation
> Structure shift + aggressive entry post-mitigation
Disclaimer
The information and publications are not meant to be, and do not constitute, financial, investment, trading, or other types of advice or recommendations supplied or endorsed by TradingView. Read more in the Terms of Use.
Disclaimer
The information and publications are not meant to be, and do not constitute, financial, investment, trading, or other types of advice or recommendations supplied or endorsed by TradingView. Read more in the Terms of Use.