4-Hour Analysis: The Bigger Picture
Price Action & Market Structure
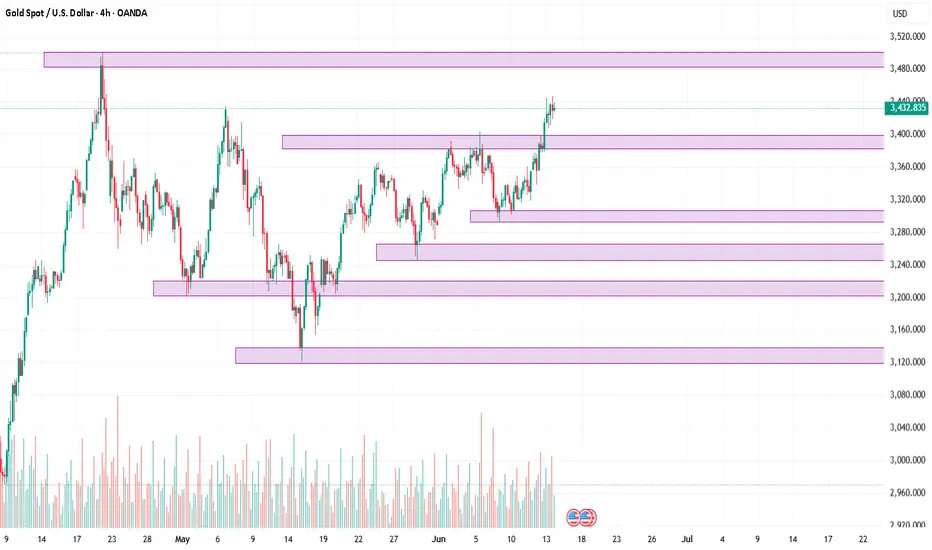
Current price is at $3432.835.
The market has printed a higher high above the previous swing at ~$3425.
Last Break of Structure (BOS): Occurred to the upside at ~$3412.
Recent CHoCH (Change of Character): None yet to the downside—bullish structure still intact.
Conclusion: Bullish Market Structure is dominant.
Fibonacci Levels
Measured from the swing low at $3362 to the recent swing high at $3437:
38.2% retracement: ~$3410
50% retracement: ~$3399
61.8% retracement: ~$3388
These are our retracement zones where demand is likely to step in.
Smart Money Key Concepts
Imbalance: Clean imbalance exists between $3408–$3415.
Bullish Order Block (OB): 4H candle at $3394–$3402
Liquidity Grab: Sweep below $3411 (old low) before reversal signals smart money accumulation.
Premium/Discount Zone: Current price is above 50% of last impulse → In premium zone (better to look for sells here until retracement).
Key Zones (Interaction Points)
Buy Zone Cluster (Discount Price)
Zone A (OB + 61.8% + Liquidity Pool) → $3385–$3402
Zone B (Imbalance + Fib 50%) → $3408–$3415
Sell Zone Cluster (Premium Price) – for retracements
Zone C (Last Supply + Swing Highs) → $3437–$3445
Zone D (Rejection Block + Liquidity Above) → $3455–$3462
4-Hour Bias: Bullish
We are in a bullish continuation phase. Ideal trades are buys from demand zones, aiming for new highs or liquidity sweeps above swing points.
Zoom-In: 1-Hour Chart – Trade Setups
Setup 1: Buy from Demand + OB Reaction
Entry Zone: $3394–$3402
Direction: Buy
Stop-Loss: $3384
Take Profit 1: $3430
Take Profit 2: $3445
Trigger Condition: Bullish engulfing or bullish BOS on 15-min chart after liquidity grab into the zone.
Reason: Overlap of OB, 61.8% fib, and clean liquidity pool below $3400.
Setup 2: Buy from Imbalance Tap
Entry Zone: $3408–$3415
Direction: Buy
Stop-Loss: $3398
Take Profit 1: $3432
Take Profit 2: $3440
Trigger Condition: CHoCH on 15m with FVG fill (imbalance closes with bullish follow-through).
Reason: Bullish continuation with low-risk entry within imbalance zone and close to 50% fib retracement.
Setup 3: Short from Supply Zone for Retracement
Entry Zone: $3455–$3462
Direction: Sell
Stop-Loss: $3472
Take Profit 1: $3432
Take Profit 2: $3415
Trigger Condition: Bearish engulfing or 1H CHoCH inside the zone.
Reason: Price likely to grab liquidity above highs before retracing; this is a countertrend scalp within premium pricing.
Final Takeaway:
“Stay bullish on Gold while it’s above $3394—but let price correct into demand before looking to join the trend.”
Price Action & Market Structure
Current price is at $3432.835.
The market has printed a higher high above the previous swing at ~$3425.
Last Break of Structure (BOS): Occurred to the upside at ~$3412.
Recent CHoCH (Change of Character): None yet to the downside—bullish structure still intact.
Conclusion: Bullish Market Structure is dominant.
Fibonacci Levels
Measured from the swing low at $3362 to the recent swing high at $3437:
38.2% retracement: ~$3410
50% retracement: ~$3399
61.8% retracement: ~$3388
These are our retracement zones where demand is likely to step in.
Smart Money Key Concepts
Imbalance: Clean imbalance exists between $3408–$3415.
Bullish Order Block (OB): 4H candle at $3394–$3402
Liquidity Grab: Sweep below $3411 (old low) before reversal signals smart money accumulation.
Premium/Discount Zone: Current price is above 50% of last impulse → In premium zone (better to look for sells here until retracement).
Key Zones (Interaction Points)
Buy Zone Cluster (Discount Price)
Zone A (OB + 61.8% + Liquidity Pool) → $3385–$3402
Zone B (Imbalance + Fib 50%) → $3408–$3415
Sell Zone Cluster (Premium Price) – for retracements
Zone C (Last Supply + Swing Highs) → $3437–$3445
Zone D (Rejection Block + Liquidity Above) → $3455–$3462
4-Hour Bias: Bullish
We are in a bullish continuation phase. Ideal trades are buys from demand zones, aiming for new highs or liquidity sweeps above swing points.
Zoom-In: 1-Hour Chart – Trade Setups
Setup 1: Buy from Demand + OB Reaction
Entry Zone: $3394–$3402
Direction: Buy
Stop-Loss: $3384
Take Profit 1: $3430
Take Profit 2: $3445
Trigger Condition: Bullish engulfing or bullish BOS on 15-min chart after liquidity grab into the zone.
Reason: Overlap of OB, 61.8% fib, and clean liquidity pool below $3400.
Setup 2: Buy from Imbalance Tap
Entry Zone: $3408–$3415
Direction: Buy
Stop-Loss: $3398
Take Profit 1: $3432
Take Profit 2: $3440
Trigger Condition: CHoCH on 15m with FVG fill (imbalance closes with bullish follow-through).
Reason: Bullish continuation with low-risk entry within imbalance zone and close to 50% fib retracement.
Setup 3: Short from Supply Zone for Retracement
Entry Zone: $3455–$3462
Direction: Sell
Stop-Loss: $3472
Take Profit 1: $3432
Take Profit 2: $3415
Trigger Condition: Bearish engulfing or 1H CHoCH inside the zone.
Reason: Price likely to grab liquidity above highs before retracing; this is a countertrend scalp within premium pricing.
Final Takeaway:
“Stay bullish on Gold while it’s above $3394—but let price correct into demand before looking to join the trend.”
Note
Contact me to Join our group for free gold trading ideas on daily basisWatsapp Contact +971559939571
Disclaimer
The information and publications are not meant to be, and do not constitute, financial, investment, trading, or other types of advice or recommendations supplied or endorsed by TradingView. Read more in the Terms of Use.
Disclaimer
The information and publications are not meant to be, and do not constitute, financial, investment, trading, or other types of advice or recommendations supplied or endorsed by TradingView. Read more in the Terms of Use.