🧠 THE REAL GAME – GOLD EDITION (XAUUSD)
This isn’t just a chart — it’s a decoded battlefield between smart money and emotional retail flow.
Every candle you see is backed by narrative and intent — this is not a TA guessing game; it’s Trap Warfare:
⸻
🔍 🎯 Map Breakdown:
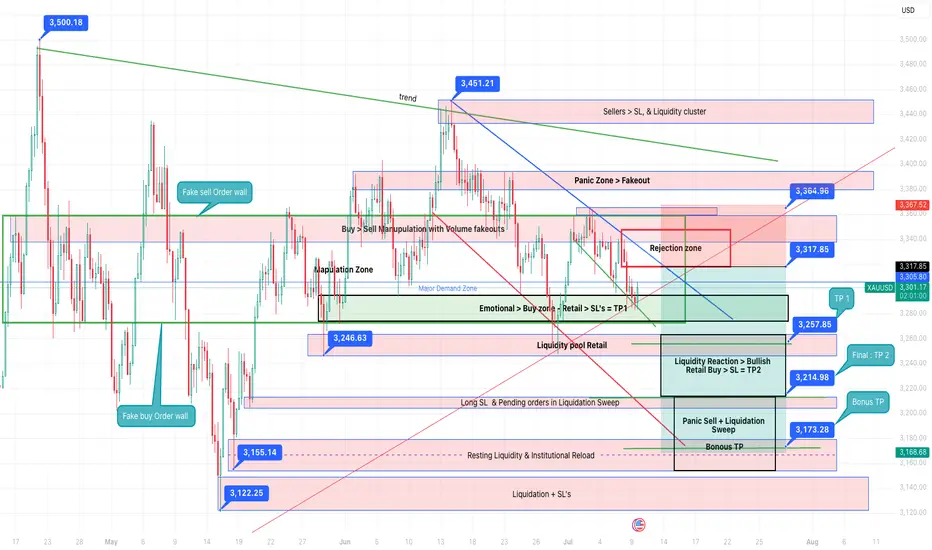
1. Liquidity Engineering (Topside):
• 3,364.96 – 3,317.85:
Red zone = Trap Confirmation
Designed as a Retail Long Trigger Zone, disguised as breakout.
• Fake Buy Orders fill
• Retail gets euphoric
• Sellers slam — High RR trap mechanics
• Also doubles as Rejection Zone from previous LH
2. Volume-Free Manipulation Zone:
• “Buy > Sell Manipulation with Volume Fakeouts”
• Emotional entries happen here
• Volumes intentionally low to mislead momentum traders
• Fake Sell Order Wall at top, Fake Buy Order Wall below — both psychological
3. Major Demand Zone (3,246 – 3,257):
• Emotional buyers enter
• SL clustering occurs
• TP1 sits here for shorts
• Smart money fakes support to trap longs before sweeping it again
⸻
💣 3 TP Structure Breakdown:
• TP1 (3,257.85) – Emotional Buy Reaction + First Liquidity Pool
• TP2 (3,214.98) – Liquidity Reaction, Retail SL Triggered
• Bonus TP (3,173.28) – Deep Sweep Zone + Institutional Reload Area
Only valid if Panic Sell Candle + Spread Widening
⸻
🧨 Smart Money Logic Built In:
• Trendline Respect = False Confidence
• Retail SL + Pending Orders = Mapped & Manipulated
• Rejection Zone = Confirmed Burn Trap
• Resting Liquidity Below = Magnet for market makers
This isn’t just a chart — it’s a decoded battlefield between smart money and emotional retail flow.
Every candle you see is backed by narrative and intent — this is not a TA guessing game; it’s Trap Warfare:
⸻
🔍 🎯 Map Breakdown:
1. Liquidity Engineering (Topside):
• 3,364.96 – 3,317.85:
Red zone = Trap Confirmation
Designed as a Retail Long Trigger Zone, disguised as breakout.
• Fake Buy Orders fill
• Retail gets euphoric
• Sellers slam — High RR trap mechanics
• Also doubles as Rejection Zone from previous LH
2. Volume-Free Manipulation Zone:
• “Buy > Sell Manipulation with Volume Fakeouts”
• Emotional entries happen here
• Volumes intentionally low to mislead momentum traders
• Fake Sell Order Wall at top, Fake Buy Order Wall below — both psychological
3. Major Demand Zone (3,246 – 3,257):
• Emotional buyers enter
• SL clustering occurs
• TP1 sits here for shorts
• Smart money fakes support to trap longs before sweeping it again
⸻
💣 3 TP Structure Breakdown:
• TP1 (3,257.85) – Emotional Buy Reaction + First Liquidity Pool
• TP2 (3,214.98) – Liquidity Reaction, Retail SL Triggered
• Bonus TP (3,173.28) – Deep Sweep Zone + Institutional Reload Area
Only valid if Panic Sell Candle + Spread Widening
⸻
🧨 Smart Money Logic Built In:
• Trendline Respect = False Confidence
• Retail SL + Pending Orders = Mapped & Manipulated
• Rejection Zone = Confirmed Burn Trap
• Resting Liquidity Below = Magnet for market makers
Disclaimer
The information and publications are not meant to be, and do not constitute, financial, investment, trading, or other types of advice or recommendations supplied or endorsed by TradingView. Read more in the Terms of Use.
Disclaimer
The information and publications are not meant to be, and do not constitute, financial, investment, trading, or other types of advice or recommendations supplied or endorsed by TradingView. Read more in the Terms of Use.