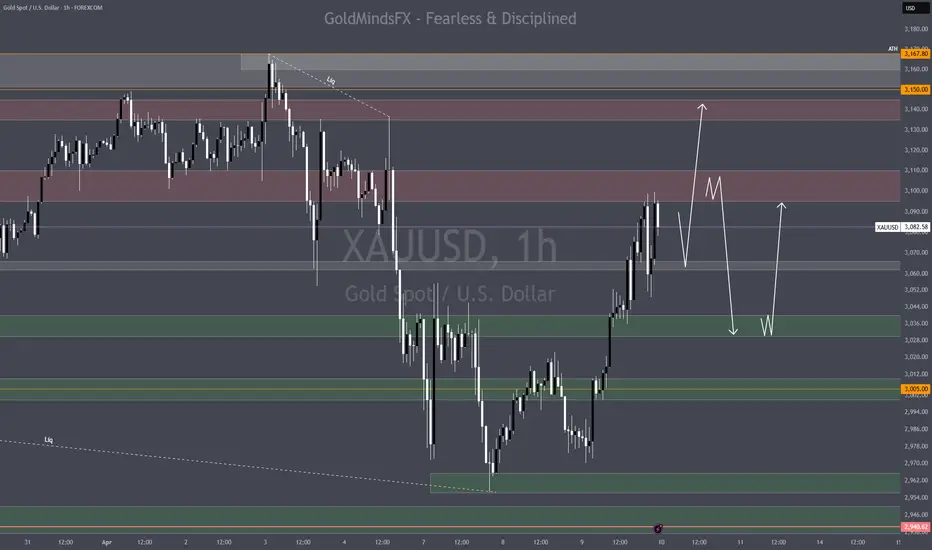
Currently, Gold is at 3082, with a mix of uncertainty ahead of tomorrow's CPI release. The market is in a wait-and-see mode as traders position ahead of the data, which could drive volatility. With the macro context in mind, we’ll be focusing on key support and resistance levels, aiming to capture price action based on SMC &more.
🔻 Sell Zone #1 – Intraday Fade
📍 Sell (confirmation only): 3,095 – 3,108
📉 SL: 3,110
🎯 TP1: 3,080
🎯 TP2: 3,060
🎯 TP3: 3,040
⚠️ Tip: Move SL to breakeven when TP1 hits fast
🔺 Sell Zone #2 – Double Tap and Dump
📍 Entry: 3,125 – 3,139 (Ideal: 3,135 – 3,139)
📉 SL: 3,145
🎯 TP1: 3,105
🎯 TP2: 3,080
🎯 TP3: 3,055
⚠️ Tip: Use only with clear rejection (M5/M15 M-pattern or bearish engulfing)
🟢 Buy Scenario 1 – “Reclaim Retest”
📍 Entry: 3,066 – 3,068.50
📉 SL: 3,062
🎯 TP1: 3,089
🎯 TP2: 3,113
🎯 TP3: 3,127
🧠 Trigger: M1/M5 CHoCH or Bullish Engulfing
📌 Confluence: M5 Order Block + Fair Value Gap (Discount Zone)
🟩 Buy Zone – Deep Value Pullback (Fresh Setup)
📍 Entry: 3,035 – 3,040
📉 SL: 3,025
🎯 TP1: 3,080
🎯 TP2: 3,095
🎯 TP3: 3,110
⚠️ Tip: Wait for strong bullish reaction (M5/M15)
📌 Important Notice!!!
The above analysis is for educational purposes only and does not constitute financial advice. Always compare with your plan and wait for confirmation before taking action.
📣 If this strategy sparked clarity, hit that like button and follow. 💛
Trade active
🔺 Sell Zone #2 – TRADE ACTIVE - CONFIRMATION ENTRY AREA 3132-3125 - 200+ PIPS✅📍 Entry: 3,125 – 3,139 (Ideal: 3,135 – 3,139)
📉 SL: 3,145
🎯 TP1: 3,105
🎯 TP2: 3,080
🎯 TP3: 3,055
⚠️ Tip: Use only with clear rejection (M5/M15 M-pattern or bearish engulfing)
Telegram t.me/GoldMindsFX_AI ⭐
⭐VIP ACCESS & Mentorship XAUUSD⭐
t.me/GoldMindsFX_A
Daily Sniper Plans| Elite Setups|Education step by step and personal guidance.
⭐VIP ACCESS & Mentorship XAUUSD⭐
t.me/GoldMindsFX_A
Daily Sniper Plans| Elite Setups|Education step by step and personal guidance.
Disclaimer
The information and publications are not meant to be, and do not constitute, financial, investment, trading, or other types of advice or recommendations supplied or endorsed by TradingView. Read more in the Terms of Use.
