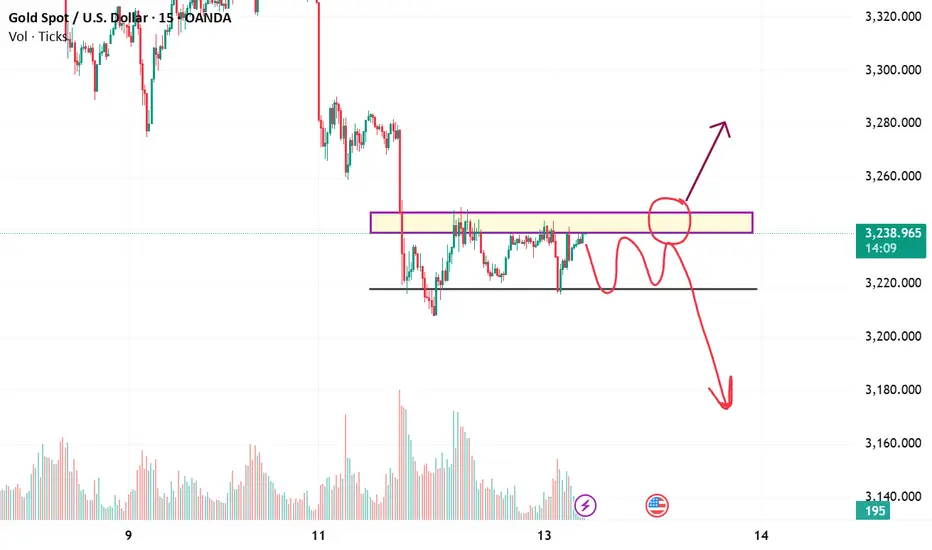
This chart captures a consolidation phase forming between two critical levels:
🔑 Key Zones:
Resistance Zone: ~$3,240–$3,245
This zone has acted as a ceiling where price repeatedly rejected. It's a liquidity cluster and decision area for bulls and bears.
Support Zone: ~$3,223–$3,225
Well-respected bottom of the range. Every touch here sees a reaction, signaling that buyers defend this zone for now.
🔄 Market Structure:
Sideways/Range-bound between $3,225 and $3,245.
Price is consolidating after a sharp move down.
Multiple failed breakouts, indicating indecision before news/events.
🔀 Scenarios:
✅ Bullish Breakout Setup:
Break and retest above $3,245 with strong volume could lead to a move toward:
First target: $3,260–$3,270
Extended target: $3,300 (previous structure)
Trigger confirmation: Break of highs at ~$3,245 with candle body close above.
🚨 Bearish Breakdown Setup:
Failure to break the purple zone + breakdown of support at $3,223 may open:
Immediate target: $3,200
Extended target: $3,180–$3,160 range
Trigger confirmation: Break and candle close below $3,223 with spike in volume.
🔄 Neutral/Bounce Range Trading:
Until a breakout, this is a mean-reversion range. Trades between $3,225 and $3,245 can be scalped with tight stops.
📊 Volume & Price Behavior:
Volume is decreasing slightly within the range → suggesting buildup before a news-related breakout.
Large move likely after breakout from this compression.
Related publications
Disclaimer
The information and publications are not meant to be, and do not constitute, financial, investment, trading, or other types of advice or recommendations supplied or endorsed by TradingView. Read more in the Terms of Use.
Related publications
Disclaimer
The information and publications are not meant to be, and do not constitute, financial, investment, trading, or other types of advice or recommendations supplied or endorsed by TradingView. Read more in the Terms of Use.