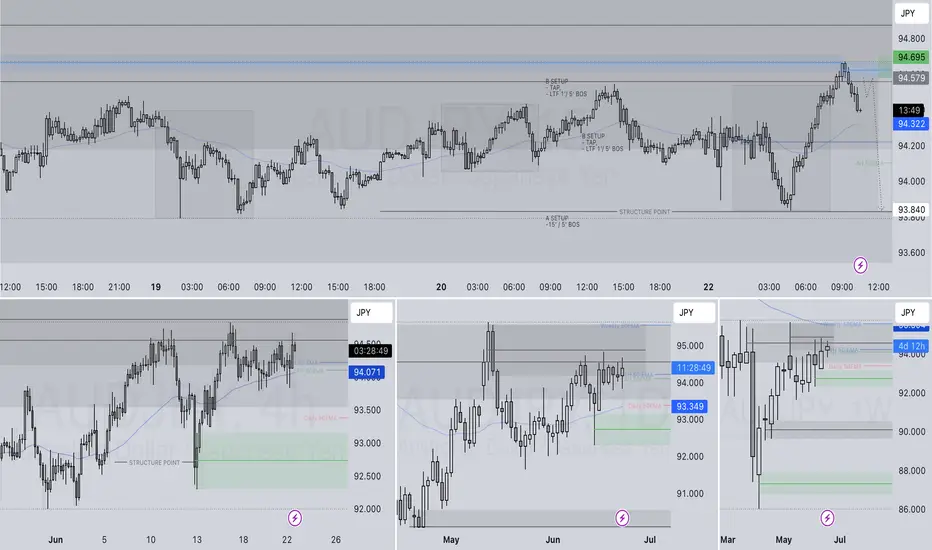
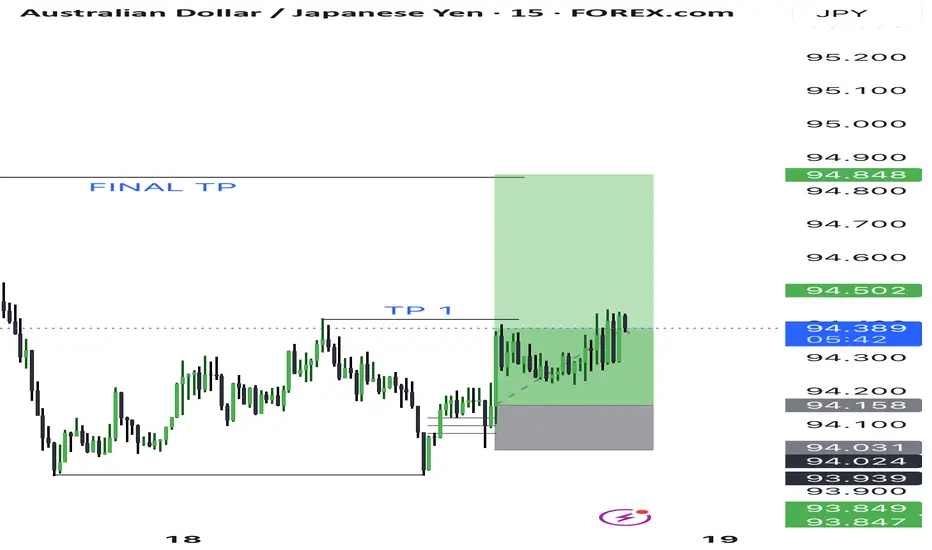
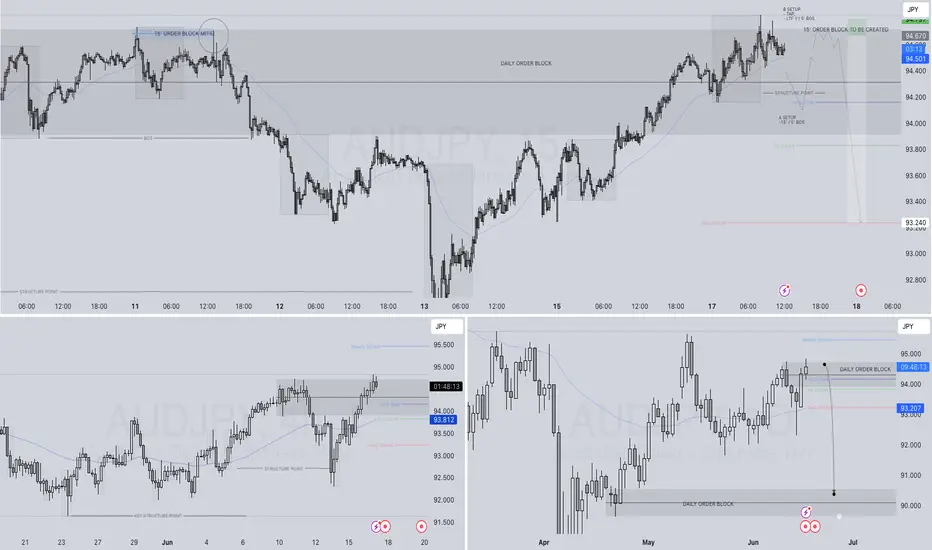
AUDJPY SHORT FORECAST Q2 W26 D24 Y25AUDJPY SHORT FORECAST Q2 W26 D24 Y25
Professional Risk Managers👋
Welcome back to another FRGNT chart update📈
Diving into some Forex setups using predominantly higher time frame order blocks alongside confirmation breaks of structure.
Let’s see what price action is telling us today! 👀
💡Here are some trade confluences📝
✅Weekly Order Block Identified
✅Daily Order block identified
✅4H Order Block identified
✅15' Order block identified
🔑 Remember, to participate in trading comes always with a degree of risk, therefore as professional risk managers it remains vital that we stick to our risk management plan as well as our trading strategies.
📈The rest, we leave to the balance of probabilities.
💡Fail to plan. Plan to fail.
🏆It has always been that simple.
❤️Good luck with your trading journey, I shall see you at the very top.
🎯Trade consistent, FRGNT X
AUDJPY trade ideas
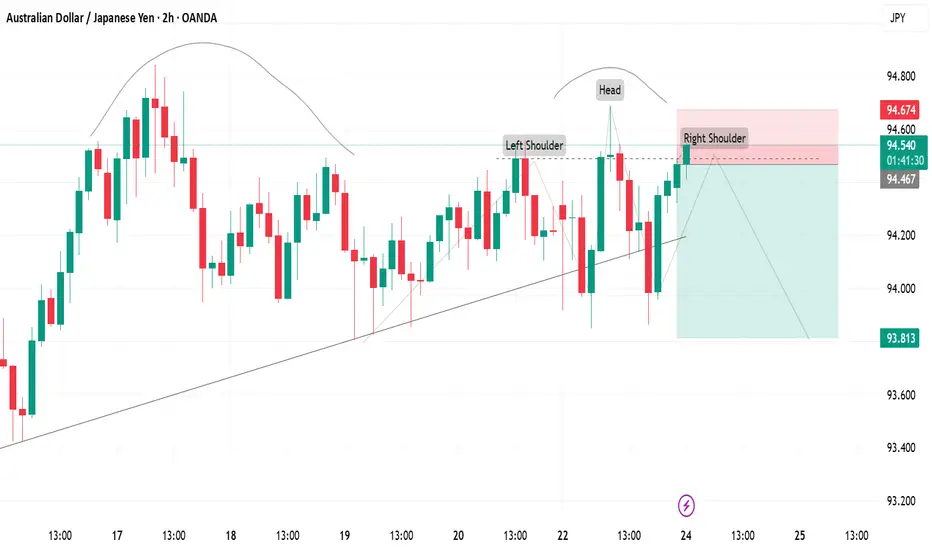
SELL AUDJPYSELL AUDJPY. Followed price up this rising trend line to the edge where price created a head and shoulders pattern.
Sell 94,5
TP 93,986 & 93,864
Structure Pattern: Cup and Handle (inverted)
Entry Model: Head and Shoulders
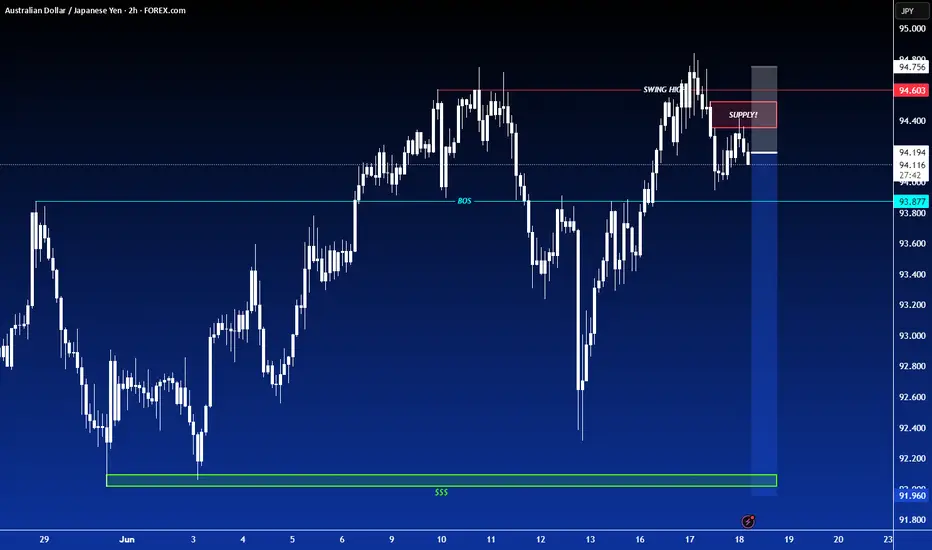
AUDJPY - Potential Short at the upper supply liquidity levelLooking for the potential short, only valid with bearish PA around the upper supply level, ideally sweeping the upper level of liquidity around 94.400-94.405. Bearish PA then bring this trade down.

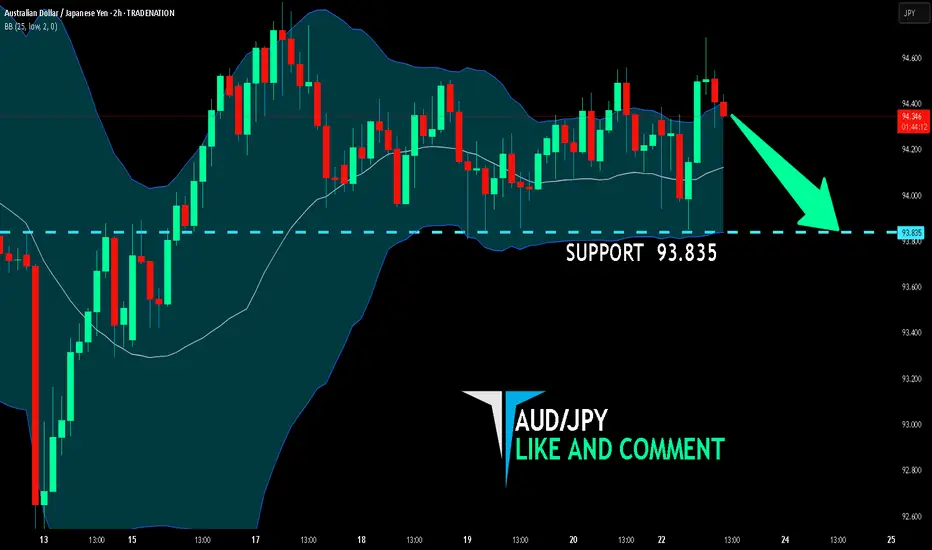
AUD/JPY SENDS CLEAR BEARISH SIGNALS|SHORT
Hello, Friends!
Previous week’s green candle means that for us the AUD/JPY pair is in the uptrend. And the current movement leg was also up but the resistance line will be hit soon and upper BB band proximity will signal an overbought condition so we will go for a counter-trend short trade with the target being at 93.835.
Disclosure: I am part of Trade Nation's Influencer program and receive a monthly fee for using their TradingView charts in my analysis.
✅LIKE AND COMMENT MY IDEAS✅
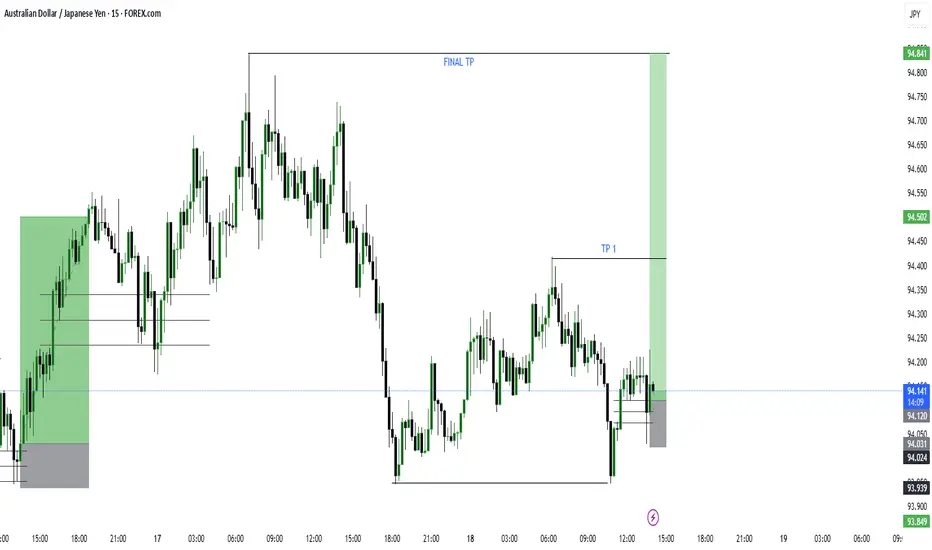
AUDJPY SHORT FORECAST Q2 W26 D23 Y25AUDJPY SHORT FORECAST Q2 W26 D23 Y25
Professional Risk Managers👋
Welcome back to another FRGNT chart update📈
Diving into some Forex setups using predominantly higher time frame order blocks alongside confirmation breaks of structure.
Let’s see what price action is telling us today! 👀
💡Here are some trade confluences📝
✅Weekly Order Block Identified
✅Daily Order block identified
✅4H Order Block identified
✅15' Order block identified
🔑 Remember, to participate in trading comes always with a degree of risk, therefore as professional risk managers it remains vital that we stick to our risk management plan as well as our trading strategies.
📈The rest, we leave to the balance of probabilities.
💡Fail to plan. Plan to fail.
🏆It has always been that simple.
❤️Good luck with your trading journey, I shall see you at the very top.
🎯Trade consistent, FRGNT X
Trendline BreakThe price has been correcting within a trendline and now the price has broken the trendline and made a pullback, if the price makes a higher high, we will see an impulse to the upside
WE ONLY TRADE PULLBACKS
AUDJPY daily/ weekly cp wow 📈 AUDJPY Swing Trade Setup
🔹 Buy Limit: At Weekly/Daily Demand Zone
🔹 Bias: Bullish (COT-supported)
🔹 Reason:
Price is sitting inside a key weekly/daily demand zone, offering a strong long opportunity.
COT report shows commercials (smart money) are net long AUD and speculators are net short, indicating potential for a reversal or continued upside.
Aligns with the Set & Forget swing strategy — no confirmation needed.
📊 Structure supports a clean risk-to-reward setup with confluence from both technicals and sentiment.
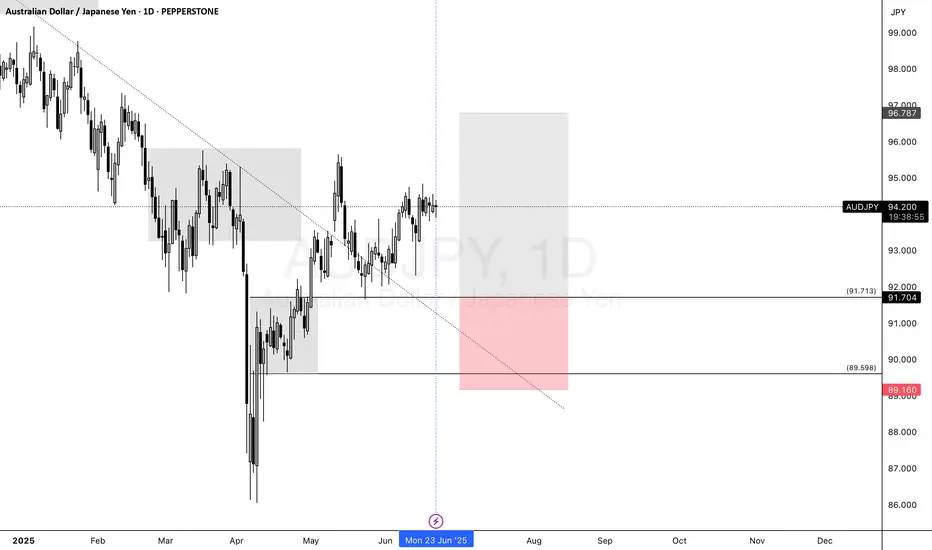
AUD/JPY Short Trade Plan Options
✅ Standard Entry
Sell Limit: 94.80
Stop Loss: 96.10
Take Profit 1: 90.00
Take Profit 2: 85.00
Why: Clean entry inside rejection zone, just under multi-decade resistance. Gives room for price to wick higher without being stopped prematurely.
🛡️ Conservative Entry
Sell Limit: 95.20
Stop Loss: 96.30
Take Profit 1: 90.00
Take Profit 2: 85.00
Why: Waits for deeper retracement into top of range. Better R:R, but may not trigger if price weakens early in the week.
🔐 Optional Manual Confirmation Strategy
Watch for a bearish daily candle (pin bar, engulfing) inside 94.50–95.50
Enter at close of that candle with stop above candle high
Gives added confirmation but may reduce reward slightly
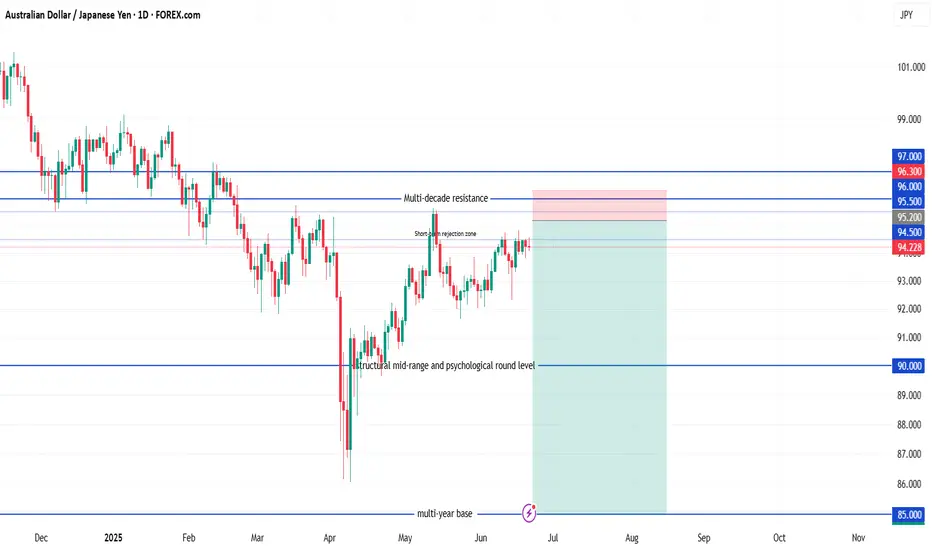
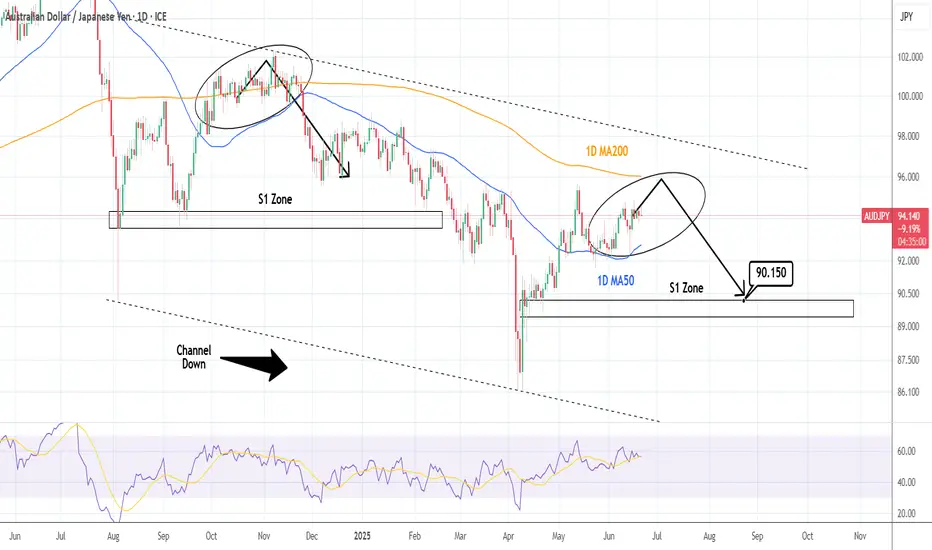
AUDJPY: Sell opportunity.AUDJPY is basically neutral on its 1D technical outlook (RSI = 56.422, MACD = 0.430, ADX = 19.989), ranging inside the 1D MA200 and 1D MA50 since the start of May. The last bullish wave top of the Channel Down got rejected around those levels and targeted the S1 Zone. Short, TP = 90.150.
## If you like our free content follow our profile to get more daily ideas. ##
## Comments and likes are greatly appreciated. ##
AUDJPY SHORT FORECAST Q2 W25 D20 Y25AUDJPY SHORT FORECAST Q2 W25 D20 Y25
Professional Risk Managers👋
Welcome back to another FRGNT chart update📈
Diving into some Forex setups using predominantly higher time frame order blocks alongside confirmation breaks of structure.
Let’s see what price action is telling us today! 👀
💡Here are some trade confluences📝
✅Weekly Order block rejection
✅15' Order block to be confirmed
✅4H Order block
✅1H Order block
🔑 Remember, to participate in trading comes always with a degree of risk, therefore as professional risk managers it remains vital that we stick to our risk management plan as well as our trading strategies.
📈The rest, we leave to the balance of probabilities.
💡Fail to plan. Plan to fail.
🏆It has always been that simple.
❤️Good luck with your trading journey, I shall see you at the very top.
🎯Trade consistent, FRGNT X
AUD_JPY GROWTH AHEAD|LONG|
✅AUD_JPY has retested a key support level of 93.800
And as the pair is already making a bullish rebound
A move up to retest the supply level above at 94.600 is likely
LONG🚀
✅Like and subscribe to never miss a new idea!✅
Disclosure: I am part of Trade Nation's Influencer program and receive a monthly fee for using their TradingView charts in my analysis.
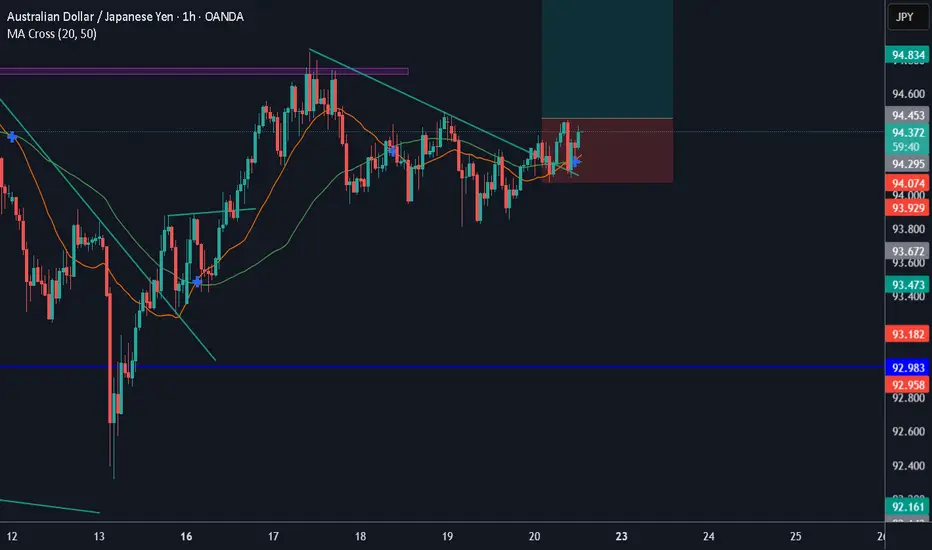
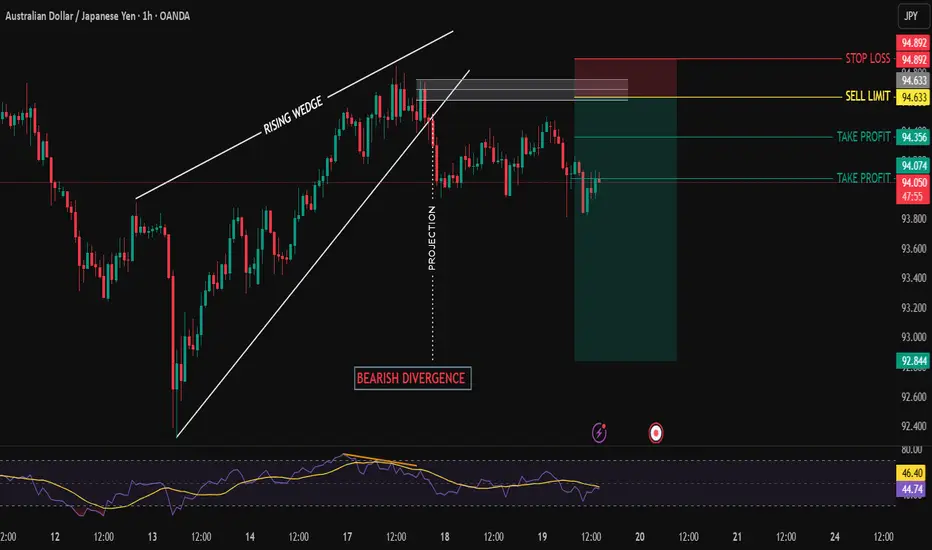
AUDJPY BEARSH SETUPAUDJPY bearish trend start.
At rsi bearish divergence and also reversal pattern rising wedge formed, also HL already break.
My entry was missed with sell stop order.
I was expecting price go up this fib level then go down.
Manage your trade accordingly.
Markets in Motion: Fed, Geopolitics, and the Next Big Move This week’s midweek market review dives into the critical catalysts shaking global markets—just ahead of the pivotal FOMC decision.
📉 Is the U.S. dollar heading for a deeper slide?
🏆 Will gold break past its all-time highs again?
₿ Can Bitcoin sustain momentum amid geopolitical risk and Fed uncertainty?
We unpack:
Key economic data driving DXY
Gold’s safe-haven surge and central bank demand
Bitcoin’s resilience, ETF flows, and macro headwinds
Geopolitical flashpoints in the Middle East and their market implications
Stay ahead of the curve with real-time insights to help you navigate the markets confidently into the weekend and beyond.
🔔 Don’t forget to like, subscribe, and hit the bell to stay updated with our weekly outlooks!

SHORT ON AUD/JPYAUD/JPY has given us a choc (change of character) from up to down at a major resistance zone.
I will be selling AUD/JPY to the next demand level looking to catch 100-200 pips
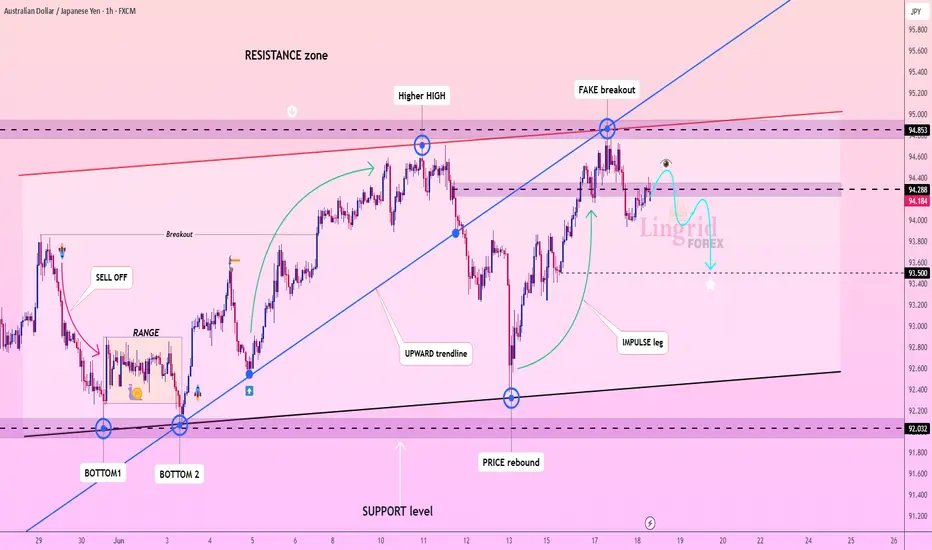
Lingrid | AUDJPY Short-Term Bearish Move from ResistanceFX:AUDJPY posted a strong rally to a new Higher High, but the recent breakout above resistance at 94.85 proved to be false, with price pulling back beneath the resistance zone. The pair is now consolidating just below this level, showing early signs of potential weakness. A confirmed rejection and breakdown below 94.20 would reinforce the bearish case for a move back toward 93.50.
📈 Key Levels
Buy zone: 93.50–93.70
Sell trigger: loss of 94.00–94.20 support
Target: 93.50
Buy trigger: strong reclaim of 94.85 resistance
💡 Risks
Re-entry above the broken resistance could revive bullish momentum
Price structure remains within a broader uptrend unless 93.50 breaks
Lower volatility could limit short-term follow-through
Traders, if you liked this idea or if you have your own opinion about it, write in the comments. I will be glad 👩💻
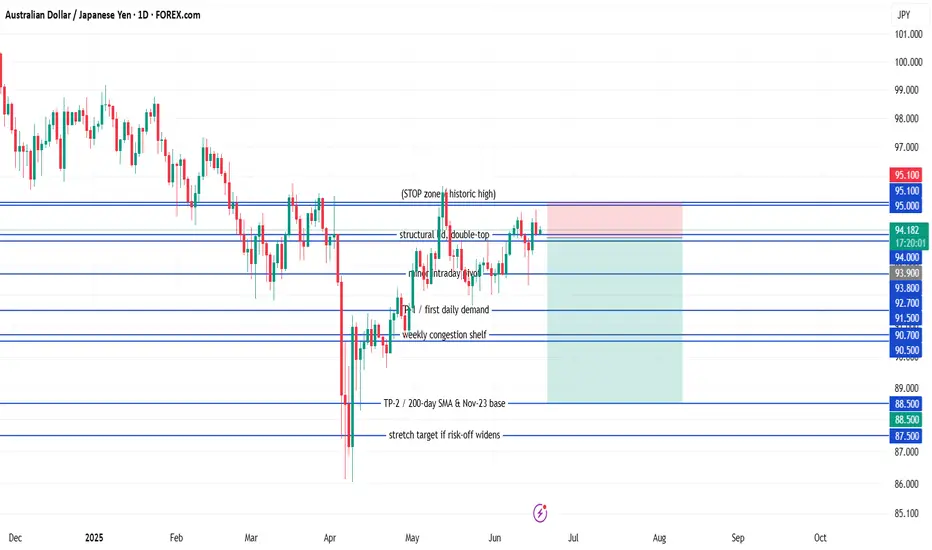
AUD/JPY ShortSell-limit (primary) 93.90 — front-runs the twin highs at 94.00 (May and again last week).
Stop-loss 95.10 — just above the 2024 YTD peak and round-number 95; if price closes above, the breakout is real.
Take-profit 1 91.50 — first daily support shelf; locks ~240 pips (≈ 1.6 R) and is often the first bounce zone.
Take-profit 2 88.50 — November-2023 base / 200-day SMA; full mean-reversion target (~540 pips, ≈ 3.6 R).
Filter to keep order Only leave the order active while the daily candle closes ≥ 93.80 (shows the lid is still respected).
GTC Cancel the order if unfilled after 5 trading days; reassess next week.
Quick rationale
Fundamentals: RBA leaning dovish; JPY could firm on BoJ hawkish hints & intervention risk.
Technical: Double-top near 94; bearish RSI divergence on daily; room down to 91s/88s.
Risk-reward: 120-pip risk vs. 240 / 540-pip reward = 1.6 R and 3.6 R pay-offs.
Place the limit, set the filter alert on daily closes, and let the trade come to you—no need to babysit intraday moves.
AUDJPY 4H Short Setup📕 Smart Money Trade Breakdown
🔻 AUDJPY 4H Short Setup
This is a short entry on AUDJPY, taken from a premium price zone within an Order Block (O-B) and Supply & Demand (S&D) area, showing strong bearish rejection after internal market structure shift.
📉 Entry: 94.096
🎯 Take Profit: 90.136
🛡️ Stop Loss: 95.399
⚖️ Risk-Reward Ratio: ~1:3
🔍 Key Confluences:
Entry within a well-defined Order Block and S&D zone
Price reacted to upper supply with a visible wick rejection
Break of internal structure (M15-H1) shows bearish intent
Bearish engulfing on confirmation candle
Trendline break suggests end of bullish wave
This setup aims to catch the institutional distribution phase before price retraces to discount demand around the 90.100 zone or lower.
⚠️ Disclaimer: This is for educational purposes. Apply proper risk management and strategy validation before live execution.
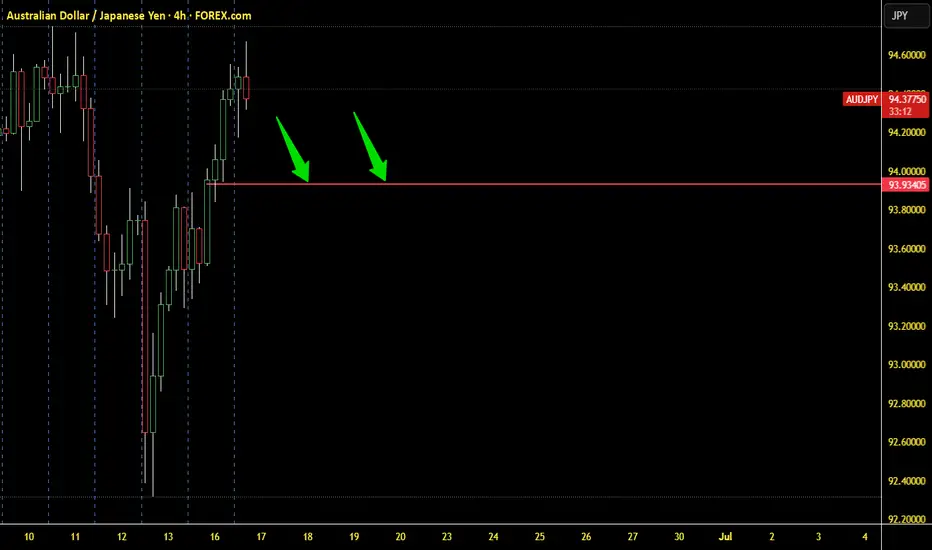
AUDJPY SELL SIGNAL – GLOBAL HORNS🦘 AUDJPY SELL SIGNAL – GLOBAL HORNS
🕰️ Timeframe: 4H
📉 Direction: SELL
📍 Entry: 94.40 (active)
🎯 Target: 93.94
⏳ Duration: usually within a few days max
📊 Context:
Price surged into a key reaction zone and is now stalling. I'm looking for a short-term pullback to the 93.94 area, which aligns with recent structural retests (see arrows). Trade is already active.
📌 No stop loss — this is managed by time and price behavior. If target isn't hit by the window, I’m out.
🧠 As always, this is not financial advice. Just showing what I’m doing.
#GlobalHorns #AUDJPY #Forex
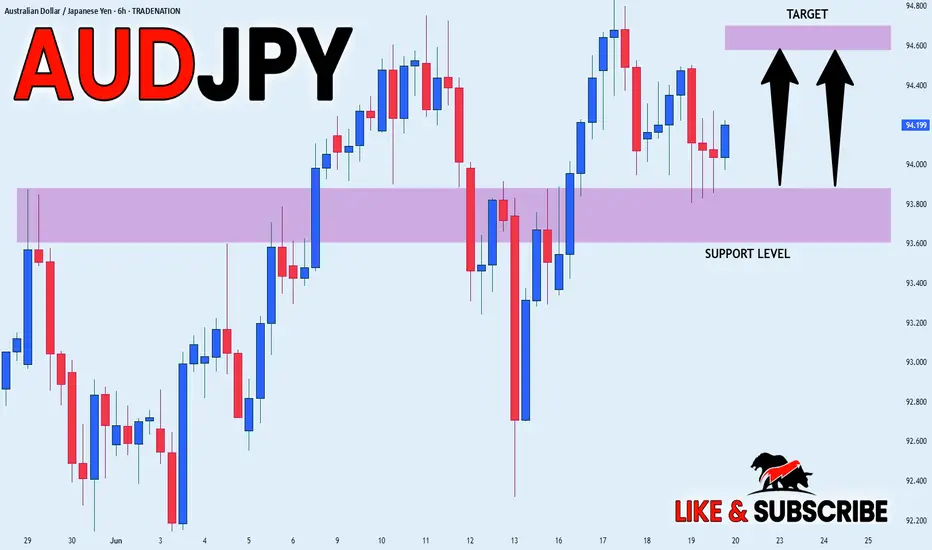
AUDJPY Will Go Higher! Buy!
Here is our detailed technical review for AUDJPY.
Time Frame: 6h
Current Trend: Bullish
Sentiment: Oversold (based on 7-period RSI)
Forecast: Bullish
The market is approaching a significant support area 94.496.
The underlined horizontal cluster clearly indicates a highly probable bullish movement with target 95.595 level.
P.S
The term oversold refers to a condition where an asset has traded lower in price and has the potential for a price bounce.
Overbought refers to market scenarios where the instrument is traded considerably higher than its fair value. Overvaluation is caused by market sentiments when there is positive news.
Disclosure: I am part of Trade Nation's Influencer program and receive a monthly fee for using their TradingView charts in my analysis.
Like and subscribe and comment my ideas if you enjoy them!

AUDJPY SHORT FORECAST Q2 W25 D17 Y25AUDJPY SHORT FORECAST Q2 W25 D17 Y25
Professional Risk Managers👋
Welcome back to another FRGNT chart update📈
Diving into some Forex setups using predominantly higher time frame order blocks alongside confirmation breaks of structure.
Let’s see what price action is telling us today! 👀
💡Here are some trade confluences📝
✅Weekly Order block rejection
✅15' Order block
✅Daily order block identified
🔑 Remember, to participate in trading comes always with a degree of risk, therefore as professional risk managers it remains vital that we stick to our risk management plan as well as our trading strategies.
📈The rest, we leave to the balance of probabilities.
💡Fail to plan. Plan to fail.
🏆It has always been that simple.
❤️Good luck with your trading journey, I shall see you at the very top.
🎯Trade consistent, FRGNT X
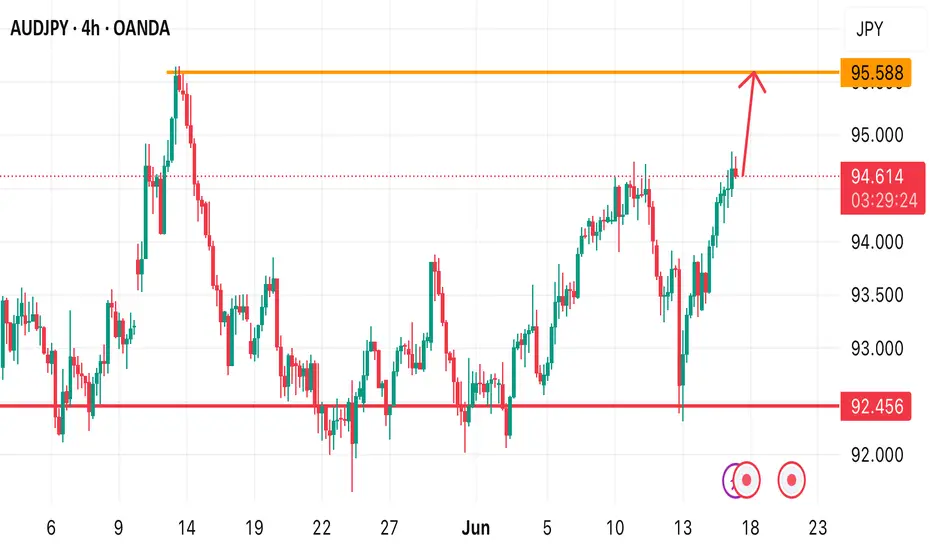
AUDJPY BUY OPPORTUNITY Price is on a strong impulsive move. I anticipate a continuous momentum shift to the upside. A buy opportunity is envisaged from the current market price. Our target profit is at 95.588 ( a pullback resistance)
Take advantage of this opportunity!