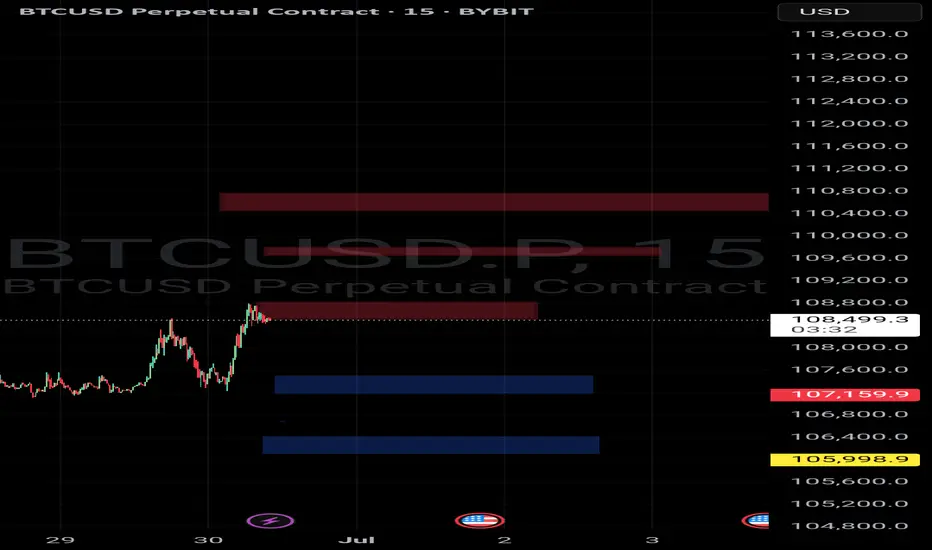
### 🔴 **Bearish Order Blocks (Resistance Zones)**:
These are likely areas where price previously faced selling pressure and may again.
1. **Zone 1 (Lowest Red OB)**
📍 Range: \~108,300 – 108,800
🔹 Price is currently reacting at this zone.
🔹 If price fails to break and close above this zone with volume, expect a short-term rejection.
2. **Zone 2**
📍 Range: \~109,65,0 – 110,000
🔹 If price breaks above Zone 1, this becomes the next target/resistance.
3. **Zone 3 (Highest Red OB)**
📍 Range: \~110,500 – 111,500
🔹 Strongest resistance in this chart. If price reaches here, high chance of reversal unless strong momentum continues.
---
### 🔵 **Bullish Order Blocks (Support Zones)**:
These are previous demand areas where buyers stepped in.
1. **Zone 1 (Highest Blue OB)**
📍 Range: \~106,900 – 107,600
🔹 Closest support below current price. If price retraces, it may bounce from here.
🔹 Good area for long entries if price gives bullish confirmation.
2. **Zone 2**
📍 Range: \~105,800 – 106,500
🔹 Stronger support zone; last defense before potential further downside.
🔹 Matches with yellow price marker (105,998.9), possibly a key liquidity level.
---
### 🧠 **Trade Idea Suggestion** (Based on your OB strategy):
#### ✅ **Bullish Scenario**:
* Break & close above 108,800 (top of current red OB) with volume → Look for retest to go **long**.
Trade closed: target reached
Target reached
Told you just play my boxes thats it
Note
Full tp hit
Easy 4.2r
Just follow my boxes and print
Join premium for 1-5k challenge
Note
Dropped from the first sell zone and hit full tp
Now again pumped toward 2nd upper red zone and dropped again
THIS WAS IN THE SYSTEM BRO !!
Disclaimer
The information and publications are not meant to be, and do not constitute, financial, investment, trading, or other types of advice or recommendations supplied or endorsed by TradingView. Read more in the Terms of Use.
Disclaimer
The information and publications are not meant to be, and do not constitute, financial, investment, trading, or other types of advice or recommendations supplied or endorsed by TradingView. Read more in the Terms of Use.