How I Use Multi Timeframe Analysis to Capture LARGE Price SwingsDISCLAIMER: This is not trade advice. Trading involves real risk. Do your own due diligence.
TUTORIAL:
Today, I demonstrate the thought process and mechanical steps I take when trading my Multi-Timeframe strategy. We take a look at US Treasuries, which have offers a classic lesson in how to apply this approach.
As you will see, throughout the year, this approach took some losses prior to getting involved in the "real" move which we anticipated. No strategy is perfect, and I do not purport this to be perfect. It is a rules based and effective way to read price. This strategy is great for people who don't have a lot of time to spend at the charts. I would classify this more as an "investing" strategy when utilizing the 12M-2W-12H timeframe.
If you have questions about anything in this video, feel free to shoot me a message.
I hope you have all had a great week so far.
Good Luck & Good Trading.
Multiple Time Frame Analysis

Catch Big Market Moves: How to Trade Liquidity Zones Like a Pro The charts provided showcase potential scenarios based on different liquidity zones (LQZ) on multiple timeframes, such as 15M, 1H, and 4H. Let's break down the key insights from the images:
Key Levels:
Weekly Flag Trendline: This yellow trendline represents the long-term trend and acts as a major resistance or support. It’s crucial to monitor price action around this level for significant moves.
4HR LQZ (Liquidity Zone) at 2,532.077: This level signifies an important area of liquidity on the 4-hour chart. It’s a potential reversal point or continuation area depending on how the price interacts with it.
1HR LQZ and 15M LQZ: These shorter timeframe liquidity zones are at 2,482.129 and 2,470.544 respectively. They act as interim targets or bounce zones based on the smaller trend movements.
Price Action Context:
Wedge Formation: The rising wedge pattern visible in all the charts, combined with slowing momentum near the top, suggests possible bearish pressure. Wedges often lead to sharp breakouts, so a breakout to the downside would align with the wedge structure.
Multi-Touch Confirmation: The multiple touches on trendlines, both support and resistance, increase the probability of significant movements. This concept is supported by multi-touch confirmation techniques.
Scenario Planning:
Upside Potential: A breakout above the 4HR LQZ suggests further bullish momentum, likely toward higher liquidity zones. This can result in a continuation to the upside, as shown with the green line projection on some charts.
Downside Risks: A breakdown below the wedge support and failing to hold the 15M or 1HR LQZ may lead to a bearish move toward the lower liquidity targets. The yellow line projections suggest a pullback to 2,485.055 and potentially lower.
The Trinity Rule Approach:
Confluence Setup: If price interacts with three major zones (like the 4HR LQZ, wedge support, and Weekly Flag Trendline), we can assess whether these align with other signals. This rule adds extra confirmation for higher-probability setups, as discussed in your document.
Overall, price action shows a decision point around the wedge and liquidity zones, with strong reactions expected in either direction.

Unlock Winning Strategies: Spot High-Probability Trades!Chart Analysis: XAU/USD (Gold Spot vs. USD)
Based on the two charts you have provided, here is a detailed technical analysis of XAU/USD using price action and chart pattern observations:
1. Weekly Flag Trendline (Higher Time Frame Context)
The upper and lower yellow trendlines represent a possible flag pattern on the weekly chart. This suggests a consolidation phase after a strong impulsive move. A flag pattern typically signals a continuation of the previous trend, which, if the context is bullish, indicates that after consolidation, there may be a continuation to the upside.
On both charts, we can observe that price action is contained within this broader structure, indicating that price is in a correction phase rather than an impulsive phase.
2. Key Horizontal Levels
2,532.144 and 2,506.245: These levels act as strong resistance zones. The price has struggled to break above these levels multiple times, indicating significant selling pressure or profit-taking at these points.
2,471.313: This is a key support level. The price has reacted to this level before and, most recently, has bounced back after testing this support zone. This suggests that buyers are willing to step in at this level, providing a floor for the price.
3. Descending Channel and Price Action Patterns
Descending Triangle/Channel Pattern: On the 15-minute chart, the price seems to be forming a descending triangle pattern (lower highs and a flat support at 2,471.313). This pattern is typically bearish, suggesting a potential breakdown if the support does not hold.
Potential Reversal Patterns: After testing the lower trendline of the weekly flag pattern and finding support at the 2,471.313 level, there was a notable bullish reaction. This can imply a short-term reversal, especially if confirmed by a break above the minor resistance level of 2,494.370.
4. Consolidation Zone and Lower Time Frame Patterns
The 15-minute chart shows a clear consolidation pattern after the sharp decline, with price action currently moving sideways between 2,494 and 2,506. A break above this consolidation range could signal a short-term bullish continuation towards the upper resistance levels, while a break below would imply a continuation of the bearish trend observed previously.
5. Breakout and Pullback Zones
The yellow dotted lines on the 15-minute chart indicate key areas where the price broke out from consolidation phases. These areas are crucial for identifying potential entry points in a trending market. If the price retests these zones and finds resistance or support, they could act as triggers for either continuation or reversal trades.
Trading Strategy Considerations
Bullish Bias: Traders with a bullish bias might consider waiting for a breakout above the 2,506.245 resistance, looking for a confirmation with a pullback to this level as support. The target could be the upper boundary of the flag around 2,532.144 or higher, depending on momentum and broader market conditions.
Bearish Bias: A trader with a bearish outlook might wait for the price to break below the 2,471.313 support level, looking for short positions targeting lower levels aligned with the descending channel's trajectory.
Range Trading: Given the current consolidation between 2,494.370 and 2,506.245, range traders could look for entries at the edges of this range with tight stops and defined profit targets within the range.
Conclusion
Given the price action analysis and current chart patterns, the XAU/USD market appears to be in a consolidation phase within a broader flag pattern. This suggests that while the immediate outlook may be neutral to bearish, there is potential for a bullish breakout if key resistance levels are breached. Traders should watch for confirmed breakouts or breakdowns from these levels to guide their trading decisions, keeping in mind the broader market trend and any fundamental drivers influencing gold prices.

How I Nailed a Perfect Breakout Trade Using a Simple Strategy*The following Analysis is made by my Trading BOT*
Analysis of Your Trade:
Descending Channel:
Formation and Breakout: The descending channel is well-defined, indicating a corrective phase following an impulsive move. The breakout above the channel suggests a potential reversal or continuation of the prior trend, which appears bullish.
Entry Timing: You entered the trade after the breakout from the descending channel. This entry aligns with a strategy to buy at the break of a corrective pattern, capitalizing on the resumption of bullish momentum.
Resistance Zone (Blue Area):
Initial Resistance Encounter: The blue horizontal line represents a resistance zone where price consolidated and failed to break higher on the first attempt. This is a good spot to watch for confirmation of a breakout or reversal.
False Breakouts: There are some upper wicks visible in this resistance zone, indicating possible false breakouts or liquidity grabs. This suggests that many traders might have been stopped out before the true breakout occurred.
Price Action Post-Breakout:
Sharp Move Down: After the breakout, price made a sharp move down to retest the previous resistance (now turned support), which aligns with the principles of market structure where old resistance becomes new support.
Correction and Continuation: The downward move appears corrective in nature, forming a series of lower highs and lower lows within a descending channel, after which the price breaks out and moves upwards sharply.
Risk and Reward Considerations:
Stop Placement: If your stop loss was placed below the previous swing low or the bottom of the descending channel, this would be a strategic placement to avoid being stopped out by market noise.
Take Profit: Your target seems to be well-placed, considering the previous highs or a key Fibonacci level. The green area likely represents the take-profit zone.
Volume Analysis:
Confirmation with Volume: The volume spike during the breakout from the descending channel and the subsequent move up indicates strong buying interest, which is a good confirmation signal.
Key Takeaways for Future Trades:
Pattern Recognition: Identifying descending channels and their breakouts is a strong skill that can be leveraged in various time frames.
Risk Management: Your trade shows a good understanding of risk management, especially if stops were placed beyond significant levels to avoid market noise.
Confirmation Signals: Waiting for volume confirmation during breakouts is an excellent strategy to avoid false moves.
Suggestions:
Multiple Time Frame Analysis: Ensure that your lower-time-frame trades are aligned with the higher-time-frame trends or setups to increase the probability of success.
Post-Trade Analysis: Continue reviewing your trades like this to refine your entry and exit strategies, especially around key zones like support and resistance.

Chart Patterns Within Patterns: A Guide to Nested Setups Daily Chart Analysis:
Pattern Overview:
The daily chart shows an Ascending Channel formation, which generally indicates a bullish trend but can also signal a potential reversal if the upper trendline acts as strong resistance.
Within the ascending channel, there are continuation patterns such as smaller bull flags, which suggest bullish momentum continuation.
Key Resistance and Liquidity Zone (LQZ):
The upper trendline of the ascending channel aligns closely with the recent highs around the $2,530 - $2,540 region, creating a significant resistance area.
The 1-Hour Liquidity Zone (LQZ) at $2,486.793 is marked below the current price, indicating potential areas where price might retest before any significant upward or downward move.
Potential Reversal Signal:
The upper boundary of the ascending channel has recently been tested multiple times, and each time, there has been a slight pullback, indicating selling pressure. This could be a precursor to a possible reversal if this level is not broken with conviction.
4-Hour Chart Analysis:
Nesting Patterns:
The 4-hour chart also reveals several nested patterns within the broader ascending channel, including smaller bull flags and a potential double-top pattern forming at the resistance zone.
The price action is consolidating below the resistance line at $2,530.750, creating a possible Double Top scenario, which could indicate a bearish reversal if confirmed by a breakdown below the neckline support.
Impulse and Correction Phases:
The recent impulsive moves upwards have been followed by corrective pullbacks, which have been forming higher lows, reinforcing the bullish bias in the medium term.
However, the proximity to the resistance and the potential double-top formation might signal caution for long positions.
1-Hour and 15-Minute Chart Analysis:
Short-Term Structure:
The 1-hour chart shows a more detailed view of the recent consolidation phase near the key resistance level. There are signs of weakening momentum as prices approach the upper trendline.
The 15-minute chart further shows a tightening range and potential bear flag or a descending channel, which could indicate a short-term bearish continuation if the lower trendline of this smaller pattern breaks.
Critical Levels:
The support level around $2,486.793 (1HR LQZ) is critical for intraday trading. A break below this could lead to a sharper correction towards the lower boundary of the ascending channel on the daily chart.
For bullish continuation, a clear break above the $2,530 - $2,540 resistance with strong volume would be needed to confirm further upside potential.
Trading Strategy and Recommendations:
Bullish Scenario:
Look for a strong breakout above the $2,530 - $2,540 resistance on the daily chart, accompanied by increased volume and a break above the smaller continuation patterns (flags) on the lower timeframes.
Enter on a reduced risk entry after a pullback to the breakout level, with stops placed below the recent consolidation range or the 1-Hour LQZ.
Bearish Scenario:
Watch for a confirmed Double Top breakdown on the 4-hour chart, with a clear break below the neckline support around $2,486.793.
Consider short positions on the break of the neckline or after a retest of the breakdown level, with stops placed above the recent highs or the upper boundary of the descending channel on the 15-minute chart.
Risk Management:
Given the proximity to a key resistance level and the potential for a reversal, it is crucial to manage risk carefully. Use tight stops and consider reducing position size until a clear directional move is confirmed.

XAU/USD Strategy: Pattern Recognition and Trade ExecutionComprehensive Market Breakdown for XAU/USD (Gold Spot) Based on Multi-Time Frame Analysis
Overview:
The analysis of XAU/USD across multiple time frames (15-minute, 30-minute, 1-hour, and 4-hour) indicates a complex market structure with both bullish and bearish signals. This detailed breakdown will provide insights into the current market conditions, key patterns to watch, potential trading strategies, and risk management considerations.
1. 15-Minute Time Frame: Symmetrical Triangle Pattern
Pattern Details:
Symmetrical Triangle: This pattern is characterized by converging trend lines connecting lower highs and higher lows, indicating indecision in the market.
Apex Proximity: The price is nearing the apex of the triangle, suggesting a potential breakout is imminent.
Implications:
Neutral Bias: The symmetrical triangle does not inherently suggest a bullish or bearish bias but indicates a potential breakout in either direction depending on market sentiment.
Volume Confirmation: A breakout with a significant surge in volume will confirm the direction of the move.
Trading Strategy:
Bullish Breakout: If the price breaks above the upper trendline with strong volume, consider entering long positions targeting previous resistance levels.
Bearish Breakout: Conversely, if the price breaks below the lower trendline with increased volume, consider short positions targeting previous support levels.
Stop-Loss Placement: Place stops just outside the opposite side of the breakout point to mitigate risks from false breakouts.
2. 30-Minute Time Frame: Mixed Channels (Descending and Ascending)
Patterns Observed:
Descending Channels: Suggest bearish continuation if in a downtrend or a potential reversal if broken to the upside.
Ascending Channels: Suggest bullish continuation if in an uptrend but signal a potential reversal if broken to the downside.
Market Implications:
Corrective Phase: The presence of both descending and ascending channels indicates the market is in a corrective phase, oscillating between support and resistance levels.
Range-Bound Trading: Until a significant breakout occurs, the market is likely to remain range-bound.
Trading Strategy:
Range Trading: Consider buying at the lower boundaries of the channels and selling at the upper boundaries.
Breakout Preparation: Prepare for a potential breakout by setting alerts around key levels (upper and lower boundaries of the channels).
Stop-Loss Placement: Place stops just outside the channels to protect against unexpected breakouts.
3. 1-Hour Time Frame: Rising Wedge Pattern
Pattern Details:
Rising Wedge: This pattern is characterized by higher highs and higher lows within a narrowing upward slope, typically a bearish reversal pattern.
Implications:
Bearish Reversal: The rising wedge suggests that upward momentum is weakening, and a potential breakdown could follow.
Reversal Zone: The price is near the upper boundary of the wedge, which may serve as a reversal zone, especially if a breakout to the downside occurs on high volume.
Trading Strategy:
Short Entry on Breakdown: Enter short positions if the price breaks below the lower trendline of the wedge with confirming volume.
Target Levels: Target the lower boundary of the larger ascending channel or previous support levels as take-profit points.
Stop-Loss Placement: Set stops above the most recent high within the wedge to protect against false breakouts.
4. 4-Hour Time Frame: Broader Rising Channel and Nested Patterns
Patterns Observed:
Broad Rising Channel: Indicates a larger uptrend is intact, providing a bullish bias.
Nested Descending Channels: Smaller corrective patterns within the broader uptrend suggest temporary pauses or consolidation phases before potential continuation moves.
Key Levels to Watch:
Resistance at 2,540: A break above this level would suggest a bullish continuation and potential for new highs.
Support at 2,470: A break below this level would indicate a significant shift in market sentiment towards bearishness.
Market Implications:
Potential Continuation or Reversal: The larger rising channel gives more weight to potential continuation moves, but the presence of smaller corrective patterns within suggests caution.
Echo Phase: The nested descending channel could represent an echo phase, a corrective move within the larger uptrend.
Trading Strategy:
Long Positions on Break Above 2,540: Enter long positions if the price breaks above this resistance level with confirming volume.
Short Positions on Break Below 2,470: Consider short positions if the price breaks below this support level with increased volume.
Volume Confirmation: Ensure any breakout is confirmed with a surge in volume to avoid false signals.
Risk Management: Use wider stops given the higher time frame context to avoid being stopped out by market noise.
5. Synthesis of Multi-Time Frame Analysis:
Confluence of Patterns: The alignment of rising wedges, symmetrical triangles, and mixed channels across multiple time frames suggests a market at a critical juncture. The presence of both bullish and bearish signals indicates that the market is poised for a decisive move.
Key Takeaways for Traders:
Patience and Discipline: Wait for confirmed breakouts with volume before entering trades. Do not rush into trades without sufficient confirmation.
Adaptability: Be prepared to adapt strategies based on the direction of the breakout or breakdown. Use alerts and monitor key levels closely.
Focus on Higher Time Frame Signals: Higher time frame signals carry more weight and should be given priority when making trading decisions.
Risk Management: Employ tight stops and carefully manage position sizes to limit exposure in case of adverse market movements.
6. Final Recommendations:
Potential Bullish Scenario:
Watch for a break above 2,540 on strong volume across multiple time frames. A confirmed breakout could lead to a bullish continuation towards new highs.
Potential Bearish Scenario:
Monitor for a breakdown below 2,470, especially if supported by a break of the rising wedge and descending channel patterns. A breakdown here would signal a shift to a bearish trend.
By combining these insights with real-time monitoring of market conditions, traders can enhance their decision-making process and capitalize on high-probability trade setups in the XAU/USD market.

Gap Between Understanding and Expect;Why forex traders failThis topic explores how uninformed expectations often lead to failure in Forex trading.
The internet is littered with people explaining how they lost money in Forex trading or how Forex is a scam. In your circle of friends and family, should you make the mistake of mentioning Forex trading, you are likely to get salty looks. To many, Forex trading equals failure and heartbreak.
To further emphasize the magnitude of failure in this industry, Forex brokers issue disclaimers on their websites indicating failure rates ranging from 75-90%. To put it into perspective, out of 1000 individuals who venture into Forex trading, up to 900 inevitably will fail and lose their entire capital outlay. A sad statistic indeed. I must admit, in my 10-year trading career, I have formed part of that painful statistic.
Why do we fail? I wonder? Presently, I seem to gravitate towards the belief that fundamentally, our failure is primarily driven by divergence between understanding and expectations. I posit further when we place a premium on expectations over understanding, we should prepare for rather painful results. From experience, many enter the Forex trading space driven by expectations, not understanding.
By definition, understanding is awareness. Expectation is defined as the belief that something will happen. Let me illustrate how the divergence between understanding and expectation causes failure.
Recall your childhood years watching your favorite superhero, say, superman. Watching the indestructible Superman flying around fighting bad guys was quite a motivator. Children are impressionable, therefore, it wasn't hard to find young boys mimicking Superman's behavior to the degree we thought we could fly. It was common to find boys leaping off tables and high surfaces believing and expecting they could fly. At this point, gravity, or the understanding of the effects of gravity was a foreign concept. Later on, of course, gravity was introduced to us painfully, sometimes with an accompanying injury and or beating from our mothers. I believe this reminder illustrates the outcomes when understanding and expectations are not aligned.
Back to Forex trading. If we are honest, we lose not because we seek understanding and mastery, we lose because we seek to fulfill our expectations. The promise of a lavish lifestyle, and the allure of making X % per month without struggling appeals to many. Ultimately, this leads to disastrous decisions that end in heartbreak.
How do you bridge the gap between understanding and expectations?
1. Education and continuous learning
I am in my fourth profitable year in Forex trading. What is different, my desire to consistently improve my knowledge is constant. I am always learning new things that improve my skills and edge. I am not the same trader I was six months ago.
2. Set realistic goals.
Early in my trading career, I would set goals out of desire and ignorance. Consequently, I would trade aggressively and force the markets to meet my expectations. The outcome was always disastrous. Presently, I target a 20% return annually based on experience. This target is achievable and less risky, allowing me to outlast seasons.
In conclusion, mastery is only achieved through understanding. I leave you with a verse from the Bible to reinforce the above statement, Proverbs 4: 5-9
Profitable Gold Price Action Strategy For Beginners
To trade this Gold price action strategy, you need to learn just 2 simple things:
support and resistance levels identification
a couple of bullish and bearish price action patterns.
In this article, I will share with you a complete guide for Gold trading with price action and reveal the best patterns for XAUUSD.
Step 1
Your First task will be to execute complete structure analysis on a daily time frame.
It means that you should identify all vertical and horizontal supports and resistances.
From structure supports, we will look for buying opportunities.
From structure resistances, we will look for selling the market.
Above, you can see how a complete Gold support and resistance analysis should look.
Step 2
Patiently wait for the test of one of these structures.
In the example above, we see a test of Support.
Step 3
Your next task will be to look for a price action pattern on an hourly time frame on one of these structures.
You should look for a bullish pattern after a test of a structure support.
You should look for a bearish pattern after a test of a structure resistance.
Here is the list of classic bullish patterns that you should look for:
falling wedge,
bullish flag,
double bottom,
triple bottom,
inverted head & shoulders pattern,
cup & handle,
ascending triangle.
Once you identified a bullish pattern, simply wait for a signal -
with horizontal patterns like a double bottom or cup & handle you should wait for a bullish breakout of its neckline - an hourly candle close above.
With vertical patterns like a bullish flag or a falling wedge, you should look for a bullish breakout of its trend line - and hourly candle close above.
Here is the list of classic bearish patterns that you should look for:
rising wedge,
bearish flag,
double top,
triple top,
head & shoulders pattern,
inverted cup & handle,
descending triangle.
Once you identified a bearish pattern, simply wait for a signal -
with horizontal patterns like a double top or inverted cup & handle you should wait for a bearish breakout of its neckline - an hourly candle close below.
With vertical patterns like a bearish flag or a rising wedge, you should look for a
bearish breakout of its trend line - and hourly candle close below.
Sometimes there will be the situation when you will encounter multiple patterns. The rule is that the more - the better.
Above, we can see 2 bullish patterns on an hourly time frame, after a test of a key daily support on Gold: bullish flag pattern and cup & handle.
The price broke the resistance line of the flag and a neckline of a cup & handle, giving us a strong bullish signal.
Step 4
Open a trading position.
Once you spotted a bearish pattern after a test of a key daily resistance, and a signal - a bearish breakout of a neckline or a trend line, sell Gold on a retest of a broken neckline/trend line.
Stop loss will lie above the highs of the patterns.
Take profit will be the closest 4H support.
Once you spotted a bullish pattern after a test of a key daily support, and a signal - a bullish breakout of a neckline or a trend line, buy Gold on a retest of a broken neckline/trend line.
Stop loss will lie below the lows of the pattern.
Take profit will be the closest 4H resistance.
In our example, a long position was opened on Gold on a retest of a broken neckline of a cup & handle formation. Stop loss lies below the lows, TP based on a 4H resistance.
After some time, the price reached the target!
This Gold price action strategy is simple and very profitable. Try this strategy by your own and good luck in trading Gold!
❤️Please, support my work with like, thank you!❤️

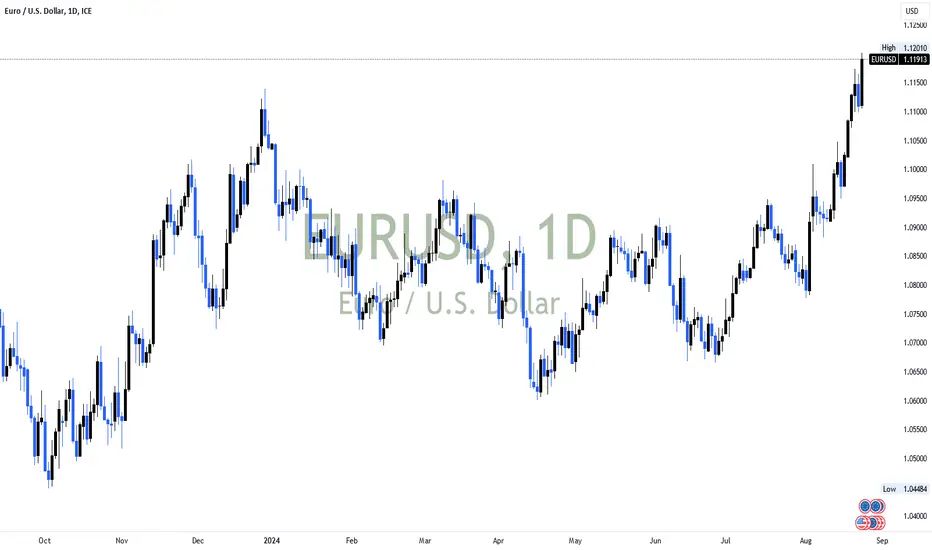
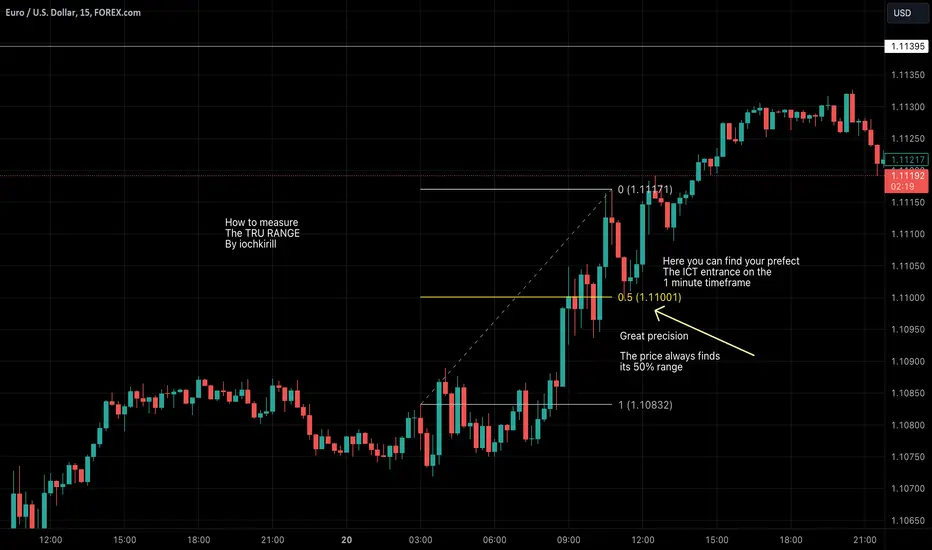
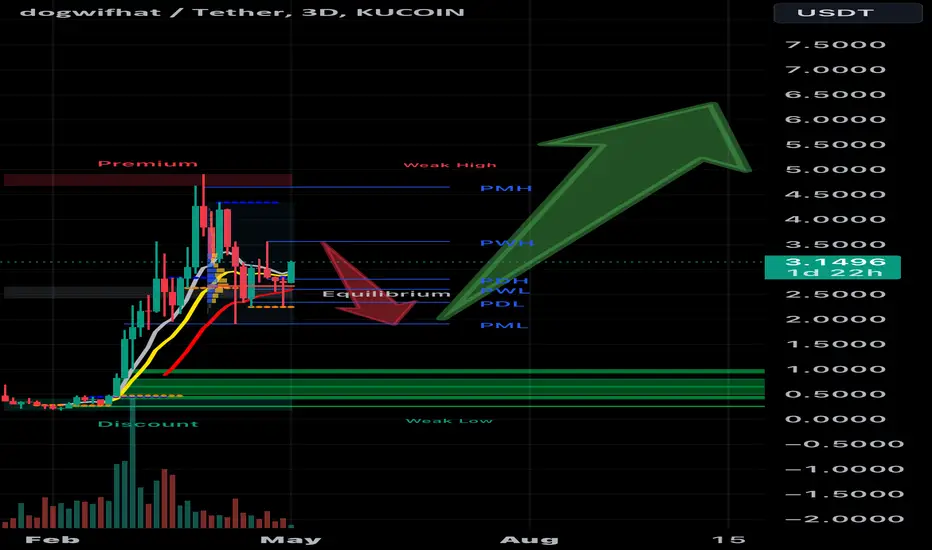
How to measure a true range in any asset!Hello to everyone familiar with ICT concepts!
If you already understand breakers, order blocks, and the principles of price premiums and discounts, you're in the right place.
I’m excited to share some insights with you, using the FOREXCOM:EURUSD
chart from August 20th, 2024.
One challenge I've always faced is accurately measuring the true range. It often feels like price moves towards balance, finding equilibrium before moving away again. ICT's teachings on this topic can sometimes be a bit vague, especially when it comes to the details of whether to measure wicks or focus solely on candlestick bodies. However, I’ve recently made a breakthrough and discovered the key to accurately measuring a true range!
This knowledge aligns with the idea of balances, but it’s crucial to understand that when one algorithm meets another, neither has the power to deviate far from the current price. But that's not what we need to focus on.
What truly matters is identifying when the price is moving away from its current state. This method works exceptionally well during trending markets, like we’ve seen recently with #EURUSD, #GBPUSD, and other forex pairs. It’s also effective in commodities like Gold, indices such as #NQ, #YM, #ES, and even in the crypto markets!
Take yesterday's trend in EURUSD, for example. We saw a significant 5-15 minute trend where the price perfectly retraced to its 50% level. But how did I know where to start measuring?
This time, I used a breaker from a different structure on the 15-minute chart to identify the key level. The answer lies in understanding breakers, order blocks, and supporting structures.
If this topic resonates with you, I’d love to hear your thoughts! Let’s dive deeper together—there’s so much more to explore. Feel free to share your insights or reach out if you’re curious about how to apply these concepts more effectively
EURUSD 21.08.2024 10:11
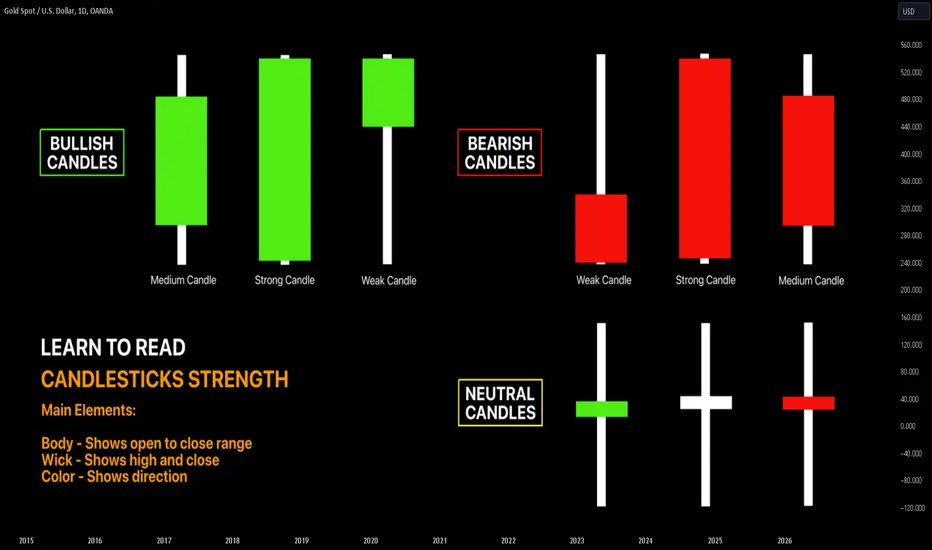
How to Identify Candlestick Strength | Trading Basics
Hey traders,
In this educational article, we will discuss
Please, note that the concepts that will be covered in this article can be applied on any time frame, however, higher is the time frame, more trustworthy are the candles.
Also, remember, that each individual candle is assessed in relation to other candles on the chart.
There are three types of candles depending on its direction:
🟢 Bullish candle
Such a candle has a closing price higher than the opening price.
🔴 Bearish candle
Such a candle has a closing price lower than the opening price.
🟡 Neutral candle
Such a candle has equal or close to equal opening and closing price.
There are three categories of the strength of the candle.
Please, note, the measurement of the strength of the candle is applicable only to bullish/bearish candles.
Neutral candle has no strength by definition. It signifies the absolute equilibrium between buyers and sellers.
1️⃣ Strong candle
Strong bullish candle signifies strong buying volumes and dominance of buyers without sellers resistance.
Above, you can see the example of a strong bullish candle on NZDCHF on a 4H.
Strong bearish candle means significant selling volumes and high bearish pressure without buyers resistance.
On the chart above, you can see a song bearish candle on EURUSD.
Usually, a strong bullish/bearish candle has a relatively big body and tiny wicks.
2️⃣ Medium candle
Medium bullish candle signifies a dominance of buyers with a rising resistance of sellers.
You can see the sequence of medium bullish candles on EURJPY pair on a daily time frame.
Medium bearish candle means a prevailing strength of sellers with a growing pressure of bulls.
Above is the example of a sequence of medium bearish candles on AUDUSD pair.
Usually, a medium bullish/bearish candle has its range (based on a wick) 2 times bigger than the body of the candle.
3️⃣ Weak candle
Weak bullish candle signifies the exhaustion of buyers and a substantial resistance of sellers.
Weak bearish candle signifies the exhaustion of sellers and a considerable bullish pressure.
Usually, such a candle has a relatively small body and a big wick.
Above is the sequence of weak bullish and bearish candles on NZDCHF pair on an hourly time frame.
Knowing how to read the strength of the candlestick, one can quite accurately spot the initiate of new waves, market reversals and consolidations. Watch how the price acts, follow the candlesticks and try to spot the change of momentum by yourself.
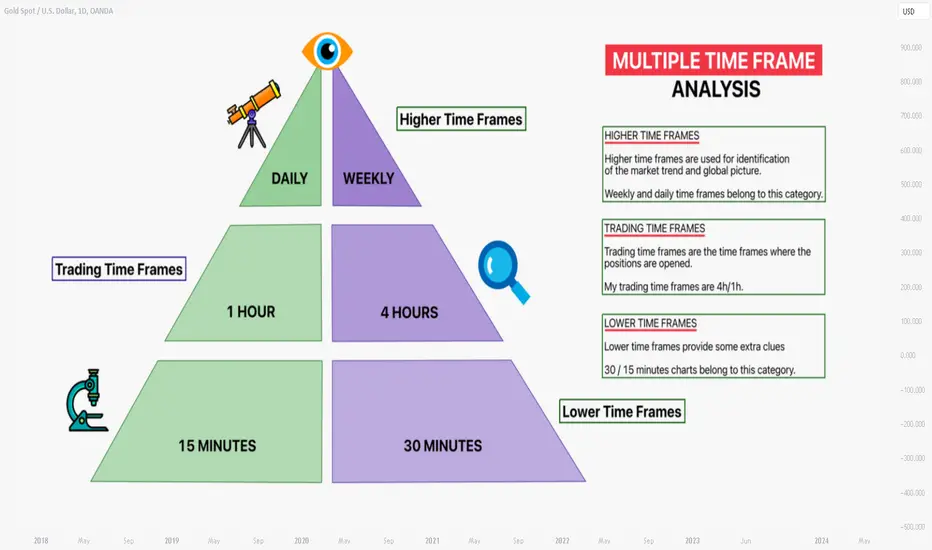
Learn How to Apply Top-Down Multiple Time Frame Analysis
In this article, we will discuss how to apply Multiple Time Frame Analysis in trading .
I will teach you how to apply different time frames and will share with you some useful tips and example of a real trade that I take with Top-Down Analysis strategy.
Firstly, let's briefly define the classification of time frames that we will discuss:
There are 3 main categories of time frames:
1️⃣ Higher time frames
2️⃣ Trading time frames
3️⃣ Lower time frames
Higher Time Frames Analysis
1️⃣ Higher time frames are used for identification of the market trend and global picture. Weekly and daily time frames belong to this category.
The analysis of these time frames is the most important .
On these time frames, we make predictions and forecast the future direction of the market with trend analysis and we identify the levels , the areas from where we will trade our predictions with structure analysis .
Above is the example of a daily time frame analysis on NZDCAD.
We see that the market is trading in a strong bullish trend.
I underlined important support and resistance levels.
The supports will provide the safest zones to buy the market from anticipating a bullish trend continuation.
Trading Time Frames
2️⃣ Trading time frames are the time frames where the positions are opened . The analysis of these time frames initiates only after the market reaches the underlined trading levels, the areas on higher time frames.
My trading time frames are 4h/1h. There I am looking for a confirmation of the strength of the structures that I spotted on higher time frames. There are multiple ways to confirm that. My confirmations are the reversal price action patterns.
Once the confirmation is spotted, the position is opened.
Analyzing the reaction of the price to Support 1 on 1H time frame on NZDCAD pair, I spotted a strong bullish confirmation - a triple bottom formation.
A long position is opened on a retest of a broken neckline.
Lower Time Frames
3️⃣ Lower time frames are 30/15 minutes charts. Even though these time frames are NOT applied for trading, occasionally they provide some extra clues . Also, these time frames can be applied by riskier traders for opening trading positions before the confirmation is spotted on trading time frames.
Before the price broke a neckline of a triple bottom formation on an hourly time frame on NZDCAD, it broke a resistance line of a symmetrical triangle formation on 15 minutes time frame. It was an earlier and riskier confirmation to buy.
Learn to apply these 3 categories of time frames in a combination. Start your analysis with the highest time frame and steadily go lower, identifying more and more clues.
You will be impressed how efficient that strategy is.
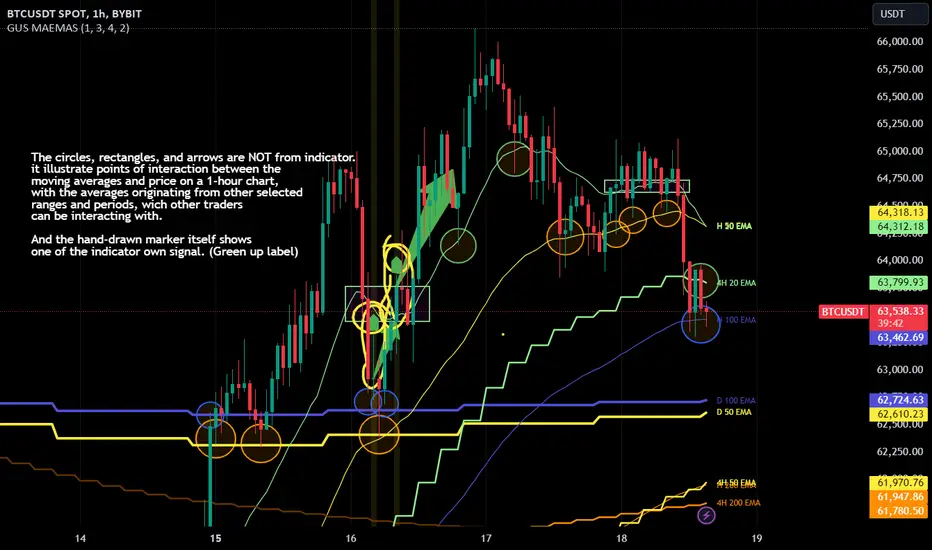
Ex. Averages interactionsHow trendlines averages interact with price, and can make(be/show) support, resistance, trends, and how crosses can signal moves.
The averages at the end, show memory of price in time, when you find something expensive or cheap over time, having the earlier prices as base for your(traders) sentiment.
After that you will have another feelings like greed or fear etc etc.
Revealing My Top Gold Trading Secrets for Huge Profits!In this video, I reveal my top trading secrets for making huge profits in gold trading (XAU/USD). This educational content will cover key technical analysis techniques and strategies that I frequently use in my charts, as well as valuable insights into trading mindset and proper risk management. Let's unlock the potential of your trading skills together!
Technical Approach:
In this educational segment, we'll focus on the core technical analysis principles that I use to make informed trading decisions. Here's a detailed breakdown of my approach:
Identifying the Trend:
Uptrends and Downtrends: Learn how to recognize market trends using higher highs and higher lows for uptrends, and lower highs and lower lows for downtrends.
Trendlines: Use trendlines to connect the highs and lows of price movements, helping to identify the direction of the trend and potential reversal points.
Support and Resistance Levels:
Support Levels: Identify areas where the price tends to find support as it falls, acting as a floor preventing further decline.
Resistance Levels: Identify areas where the price tends to find resistance as it rises, acting as a ceiling preventing further ascent.
Historical Price Action: Use past price movements to pinpoint key support and resistance levels that the market respects.
Liquidity Zones (LQZ):
Definition: Liquidity zones are areas on the chart where there is a high concentration of trading activity, often leading to significant price movements.
Identification: Learn how to spot these zones using volume profiles, order flow analysis, and historical price action.
Trading Strategy: Use liquidity zones to identify potential entry and exit points, as they often precede major price moves.
Volume Analysis:
Volume Spikes: Understand how volume spikes can indicate strong buying or selling interest, confirming the validity of price movements.
Volume Trends: Analyze volume trends to gauge the strength of a price trend and anticipate potential reversals.
Entry and Stop Loss Strategies:
Breakouts and Pullbacks: Enter trades on confirmed breakouts above resistance or below support, or on pullbacks to key levels within a trend.
Trailing Stop Loss: Implement a trailing stop loss to lock in profits as the trade moves in your favor, adjusting the stop loss level as the price progresses.
Mini Lessons: Mindset:
Patience and Discipline:
Patience: Wait for the right trading setups that meet your criteria, avoiding impulsive decisions.
Discipline: Stick to your trading plan and rules, even when the market becomes volatile or unpredictable.
Emotional Control:
Stay Calm: Keep your emotions in check to avoid making irrational decisions based on fear or greed.
Mindfulness: Practice mindfulness techniques to remain focused and calm, especially during stressful trading situations.
Proper Risk Management:
Position Sizing:
Risk Per Trade: Limit the amount of capital you risk on any single trade, typically 1-2% of your trading account.
Position Size Calculation: Calculate your position size based on the distance to your stop loss and your risk tolerance.
Risk-Reward Ratio:
Target Ratio: Aim for a risk-reward ratio of at least 2:1, meaning your potential profit should be at least twice your potential loss.
Trade Evaluation: Evaluate each trade based on its risk-reward ratio before entering, ensuring it aligns with your trading strategy.
By incorporating these technical strategies and mindset principles, you can enhance your trading performance and increase your chances of success in the gold market. Stay tuned for more educational content and trading insights!

You are (probably) using MAs wrongWhen it comes to moving averages, people tend to forget what they are. A moving average is just as the name suggests - an average of the chosen number of candles that moves (once a new candle prints). I know it seems obvious to most, but why then, when it comes to lengths we seem to be so confused about it?
When choosing the length of a MA - what do you look for? "Magical" Fibonacci Numbers? Most common length 200, because you were told that's what everyone uses?
But let's thing about it for a second. What is an EMA200, for example? It's an exponentially weighted average of the past 200 candles. So why would it be so "important"?
MA200, if you're on a 15-minute timeframe represents two hundred 15-minute candles, or, in different words - an average price of the past 50 hours.
MA200 on a 5-minute timeframe represents two-hundred 5-minute candles, which equals to about 16 and a half hours. Is there anything special about the average price of the past 16.5 hours? Of course not.
The way moving averages should be looked at, in my humble opinion is by using them to look at an average price of the past periods that actually matter. Periods like Daily, Weekly, Monthly.
If you're a scalper who trades 1-minute charts, perhaps you want to know what the average price of the past 15 minutes, 1 hour and 4 hours is.
To do that you would divide 15 by 1, giving you MA length of 15 representing the average price of the past 15 minutes.
If you're a day trader, like me, who loves trading 5 and 15-minute timeframes, I want to know the average prices of the past hour, 4 hours and Daily. Weekly and Monthly averages also give me potential targets, or potential areas of interest. Hence the length of forementioned moving averages would be 12, 48, and 288 (on a 5-minute chart) and 4, 12, and 96 (on a 15-minute chart).
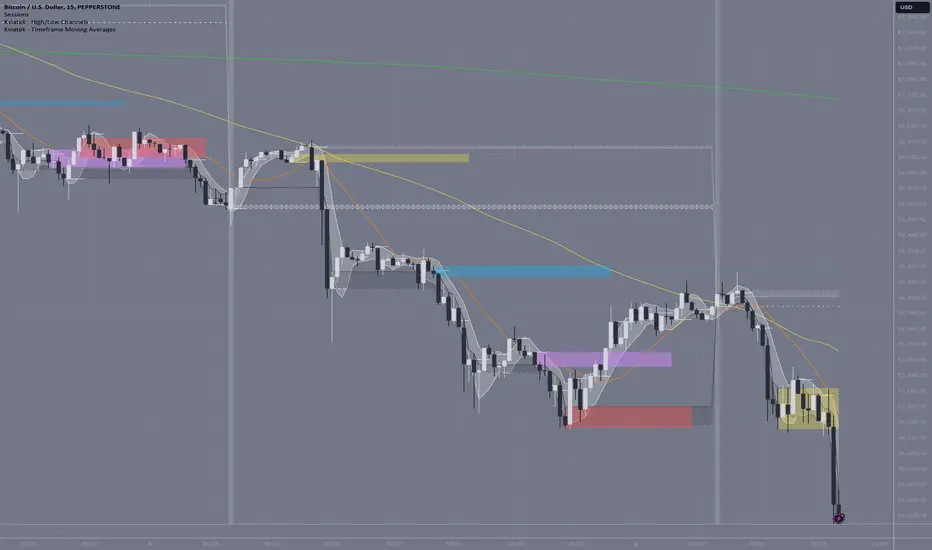
I recently created an Indicator that automatically calculates these lengths based on your chosen higher timeframes of interest and your current timeframe, so you don't need to calculate these lengths yourself.
However, you can very easily do the same by making a simple calculation. How many of my current timeframe candles are in a higher timeframe that I want to know.
You can use the same method in calculating length of other things, like a RSI, for instance. Perhaps you wondered, like I did, why the period 14 is used to calculate the RSI.
Fortunately we can adjust these periods and perhaps find an edge in the market.
Hope this short post clarifies some things.
I will be publishing the Timeframe Based Moving Averages script soon.
Cheers
Cancellation of “Head-and-Shoulders” Pattern. Bears trapThe "Head-and-Shoulders" (H&S) pattern is considered a powerful trend reversal indicator. However, it can also become very costly for new traders. Yesterday, the S&P provided a great example of H&S cancellation. Traders who entered short on the break-out of the shoulders line (and Monday's low) incurred losses after the price returned to the previous day's range and rallied all the way up. Such scenarios happen more often than you might think.
To avoid being caught in such traps, it is important to consider two things:
1. Higher Level Context : In this example, the H&S pattern formed on the hourly time frame. But if we zoom out, we'll see that on the weekly chart, the price is in a strong uptrend, currently making new historical highs. This is a very bullish context, with buyers having full control over the price.
2. Price Behavior on the Break-out : Upon confirmation of a reversal pattern, you should expect sellers to jump in and drive the price down as fast as possible. It is "abnormal" to see the price returning to the previous range and gaining acceptance. This is a trigger that something is not right.
Some people will add volume analysis on the break-out, but I’m personally not a fan of it, especially for SPY.

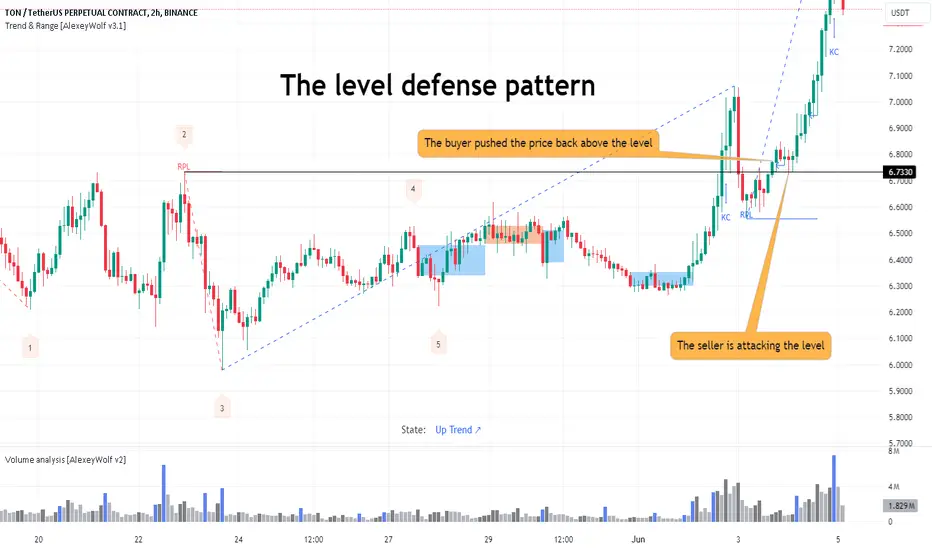
The level defense patternI use the concept of a level being defended by either a buyer or a seller to find potential buying or selling opportunities. This is a specific pattern that can be identified on a chart. Let's consider one variant of this pattern. In this variant, the defense of a level by a buyer looks as follows: a buyer's candle closes above the level. Then, a seller's candle or candles interact with the level, followed by the appearance of a buyer's candle, which needs to be evaluated. If it meets the criteria, entry points can be identified.
Let's look at a concrete example. The pattern developed over 10 hours.
On the chart, blue-shaded areas represent 2-hour buyer's candles, and red-shaded areas represent 2-hour seller's candles. After the buyer pushed the price back above the 6.733 level, they attempted to resume from the 6.7571 level, the volume of the buyer's candle (632K) was less than that of the seller's candle (1.274M).
Then, the seller attacked the 6.733 level with increased volume (709K) but could not push the price below this level. Note where POC of the volume profile for the 2-hour seller's attack candle is: below 6.7571. The high of the attack candle is at 6.8166.
The next buyer's candle had increased volume (792K). Notice where the buyer's movement started in this candle: from the POC of the volume profile of the seller's attack candle.
Now entry points can be identified. In this example, the entry points are visible on the 1-minute time frame. The chart shows two entry points. Note how volumes are distributed at these points and the resulting buyer's zones (blue rectangles on the chart).
The first entry point is the defense of the breakout from the range by the buyer, which was formed in the previous 2-hour candle (RPL on the chart, 6.7784).
The second entry point is the defense of the high of the attacking 2-hour seller's candle by the buyer (6.8166 level).
How to pick trades in different market conditionsIn the video I look at two different markets and the resultant setups which yielded the prime trades. The two markets had to be approached in different ways, especially early in the session.
I look through the price action on the DOW and then the Nasdaq. The DOW proved to be more clear cut and a trend style approach while the Nasdaq was very choppy and warranted a range or reversion style approach to the trades.
Still, both were tradable and produced some good scalps although the action had to be recognised early.
ANY QUESTIONS, JUST LEAVE IN THE COMMENTS !!
** If you like the content then take a look at the profile to get more ideas and learning material **
** Any Comments and likes are greatly appreciated **

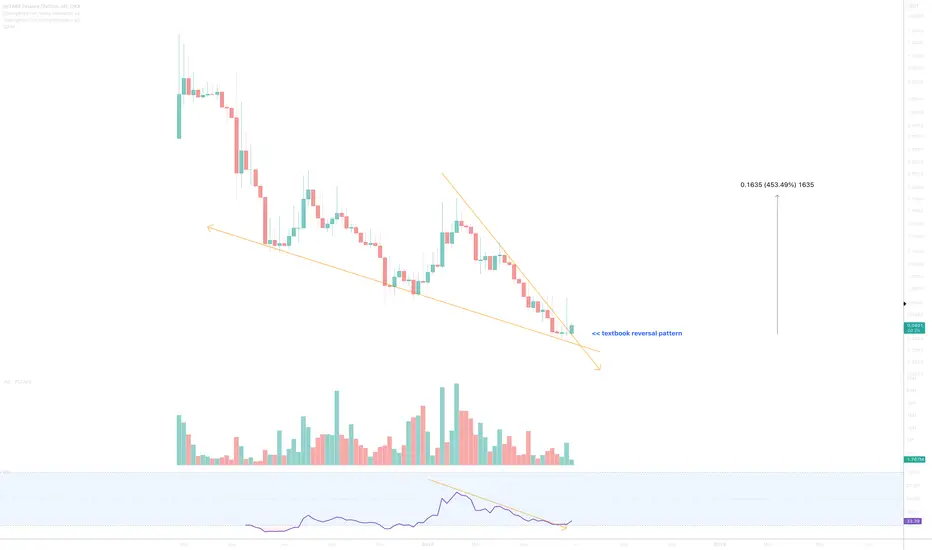
A textbook reversal signal..And if you do not know what I mean then see the linked idea below ‘the study’. Now the market cap is way to small for my interest but it might appeal to someone or indeed someone who is interested in the long game.
The reversal pattern is one we see play out time and time again in all markets. Most recently on a crypto called CFX (see example below). The psychology between buyers and sellers is very specific and is told in great detail on this particular pattern. The last 6-day candle to print on this chart informed you of the great weakness amongst sellers. This crucial.. for the moment demand returns there practically no resistance until new buyers sell into the market.
Is it possible price action falls further? Sure.
It is probable? No
Ww
Type: trade
Risk: 1%
Timeframe: now
Return: At least 500%
The study
Example
Using Multi-Timeframe analysis for a major WinnerMulti-timeframe analysis is a key techniques for prepping a market prior to a trading session.
The first thing to do before trading is to understand the major moves and longer term price action. This enables us to get on the right side of a sessions move and avoid a lot of the chop.
We take a look at the DOW from the previous trading session and talk through the 30 min timeframe and why it was so important for the 500 pt rally into the close.
I talk through the key price action, the trap of shorts before the big move up and why we needed to be on the long side of the action.
ANY QUESTIONS, JUST LEAVE IN THE COMMENTS !!
** If you like the content then take a look at the profile to get more ideas and learning material **
** Any Comments and likes are greatly appreciated **

Trapped traders provides a great Short opportunity on DOW The plan for the session was to trade short off resistance on the DOW after an initial opening drive higher. The short side was the play and paid out nicely for patient sellers.
In the video I talk through the key Price Action for the move and prime trade areas on the DOW Index.
ANY QUESTIONS, JUST LEAVE IN THE COMMENTS !!
** If you like the content then take a look at the profile to get more ideas and learning material **
** Any Comments and likes are greatly appreciated **

A Winning Trade ExplainedIn the video I explain my approach to the market and how I use 'trade sizing' to manage my risk in the initial part of the US session.
I walk through the price action for the NASDAQ and why I traded short and then flipped long. I explain the concept of sizing with regards to trade management and then how I 'SIZE UP' when I have conviction to end with a profitable session.
** If you like the content then take a look at the profile to get more ideas and learning material **
** Any Comments and likes are greatly appreciated **

Many Ways to Skin a Cat: Tailoring Risk Management The trading world is a diverse ecosystem, teeming with individuals seeking their own slice of the financial pie. Just like there's "more than one way to skin a cat," there are numerous trading styles, each with its unique approach to risk management. Let's delve into three common styles and how they navigate the inherent risks of the market:
1. The Swing Trader: Patience and Measured Risk
Trading Style: Swing traders hold positions for days, weeks, or even months, capitalizing on broader market trends. They analyze charts to identify potential turning points and aim to capture mid-term price movements.
Risk Management: Swing traders generally have a moderate risk tolerance. They typically:
Employ position sizing strategies, allocating a specific percentage of their capital to each trade.
Utilize stop-loss orders to automatically exit positions if the price falls below a predetermined threshold, limiting potential losses.
Focus on risk-reward ratios, ensuring the potential profit outweighs the potential loss for each trade.
Pros:
Requires less active monitoring compared to day trading.
Can potentially capture larger profits from sustained trends.
Cons:
Slower potential for accumulating profits compared to shorter-term trading styles.
Requires patience and the ability to withstand temporary price fluctuations.
2. The Day Trader: In and Out, Embracing Short-Term Volatility
Trading Style: Day traders are the adrenaline junkies of the trading world, entering and exiting positions within a single trading day. They capitalize on short-term price movements and market inefficiencies.
Risk Management: Day traders often have a higher risk tolerance due to the frequent nature of their trades. They:
Emphasize strict stop-loss discipline to manage potential losses quickly.
May utilize leverage (borrowed capital) to amplify potential gains, but this significantly increases the risk of larger losses.
Focus on managing their emotional state, as rapid price movements can lead to impulsive decisions.
Pros:
Potential for quicker profits due to the high number of trades.
Greater control over individual trades and the ability to adapt to changing market conditions.
Cons:
Requires significant time commitment and constant monitoring of markets.
Highly susceptible to emotional trading due to the fast-paced nature.
Amplified risk of losses due to the potential use of leverage.
3. The Leverage Trader: Magnifying Gains (and Losses)
Trading Style: Leverage trading involves using borrowed capital to magnify potential profits. This can be done through margin accounts in traditional markets or through derivative instruments like options contracts.
Risk Management: Leverage trading demands the utmost caution and sophisticated risk management strategies. Here's why:
Losses are also magnified, meaning a small price movement against the trader's position can lead to significant capital depletion.
Margin calls can force traders to sell assets abruptly to cover losses, potentially at unfavorable prices.
Deep understanding of leverage mechanics and the ability to manage emotions are crucial.
Pros:
Potential for exponential gains with smaller initial capital.
Cons:
Extreme risk of catastrophic losses exceeding initial investment.
Not suitable for beginners or traders with weak risk management skills.
Requires a high level of financial discipline and emotional control.
Remember: Regardless of your chosen trading style, effective risk management is the cornerstone of long-term success. Always prioritize capital preservation, understand your risk tolerance, and never gamble with more than you can afford to lose.
How to use different timeframesHello traders and investors!
Today I'll talk about choosing the right timeframe and how you can use different timeframes when looking for trades. This will help us uncover what is hidden in this candle on the chart.
When we look at something, we are usually limited by a certain viewpoint. From this point, we only see part of the whole picture. But if we move and look from a different perspective, we will discover new details and aspects that were previously unnoticed. The same applies to analyzing the chart of a financial instrument when using different types of charts or different timeframes. This post will focus on using different timeframes. On one timeframe, it may be difficult to understand the essence of what is happening, while on another, everything can become clearer and more understandable.
I've already talked about using different timeframes when looking for trades in an educational article a few weeks ago (see the related post below). In that article, I highlighted 5 skills that help effectively trade in sideways markets. Discussing the first of them - how to combine higher and lower timeframes when looking for trades, I provided a practical example on the OPUSDT chart using the daily and hourly timeframes. In that practical example, I formulated target levels that are likely to be reached. You can see the results in the related post (see below).
I'll provide another example of choosing the right timeframe and the correlation between timeframes, using the BTCUSDT chart. This will help us uncover what is hidden in this candle on the chart.
In the update of this idea I noted that on the hourly timeframe at the contextual point of the seller (the beginning of the last seller impulse, level 66867), I didn't see an active seller and wasn't ready to join the sales at that moment. As a potential target, I indicated 62776.
So, I looked at the chart on different timeframes and searched for what remains unnoticed. On the 7-minute timeframe, I discovered a sideways movement at the contextual point of the seller (level 66867), as mentioned in the idea update with a recommendation to look for a trade after exiting the sideways movement and protecting this exit:
Now, let's analyze what happened next (on the bars chart, as bars take up less space and additional marks are better visible).
The seller broke through the lower boundary of the sideways movement at 65626.87.
The seller's impulse ended at 10:49 (New York time), when after breaking through the lower boundary of the sideways movement, the first buyer bar appeared.
The key candle(bar) of the impulse (the largest volume in the impulse) is marked on the chart as "KC". Therefore, the seller's defense of this candle or the lower boundary of the sideways movement (65626) increases the probability of further price decrease. The price range of the key candle of the impulse is highlighted on the chart (from high to close). Now let's pick a lower timeframe to see more clearly what happened before and after 10:49.
On the 1-minute timeframe by 10:49, a sideways movement formed, and at 10:49, the price attacked the upper boundary of the sideways movement (level at point 2).
The key candle of the buyer's impulse ("KC" on the chart) is in the middle of the impulse. At 10:59, the buyer attacked a new boundary of the sideways movement (level at point 6 - 65249.01). Pay attention to the volume of the attacking candle. At 11:02, the seller pressed the attack candle, forming a seller zone (red background on the chart). On the buyer's candle at 11:04 (black downward arrow on the chart), you can sell because:
On the hourly timeframe, the price is in the seller's impulse in the seller's area of interest, which defended the level 66867.
On the 7-minute timeframe, the seller broke through the lower boundary of the sideways movement.
On the 1-minute timeframe, the seller defended the level (65249.01) from the buyer's attack on a significant volume, which is within the price range of the key candle of the 7-minute timeframe impulse.
And one more interesting point. Look where the seller's resumption on the minute timeframe came from - from the 50% of the key candle of the 7-minute timeframe seller impulse.
Could the price, without reaching the target of 62776, go up? Yes, the probability of this event is not zero. And we see how the price did not reach the target by 18 dollars (black upward arrow on the chart) and turned upward. Where did the seller stop it? It stopped right there inside the key candle of the sideways movement exit on the 7-minute timeframe (black downward arrow on the chart). After that, the target of 62776 was reached.
